Stitch, Stop, and Roll Afghan
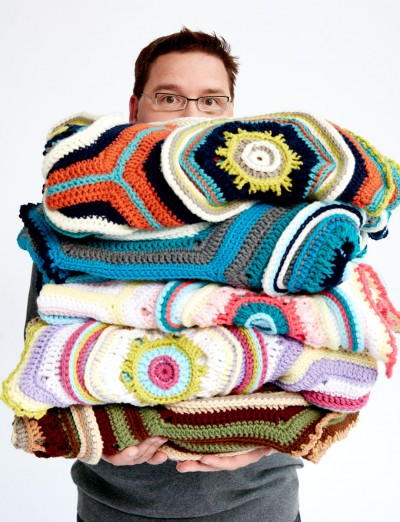
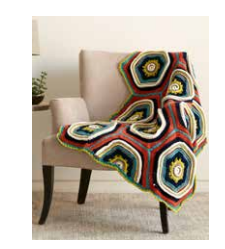
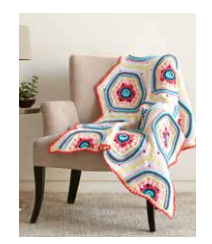
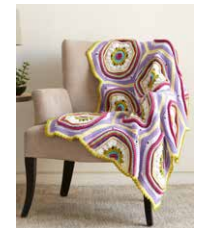
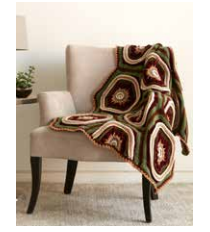
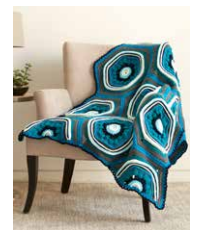
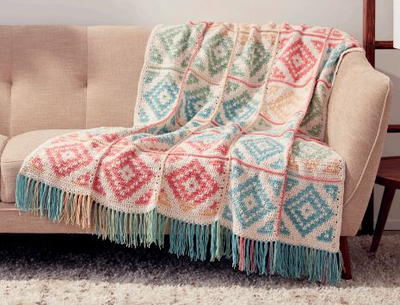
With hexagon crochet patterns and five brilliant color options, the Stitch, Stop, and Roll Afghan is a mesmerizing design that will stand out among your home decor. Whether you want a splash of flirty color with the Refreshing Soda colorway, or feel more in tune with the rich earth tones of Enchanting Grove, this free granny square afghan can fit with any room's demands. The pattern is not for beginners, but these step-by-step instructions will help you through to a rewarding piece in the end. Not only will you have a warm crochet blanket pattern to cuddle up with, but you will also have a unique design that reflects a fun personality.

Crochet HookH/8 or 5 mm hook
Yarn Weight(4) Medium Weight/Worsted Weight and Aran (16-20 stitches to 4 inches)
Crochet Gauge13 sc and 14 rows = 4 inches [10 cm]
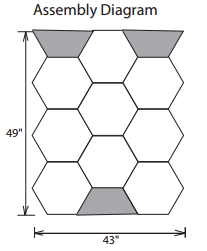
Finished SizeMotif: Hexagon is approximately 14 inches (35.5 cm) from side to side; entire afghan is 43 x 49 inches (109 x 124.5 cm)
Materials List
- Bernat® Super Value Yarn (7 oz/197 g; 426 yds/389 m); 2 balls of Contrast A, 1 ball of Contrast B, 2 balls of Contrast C, 2 balls of Contrast D, 1 ball of Contrast E, 2 balls of Contrast F
- Size U.S. H/8 (5 mm) crochet hook or size needed to obtain gauge.
- Stitch marker
Colorways Available
-
Boldly Urban:
Contrast A = Natural (07414)
Contrast B = Clay (53041)
Contrast C = Grass (53223)
Contrast D = Navy (07711)
Contrast E = Aqua (53201)
Contrast F = Pumpkin (53630) -
Refreshing Soda:
Contrast A = Cool Blue (53730)
Contrast B = Bright teal (53202)
Contrast C = Peony Pink (53417)
Contrast D = Baby Pink (07438)
Contrast E = Yellow (07745)
Contrast F = Winter White (07407) -
Peaceful Meadow:
Contrast A = Magenta (53402)
Contrast B = Cool Blue (53730)
Contrast C = Grass (53223)
Contrast D = White (07391)
Contrast E = Yellow (07745)
Contrast F = Lilac (53317) -
Enchanting Grove:
Contrast A = Oatmeal (53010)
Contrast B = Clay (53041)
Contrast C = Topaz (53514)
Contrast D = Burgundy (07636)
Contrast E = Walnut (07843)
Contrast F = Forest Green (53243) -
Calm Ocean Breeze:
Contrast A = Winter White (07407)
Contrast B = Cool Blue (53730)
Contrast C = Navy (07711)
Contrast D = Bright Teal (53202)
Contrast E = Peacock (00616)
Contrast F = True Grey (53044)
Pattern Notes:
-
Join all new colors with sl st as indicated.
Crochet Motif Pattern
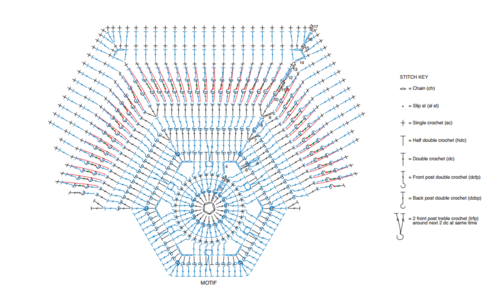
You will be making 9 of these. See the diagram below for a visual representation of the motif pattern (click for a larger view).
-
With A, ch 5. Join with sl st in first ch to form ring.
-
1st rnd: Ch 3 (counts as dc). 17 dc in ring. Join with sl st to top of ch 3. 18 dc. Fasten off.
-
2nd rnd: Join B around post of any dc, working from back to front. Ch 2 (does not count as st). 2 dcbp around each dc to end of rnd. Join C with sl st to first dcbp. Break B. 36 dcbp.
-
3rd rnd: With C, ch 1. 1 sc in same sp as last sl st and each st around. Join with sl st to first sc.
-
4th rnd: Ch 1. Sl st around post of first sc, working from back to front. Ch 3 (counts as first dcbp). 1 dcbp around each of next 5 sc. (Ch 4. 1 dcbp around each of next 6 sc) 5 times. Ch 4. Join with sl st to top of ch 3. Fasten off.
-
5th rnd: Join D to any ch-4 sp. Ch 2 (does not count as st). 5 hdc in same sp as last sl st. (1 hdc in each of next 6 sts. 5 hdc in next ch-4 sp) 5 times. 1 hdc in each of last 6 sts. Join with sl st to first hdc. 66 hdc.
-
6th rnd: Ch 1. Sl st around post of first hdc, working from front to back. Ch 2 (does not count as st). *1 dcfp around each of next 2 hdc. 3 dcbp around next hdc – corner made. 1 dcfp around each of next 2 hdc. 1 dcbp around each of next 2 hdc. Working 1 row below, 2 trfp around next 2 dc at same time. 1 dcbp around each of next 2 hdc. Rep from * 5 times more. Join with sl st to first st. Fasten off.
-
7th rnd: Join E to center dcbp at any corner. Ch 3 (counts as dc). 2 dc in same sp as last sl st. (1 dc in each of next 12 sts to next corner dcbp. 3 dc in corner dcbp) 5 times. 1 dc in each of last 12 sts. Join with sl st to top of ch 3. 90 dc. Fasten off.
-
8th rnd: Join F around post of any corner dc, working from back to front. Ch 2 (does not count as st). 1 dcbp in same sp as last sl st. 1 dcbp around each dc to end of rnd. Join with sl st to first dcbp.
-
9th rnd: Ch 3 (counts as dc). 2 dc in same sp as last sl st. (1 dc in each of next 14 sts. 3 dc in next st) 5 times. 1 dc in each of last 14 sts. Join with sl st to top of ch 3. 102 dc. Fasten off.
-
10th rnd: Join A to front loop of any corner dc. Ch 3 (counts as dc). Working in front loops only, 1 dc in each dc around. Join with sl st to top of ch 3.
-
11th rnd: Ch 2 (does not count as st). 1 dcbp around each dc to end of rnd. Join with sl st around back post of first dcbp. PM at center of post of last st.
-
12th rnd: Ch 2 (does not count as st). 1 dcbp around each dcbp to end of rnd. Join D with sl st around back post of first dcbp. Break A.
-
13th rnd: With D, ch 1. Folding 10th to 12th rnds tog to form ridge and working through both loops of 12th rnd and rem back loops of 10th rnd, 1 sc in each st around. Join with sl st to first sc.
-
14th rnd: Ch 5 (counts as dc and ch 2). 1 dc in same sp as last sl st. [1 dc in each of next 16 sc. (1 dc. Ch 2. 1 dc) in next sc] 5 times. 1 dc in each of last 16 sc. Join with sl st to 3rd ch of ch 5. Fasten off.
-
15th rnd: Join F to any ch-2 sp. Ch 1. 3 sc in same sp as last sl st. (1 sc in each dc to next ch-2 sp. 3 sc in next ch-2 sp) 5 times. 1 sc in each dc to end of rnd. 2 sc in first ch-2 sp. Join with sl st to first sc
-
16th rnd: Ch 3 (counts as dc). 1 dc in same sp as last sl st. (1 dc in each sc to center sc of 5-sc group. 3 dc in center sc) 5 times. 1 dc in each sc to end of rnd. 1 dc in first sc. Join E to top of ch 3. Break F.
-
17th rnd: With E, ch 1. 1 sc in same sp as last sl st. (1 sc in each dc to next corner dc. 2 sc in corner dc) 5 times. 1 sc in each dc to end of rnd. 1 sc in first sc. Fasten off.
-
18th rnd: Join C to marked post of 11th rnd. *Sl st around post of next dcbp. Rep from * around. Join with sl st to first sl st. Push all sts slightly to base of dcbp of 11th rnd. Fasten off.
-
19th rnd: Join B to marked post of 11th rnd, on right from 19th rnd. *Sl st around post of next st. Rep from * around. Join with sl st to first sl st. Fasten off.
Half Motif Pattern
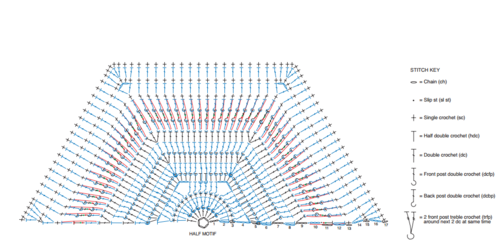
You will make 3 of these. See the diagram below for a visual representation of the motif pattern (click for a larger view).
-
With A, ch 5. Join with sl st to first ch to form ring.
-
1st row: (RS), Ch 3 (counts as dc). 8 dc in ring. Fasten off. Do not turn. 9 dc.
-
2nd row: Join B to top of ch 3. Ch 2 (does not count as st). 2 hdc in same sp as sl st. 2 dcbp around each dc to last dc. 2 hdc in last dc. Fasten off. Do not turn. 18 sts.
-
3rd row: Join C to first hdc. Ch 1. 1 sc in each st to end of row. Fasten off. Do not turn.
-
4th row: Join C to first sc. Ch 5 (counts as hdc and ch 3). 1 dcbp around each of first 6 sc. (Ch 4. 1 dcbp around each of next 6 sc) twice. Ch 2. 1 hdc in last sc. Fasten off. Do not turn.
-
5th row: Join D to first ch-2 sp. Ch 2 (does not count as st). 3 hdc in same sp as last sl st. (1 hdc in each of next 6 sts. 5 hdc in next ch-4 sp) twice. 1 hdc in each of next 6 sts. 3 hdc in last ch-2 sp. 34 hdc. Fasten off. Do not turn.
-
6th row: Join D to first hdc. Ch 2 (does not count as st). 2 dcbp around first hdc – first half-corner made.
*1 dcfp around each of next 2 hdc. 1 dcbp around each of next 2 hdc.
Working 1 row below, 2 trfp around next 2 dc at same time. 1 dcbp around each of next 2 hdc. 1 dcfp around each of next 2 hdc.** 3 dcbp around next hdc – corner made. Rep from * once more, then from * to ** once. 2 dcbp around last hdc. Fasten off. Do not turn. -
7th row: Join E to first dcbp. Ch 3 (counts as dc). 1 dc in same sp as last sl st. (1 dc in each of next 12 sts to next corner dcbp. 3 dc in corner dcbp) twice. 1 dc in each of next 12 sts. 2 dc in last st. Fasten off. 46 dc. Do not turn.
-
8th row: Join F to first dc. Ch 2 (does not count as st). 1 hdc in same sp as last sl st. 1 dcbp around each dc to last dc. 1 hdc in last dc. Fasten off. Do not turn.
-
9th row: Ch 3 (counts as dc). 1 dc in same sp as last sl st. (1 dc in each of next 14 sts. 3 dc in next st) twice. 1 dc in each of next 14 sts. 2 dc in last st. 52 dc. Fasten off. Do not turn.
-
10th row: Join A to top of ch 3. Ch 3 (counts as dc). Working in front loops only, 1 dc in each dc to end of row. Fasten off. Do not turn.
-
11th row: Join A to top of ch 3. Ch 2 (does not count as st). 1 hdc in same sp as sl st. 1 dcbp around each dc to last dc. 1 hdc in last hdc. Fasten off. Do not turn. PM at center of post of last hdc.
-
12th row: Join A to first hdc. Ch 2 (does not count as st). 1 hdc in same sp as sl st. 1 dcbp around each dcbp to last hdc. 1 hdc in last hdc. Fasten off. Do not turn.
-
13th row: Join D to first st. Ch 1. Folding 10th to 12th rnds tog to form ridge and working through both loops of 12th row and rem back loops of 10th row, 1 sc in each st to end of row. Fasten off. Do not turn.
-
14th row: Join D to first sc. Ch 3 (counts as dc). 1 dc in same sp as sl st. [1 dc in each of next 16 sc. (1 dc. Ch 2. 1 dc) in next sc] twice. 1 dc in each of next 16 sc. 2 dc in last sc. Fasten off. Do not turn.
-
15th row: Join F to first dc. Ch 1. 2 sc in same sp as last sl st. (1 sc in each dc to next ch-2 sp. 3 sc in next ch-2 sp) twice. 1 sc in each dc to last dc. 2 sc in last sc. Fasten off. Do not turn.
-
16th row: Join F to first sc. Ch 3 (counts as dc). 1 dc in same sp as last sl st. (1 dc in each sc to center sc of 5-sc group. 3 dc in center sc) twice. 1 dc in each sc to last sc. 2 dc in last sc. Fasten off. Do not turn.
-
17th row: Join E to first dc. Ch 1. 1 sc in same sp as last sl st. (1 sc in each dc to next corner dc. 2 sc in corner dc) twice. 1 sc in each dc to last dc. 2 sc in last dc. Fasten off. Do not turn.
-
18th row: Join C to marked post of 11th row. *Sl st around post of next dcbp. Rep from * to end of row. Push all sts slightly to base of dcbp of 11th rnd. Fasten off.
-
19th row: Join B to marked post of 11th row, on right from 18th row. *Sl st around post of next st. Rep from * to end of row. Fasten off.
-
Side edge of Half Motif: Join E with sl st to side post of first sc. Ch 1. Work 46 sc evenly across side of Half Motif. Fasten off.
Assembly
-
Following Assembly diagram, sew Motifs together.
Crochet Edging Pattern
-
1st rnd: With RS facing, join E with sl st to any corner sc of Motif. Ch 1. 1 sc in same sp as last sl st. 1 sc in each sc around, working sc2tog over joins of 2 Motifs. Join C with sl st to first sc. Break E.
-
2nd rnd: Ch 1. 1 sc in same sp as last sl st. *Ch 3. Skip next sc. 1 sc in next sc. Rep from * around. Ch 3. Join with sl st to first sc. Fasten off.
Abbreviations
- Dcbp
- Yoh and draw up a loop around post of next stitch at back of work, inserting hook from left to right. (Yoh and draw through 2 loops on hook) twice.
- Dcfp
- Yoh and draw up a loop around post of next stitch at front of work, inserting hook from right to left. (Yoh and draw through 2 loops on hook) twice.
- Hdc
- Half double crochet
- RS
- Right side
- Rnd(s)
- Round(s)
- Sc2tog
- Draw up a loop in each of next 2 stitches. Yoh and draw through all loops on hook
- Sl st
- Slip stitch
- Sp(s)
- Space(s)
- Trfp
- (Yoh) twice and draw up a loop around post of next stitch at front of work, inserting hook from right to left. (Yoh and draw through 2 loops on hook) 3 times
- Yoh
- Yarn over hook
Which is your favorite colorway?
Your Recently Viewed Projects
JaneEK
Sep 17, 2017
Mikey must have seen me coming because by listing the EXACT colors for each option, I dont have to make any agonizing decisions under the glare of florescent lights! Each hexagonal motif is huge (14 inches) and are worked exactly the same, so this is another very portable project. The diagrams for the whole and half motifs are nice, but enlarging them makes them fuzzy and not very readable. Head over to the Crochet Crowd site for the instructional video for this project.
Cwats
Feb 07, 2017
Hi babytotz. Row 10 kind of stands up after being in only the front loops. It forms a ridge after doing rounds 11 and 12, then you use the back loops in Row 13. Hope this helps, but if not I will try to post a picture when I get there again . I'm on Round 4 of my 3rd motif right now
babytotz 8277635
Jan 25, 2017
I'm already stuck on row 10. Just can't visualize it. Any help?
Cwats
Jan 04, 2017
Round 15 is missing from the motif pattern. I'm pretty sure you're supposed to use F and sc around, placing 5 sc in each ch-2 space. I'm basing this on the diagram and instructions in Round 16
AFC Editor Julia
Jan 05, 2017
Hi cwats, Thanks for catching that omission! So sorry about that - this pattern has been updated to include the missing round. Thank you! Julia, editor for AllFreeCrochet
SAGEANDLILYSMOM
Aug 12, 2016
Fun pattern so far,but I am lost on step 16 of the full motif pattern where am I finding the SC stiches
AFC Editor Julia
Aug 16, 2016
Hi Sageandlilysmom, For your question, I would recommend you post it to AllFreeCrochet's Facebook wall (facebook.com/allfreecrochet) - we have a community of friendly crocheters who frequent the page, and they can surely offer some advice! Thanks, Julia, editor for AllFreeCrochet
AFC Editor Annalis a
Jun 24, 2016
These are so incredibly colorful! They are stunning and would make a great gift for anyone.
Report Inappropriate Comment
Are you sure you would like to report this comment? It will be flagged for our moderators to take action.
Thank you for taking the time to improve the content on our site.

