Victorian Romance Cardigan
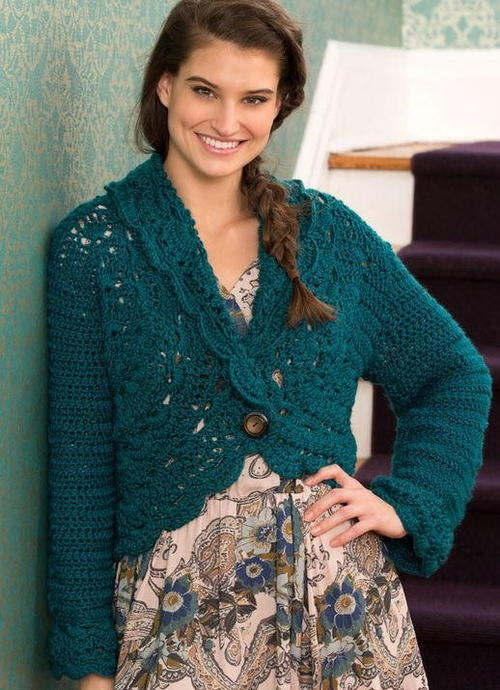
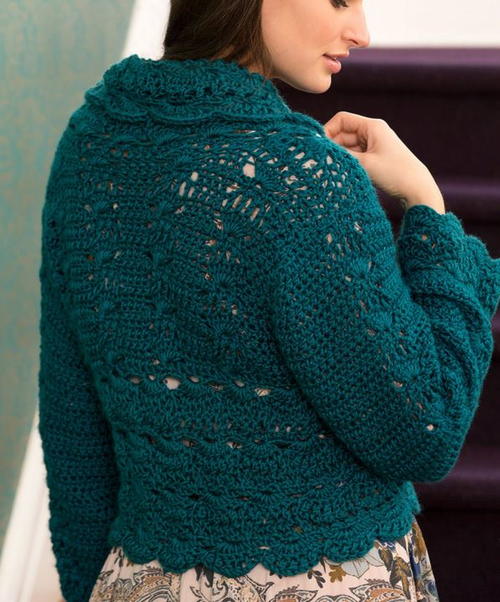
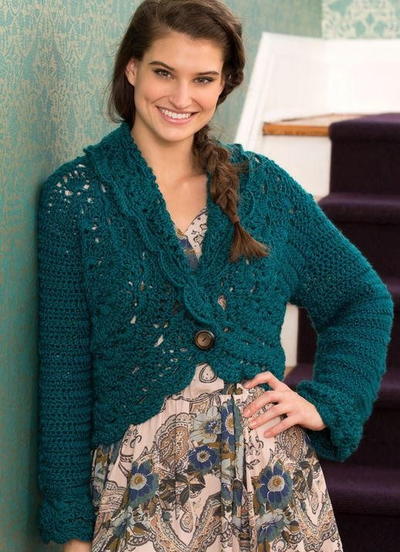
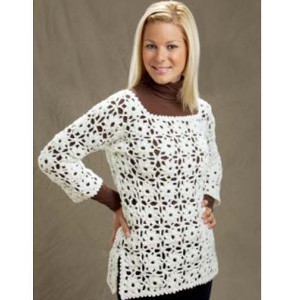
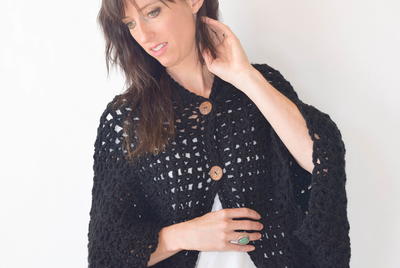
This crochet sweater is both comfy and beautiful with the lace made from foundation single crochet and the shell stitch.
Worked in worsted weight yarn with an H crochet hook, all you need after this gorgeous cardigan after you're done crocheting is a pretty button to pull the look together.
The instructions include sizing from small to xx large, so anyone can wear this wonderful sweater. There's nothing like the perfect sweater to go with anything.
A special thank you to AllFreeCrochet user spida1023 for helping us name this pattern!
NotesDirections are for size Small. Changes for Medium, Large, X-Large and XX-Large are in parentheses.

Crochet HookH/8 or 5 mm hook
Yarn Weight(4) Medium Weight/Worsted Weight and Aran (16-20 stitches to 4 inches)
Crochet GaugeGAUGE: In back pattern, 1 repeat = 3¼” [8.5 cm]; 8 rows = 4” [10 cm]. In edging pattern, 2 repeats = 4” [10 cm]; 4 rows = 2½” [6.5cm]. In sleeve pattern, 14 dc = 4” [10 cm]; 4 rows = 2½” [6.5 cm]. CHECK YOUR GAUGE. Use any size hook to obtain the gauge.
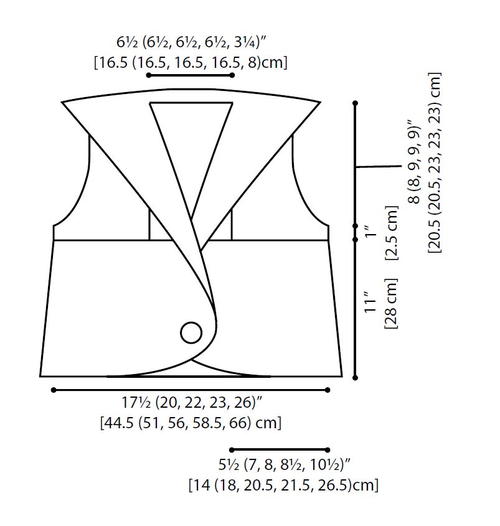
Finished SizeFinished Bust: 35 (40, 44, 46, 52) in [89 (101.5, 112, 117, 132) cm] Finished Length: 20 (20, 21, 21, 21) in [51 (51, 53.5, 53.5, 53.5) cm]
Materials List
- RED HEART® Soft®: 4 (5, 6, 7, 7) balls 9518 Teal
- Susan Bates® Crochet Hook: 5mm [US H-8], 6mm [US J-10]
- One 1/2” [13 mm] button
- Yarn needle
PLUS! Learn How to Foundation Single Crochet
Is foundation single crochet new to you? You're in luck!
This beginner-friendly video tutorial will teach you how to complete the foundation single crochet step-by-step, so you can work up the Victorian Romance Cardigan with confidence.
Pattern
Abbreviations
- ch: chain
- cm: centimeters
- dc: double crochet
- mm: millimeters
- sc: single crochet
- st(s): stitch(es)
- tog: together
- [ ]: work directions in brackets the number of times specified
- * or **: repeat whatever follows the * or ** as indicated
Special Stitches
- Fsc (foundation single crochet): Ch 2, insert hook in 2nd chain from hook and draw up a loop (ch stitch made) *yarn over and draw through 2 loops on hook (sc made), insert hook in ch stitch and draw up a loop; repeat from * for as many Fsc as called for in pattern.
- dc2tog: [Yarn over, insert hook in next stitch, yarn over and pull up loop, yarn over, draw through 2 loops] 2 times, yarn over, draw through all loops on hook
- Shell: 7 dc in same st or space.
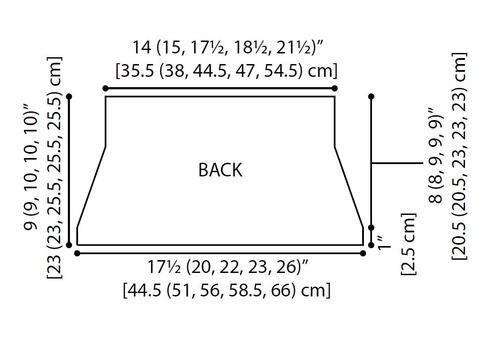
Back
-
With larger hook, fsc 52 (60, 68, 72, 81).
-
Row 1 (right side): Ch 1, dc in first 10 (14, 18, 20, 20) fsc, *skip next 2 fsc, shell in next fsc, skip next 2 fsc, dc in next 4 fsc; repeat from * 3 (3, 3, 3, 4) times, dc in last 6 (10, 14, 16, 16) fsc, turn – 4 (4, 4, 4, 5) shells.
-
Row 2: Ch 1, dc in first 10 (14, 18, 20, 20) dc, *ch 1, [dc in next dc, ch 1, skip next dc] 3 times, dc in next dc, ch 1, dc in next 4 dc; repeat from * 3 (3, 3, 3, 4) times, dc in last 6 (10, 14, 16, 16) dc, turn.
-
Shape Armhole:
Row 3: Ch 1, skip first dc, dc in next 9 (13, 17, 19, 19) dc, *ch 2, skip next (ch-1 space, dc), sc in next ch-1 space, (ch 1, sc) in each of next 2 ch-1 spaces, ch 2, skip next (dc, ch-1 space), dc in next 4 dc; repeat from * 3 (3, 3, 3, 4) times, dc in next 5 (9, 13, 15, 15) dc, turn, leaving last dc unworked. -
Row 4: Ch 1, skip first dc, dc in next 8 (12, 16, 18, 18) dc, *(ch 1, sc) in each of next 4 ch-spaces, ch 1, dc in next 4 dc; repeat from * 3 (3, 3, 3, 4) times, dc in next 4 (8, 12, 14, 14) dc, turn, leaving last dc unworked.
-
Row 5: Ch 1, skip first dc, dc in next 7 (11, 15, 17, 17) dc, *skip next 2 ch-1 spaces, shell in next ch-1 space, skip next 2 ch-1 spaces, dc in next 4 dc; repeat from * 3 (3, 3, 3, 4) times more, dc in last 3 (7, 11, 13, 13) dc leaving last dc unworked, turn.
-
Row 6: Ch 1, skip first dc, dc in next 6 (10, 14, 16, 16) dc, *ch 1, [dc in next dc, ch 1, skip next dc] 3 times, dc in next dc, ch 1, dc in next 4 dc; repeat from * 3 (3, 3, 3, 4) times, dc in next 2 (6, 10, 12, 12) dc, turn, leaving last dc unworked.
-
Row 7: Ch 1, skip first dc, dc in next 5 (9, 13, 15, 15) dc, *ch 2, skip next (ch-1 space, dc), sc in next ch-1 space, (ch 1, sc) in each of next 2 ch-1 spaces, ch 2, skip next (dc, ch-1 space), dc in next 4 dc; repeat from * 3 (3, 3, 3, 4) times, dc in last 1 (5, 7, 11, 11), turn, leaving last dc unworked.
-
Row 8: Ch 1, skip first dc, dc in next 4 (8, 12, 14, 14) dc, *(ch 1, sc) in each of next 4 chspaces, ch 1, dc in next 4 dc; repeat from * 3 (3, 3, 3, 4) times, dc in next 0 (4, 8, 10, 10) dc, turn, leaving last dc unworked.
-
Row 9: Ch 1, skip first 0 (1, 1, 1, 1) dc, dc in next 4 (7, 11, 13, 13) dc, *skip next 2 ch-1 spaces, shell in next ch-1 space, skip next 2 ch-1 spaces, dc in next 4 dc; repeat from * 3 (3, 3, 3, 4) times more, dc in last 0 (3, 7, 9, 9) dc, leaving last dc unworked, turn.
-
Row 10: Ch 1, skip first 0 (1, 1, 1, 1) dc, dc in next 4 (6, 10, 12, 12) dc, *ch 1, [dc in next dc, ch 1, skip next dc] 3 times, dc in next dc, ch 1, dc in next 4 dc; repeat from * 3 (3, 3, 3, 4) times, dc in next 0 (2, 6, 8, 8) dc, turn, leaving last 0 (1, 1, 1, 1) dc unworked.
-
Row 11: Ch 1, dc in first 4 (6, 10, 12, 12) dc, *ch 2, skip next (ch-1 space, dc), sc in next ch-1 space, (ch 1, sc) in each of next 2 ch-1 spaces, ch 2, skip next (dc, ch-1 space), dc in next 4 dc; repeat from * 3 (3, 3, 3, 4) times, dc in last 0 (2, 6, 8, 8) dc, turn.
-
Row 12: Ch 1, dc in first 4 (6, 10, 12, 12) dc, *(ch 1, sc) in each of next 4 ch-spaces, ch 1, dc in next 4 dc; repeat from * 3 (3, 3, 3, 4) times, dc in last 0 (2, 6, 8, 8) dc, turn.
-
Row 13: Ch 1, dc in first 4 (6, 10, 12, 12) dc, *skip next 2 ch-1 spaces, shell in next ch-1 space, skip next 2 ch-1 spaces, dc in next 4 dc; repeat from * 3 (3, 3, 3, 4) times more, dc in last 0 (2, 6, 8, 8) dc, turn.
-
Row 14: Ch 1, dc in first 4 (6, 10, 12, 12) dc, *ch 1, [dc in next dc, ch 1, skip next dc] 3 times, dc in next dc, ch 1, dc in next 4 dc; repeat from * 3 (3, 3, 3, 4) times, dc in last 0 (2, 6, 8, 8) dc, turn.
-
Repeat rows 11-14 until armhole measures 8 (8, 9, 9, 9)” [20.5 (20.5, 23, 23, 23)cm] from beginning. Fasten off leaving a sewing length.
Editor's Note: Click on image below to enlarge.
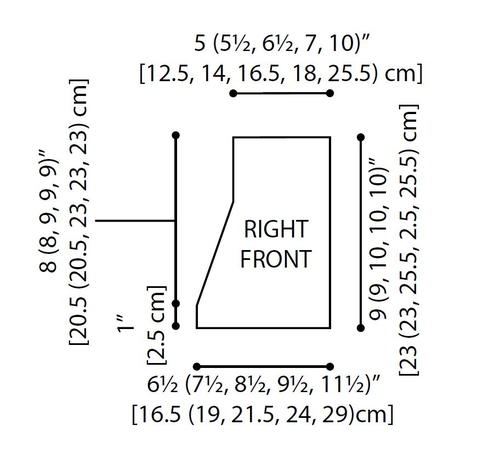
Right Front
-
With larger hook, fsc 17 (21, 25, 27, 36).
-
Row 1: Ch 1, dc in first 2 fsc, *skip next 2 fsc, shell in next fsc, skip next 2 fsc, dc in next 0 (0, 0, 0, 4) dc; repeat from * 0 (0, 0, 0, 1) time, dc in last 10 (14, 18, 20, 16) dc, turn.
-
Row 2: Ch 1, dc in first 10 (14, 18, 20, 20) dc, *ch 1, [dc in next dc, ch 1, skip next dc] 3 times, dc in next dc, ch 1*, dc in next 0 (0, 0, 0, 4) dc; repeat from * to * 0 (0, 0, 0, 1) time, dc in last 2 dc, turn.
-
Shape Armhole:
Row 3: Ch 1, dc in first 2 dc, *ch 2, skip next (ch-1 space, dc), sc in next ch-1 space, (ch 1, sc) in each of next 2 ch-1 spaces, ch 2, skip next (dc, ch-1 space), dc in next 0 (0, 0, 0, 4) dc; repeat from * 0 (0, 0, 0, 1) time, dc in next 9 (13, 17, 19, 15) dc, turn, leaving last dc unworked. -
Row 4: Ch 1, skip first dc, dc in next 8 (12, 16, 18, 18) dc, *(ch 1, sc) in each of next 4 ch-spaces, ch 1*, dc in next 0 (0, 0, 0, 4) dc; repeat from * to * 0 (0, 0, 0, 1) time, dc in last 2 dc, turn.
-
Row 5: Ch 1, dc in first 2 dc, *skip next 2 ch-1 spaces, shell in next ch-1 space, skip next 2 ch-1 spaces, dc in next 0 (0, 0, 0, 4) dc; repeat from * 0 (0, 0, 0, 1) time, dc in next 7 (11, 15, 17, 13) dc, turn, leaving last dc unworked.
-
Row 6: Ch 1, skip first dc, dc in next 6 (10, 14, 16, 16) dc, *ch 1, [dc in next dc, ch 1, skip next dc] 3 times, dc in next dc, ch 1*, dc in next 0 (0, 0, 0, 4) dc; repeat from * to * 0 (0, 0, 0, 1) time, dc in last 2 dc, turn.
-
Row 7: Ch 1, dc in first 2 dc, *ch 2, skip next (ch-1 space, dc), sc in next ch-1 space, (ch 1, sc) in each of next 2 ch-1 spaces, ch 2, skip next (dc, ch-1 space), dc in next 0 (0, 0, 0, 4) dc; repeat from * 0 (0, 0, 0, 1) time, dc in next 5 (9, 13, 15, 11) dc, turn, leaving last dc unworked.
-
Row 8: Ch 1, skip first dc, dc in next 4 (8, 12, 14, 14) dc, *(ch 1, sc) in each of next 4 ch-spaces, ch 1*, dc in next 0 (0, 0, 0, 4) dc; repeat from * to * 0 (0, 0, 0, 1) time, dc in last 2 dc, turn.
-
Row 9: Ch 1, dc in first 2 dc, *skip next 2 ch-1 spaces, shell in next ch-1 space, skip next 2 ch-1 spaces, dc in next 0 (0, 0, 4, 4) dc; repeat from * 0 (0, 0, 1, 1) time, dc in next 4 (7, 11, 13, 9) dc, turn, leaving last 0 (1, 1, 1, 1) dc unworked.
-
Row 10: Ch 1, skip next 0 (1, 1, 1, 1) dc, dc in next 4 (6, 10, 12, 12) dc, *ch 1, [dc in next dc, ch 1, skip next dc] 3 times, dc in next dc, ch 1*, dc in next 0 (0, 0, 0, 4) dc; repeat from * to * 0 (0, 0, 0, 1) time, dc in last 2 dc, turn.
-
Row 11: Ch 1, dc in first 2 dc, *ch 2, skip next (ch-1 space, dc), sc in next ch-1 space, (ch 1, sc) in each of next 2 ch-1 spaces, ch 2, skip next (dc, ch-1 space), dc in next 0 (0, 0, 0, 4) dc; repeat from * 0 (0, 0, 0, 1) time, dc in last 4 (6, 10, 12, 8) dc, turn.
-
Row 12: Ch 1, dc in first 4 (6, 10, 12, 12) dc, *(ch 1, sc) in each of next 4 ch-spaces, ch 1*, dc in next 0 (0, 0, 0, 4) dc; repeat from * to * 0 (0, 0, 0, 1) time, dc in last 2 dc, turn.
-
Row 13: Ch 1, dc in first 2 dc, *skip next 2 ch-1 spaces, shell in next ch-1 space, skip next 2 ch-1 spaces, dc in next 0 (0, 0, 0, 4) dc; repeat from * 0 (0, 0, 0, 1) time, dc in last 4 (6, 10, 12, 8) dc, turn.
-
Row 14: Ch 1, dc in first 4 (6, 10, 12, 12) dc, *ch 1, [dc in next dc, ch 1, skip next dc] 3 times, dc in next dc, ch 1*, dc in next 0 (0, 0, 0, 4) dc; repeat from * to * 0 (0, 0, 0, 1) time, dc in last 2 dc, turn.
-
Repeat Rows 11-14 until Armhole measures same as finished Back. Fasten off, leaving sewing length.
Editor's Note: Click on image below to enlarge.
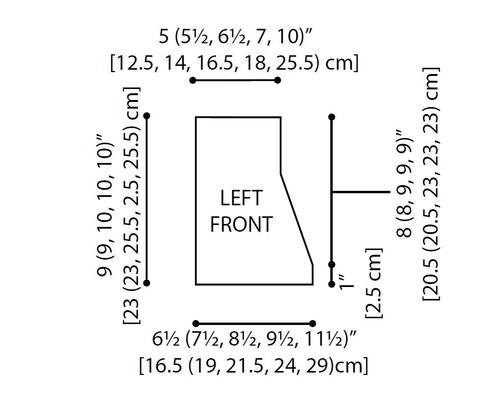
Left Front
-
With larger hook, fsc 17 (21, 25, 36, 36).
-
Row 1: Ch 1, dc in first 10 (14, 18, 20, 20) fsc, *skip next 2 fsc, shell in next fsc, skip next 2 fsc*, dc in next 0 (0, 0, 0, 4) dc; repeat from * to * 0 (0, 0, 0, 1) time, dc in last 2 dc, turn.
-
Row 2: Ch 1, dc in first 2 dc, *ch 1, [dc in next dc, ch 1, skip next dc] 3 times, dc in next dc, ch 1, dc in next 0 (0, 0, 0, 4) dc; repeat from * 0 (0, 0, 0, 1) time, dc in last 10 (14, 18, 20, 16) dc, turn.
-
Shape Armhole:
Row 3: Ch 1, skip first dc, dc in first 9 (13, 17, 19, 19) dc, *ch 2, skip next (ch-1 space, dc), sc in next ch-1 space, (ch 1, sc) in each of next 2 ch-1 spaces, ch 2, skip next (dc, ch-1 space)*, dc in next 0 (0, 0, 0, 4) dc; repeat from * to * (0, 0, 0, 1) time, dc in last 2 dc, turn. -
Row 4: Ch 1, dc in first 2 dc, *(ch 1, sc) in each of next 4 ch-spaces, ch 1, dc in next 0 (0, 0, 0, 4) dc; repeat from * 0 (0, 0, 0, 1) time, dc in next 8 (12, 16, 18, 14) dc, turn, leaving last dc unworked.
-
Row 5: Ch 1, skip first dc, dc in next 7 (11, 15, 17, 17) dc, *skip next 2 ch-1 spaces, shell in next ch-1 space, skip next 2 ch-1 spaces*, dc in next 0 (0, 0, 0, 4) dc; repeat from * to * 0 (0, 0, 0, 1) time, dc in last 2 dc, turn.
-
Row 6: Ch 1, dc in first 2 dc, *ch 1, [dc in next dc, ch 1, skip next dc] 3 times, dc in next dc, ch 1, dc in next 0 (0, 0, 0, 4) dc; repeat from * 0 (0, 0, 0, 1) time, dc in next 6 (10, 14, 16, 12) dc, turn, leaving last dc unworked.
-
Row 7: Ch 1, skip first dc, dc in next 5 (9, 13, 15, 15) dc, *ch 2, skip next (ch-1 space, dc), sc in next ch-1 space, (ch 1, sc) in each of next 2 ch-1 spaces, ch 2, skip next (dc, ch-1 space)*, dc in next 0 (0, 0, 0, 4) dc; repeat from * to * 0 (0, 0, 0, 1) time, dc in last 2 dc, turn.
-
Row 8: Ch 1, dc in first 2 dc, *(ch 1, sc) in each of next 4 ch-spaces, ch 1, dc in next 0 (0, 0, 0, 4) dc; repeat from * 0 (0, 0, 0, 1) time, dc in next 4 (8, 12, 14, 10) dc, turn, leaving last dc unworked.
-
Row 9: Ch 1, skip first dc, dc in first 4 (7, 11, 13, 13) dc, *skip next 2 ch-1 spaces, shell in next ch-1 space, skip next 2 ch-1 spaces*, dc in next 0 (0, 0, 0, 4) dc; repeat from * to * 0 (0, 0, 0, 1) time, dc in last 2 dc, turn.
-
Row 10: Ch 1, dc in first 2 dc, *ch 1, [dc in next dc, ch 1, skip next dc] 3 times, dc in next dc, ch 1, dc in next 0 (0, 0, 0, 4) dc; repeat from * 0 (0, 0, 0, 1) time, dc in last next 4 (6, 10, 12, 8) dc, turn, leaving last 0 (1, 1, 1, 1) dc unworked.
-
Row 11: Ch 1, dc in first 4 (6, 9, 12, 12) dc, *ch 2, skip next (ch-1 space, dc), sc in next ch-1 space, (ch 1, sc) in each of next 2 ch-1 spaces, ch 2, skip next (dc, ch-1 space)*, dc in next 0 (0, 0, , 4) dc; repeat from * to * 0 (0, 0, 0, 1) time, dc in last 2 dc, turn, leaving last dc unworked.
-
Row 12: Ch 1, dc in first 2 dc, *(ch 1, sc) in each of next 4 ch-spaces, ch 1, dc in next 0 (0, 0, 4, 4) dc; repeat from * 0 (0, 0, 1, 1) time, dc in last 4 (6, 10, 12, 8) dc, turn.
-
Row 13: Ch 1, dc in first 4 (6, 10, 12, 12) dc, *skip next 2 ch-1 spaces, shell in next ch-1 space, skip next 2 ch-1 spaces*, dc in next 0 (0, 0, 0, 4) dc; repeat from * to * 0 (0, 0, 0, 1) time, dc in last 2 dc, turn.
-
Row 14: Ch 1, dc in first 2 dc, *ch 1, [dc in next dc, ch 1, skip next dc] 3 times, dc in next dc, ch 1, dc in next 0 (0, 0, 0, 4) dc; repeat from * 0 (0, 0, 0, 1) time, dc in last 4 (6, 10, 12, 8) dc, turn.
-
Repeat Rows 11-14 until Armhole measures same as finished Back. Fasten off, leaving sewing length.
Sew shoulder and side seams.
Editor's Note: Click on image below to enlarge. -
Back
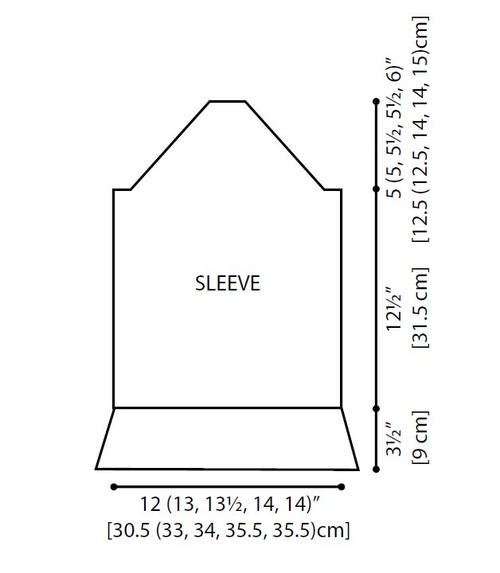
Sleeve (make 2)
-
With larger hook, fsc 41 (45, 47, 49, 49).
-
Row 1: Ch 1, dc in first 18 (20, 21, 22, 22) fsc, skip next 2 fsc, shell in next fsc, skip next 2 fsc, dc in last 18 (20, 21, 22, 22) fsc, turn.
-
Row 2: Ch 1, dc in first 18 (20, 21, 22, 22) dc, ch 1, dc in next dc ch 1, skip next dc, dc in next dc] 3 times, ch 1, dc in last 18 (20, 21, 22, 22) dc, turn.
-
Row 3: Ch 1, dc in first 18 (20, 21, 22, 22) dc, ch 2, skip next (ch-1 space, dc), sc in next ch-1 space, (ch 1, sc) in each of next 2 next ch-1 spaces, ch 2, skip next (dc, ch-1 space), dc in last 18 (20, 21, 22, 22) dc, turn.
-
Row 4: Ch 1, dc in first 18 (20, 21, 22, 22) dc, (ch 1, sc) in each of next 4 ch-spaces, ch 1, dc in last 18 (20, 21, 22, 22) dc, turn.
-
Row 5: Ch 1, dc in first 18 (20, 21, 22, 22) dc, skip next 2 ch-1 spaces, shell in next ch-1 space, skip next 2 ch-1 spaces, dc in last 18 (20, 21, 22, 22) dc, turn.
Repeat Rows 2- 5 until Sleeve measures 12½” [31.5 cm], ending with Row 4 of pattern. -
Shape Cap:
Row 1: Slip st in first 3 sts, ch 1, dc in next 15 (17, 18, 19, 19) dc, skip next 2 ch-1 spaces, shell in next ch-1 space, skip next 2 ch-1 spaces, dc in last 15 (17, 18, 19, 19), turn, leaving remaining 3 sts unworked. -
Row 2: Ch 1, skip first dc, dc in next 14 (16, 17, 18, 18) dc, ch 1, dc in next dc [ch 1, skip next dc, dc in next dc] 3 times, ch 1, dc in next 14 (16, 17, 18, 18) dc, leaving last dc unworked, turn.
-
Row 3: Ch 1, skip first dc, dc in next 13 (15, 16, 17, 17) dc, ch 2, skip next (ch-1 space, dc), sc in next ch-1 space, (ch 1, sc) in each of next 2 ch-spaces, ch 2, skip next (dc, ch-1 space), dc in next 13 (15, 16, 17, 17) dc, leaving last dc unworked, turn.
-
Row 4: Ch 1, skip first dc, dc in next 12 (14, 15, 16, 16) dc, ch 1, sc in next ch-2 space, (ch 1, sc) in each of next 3 ch-spaces, ch 1, dc in next 12 (14, 15, 16, 16) dc, leaving last dc unworked, turn.
-
Row 5: Ch 1, skip first dc, dc in next 11 (13, 14, 15, 15) dc, skip next 2 ch-1 space, shell in next ch-1 space, skip 2 ch-21 spaces, dc in last 11 (13, 14, 15, 15) dc, leaving last dc unworked, turn.
Continue in pattern of Rows 2-5, decreasing one dc at beginning and end of every row for 3 (3, 4, 4, 5) more rows. Cap should measure 5 (5, 5½, 5½, 6)” [12.5 (12.5, 14, 14, 15) cm] from beginning. Fasten off. -
Sew Sleeve into Armholes, easing in fullness.
Editor's Note: Click on image below to enlarge. -
Lower Edging:
With right side facing and smaller hook, join yarn in bottom front corner of Left Front.
Note: If you crochet left-handed, join in corner of Right Front.
Round 1: Working across ch edge of fsc, ch 1, sc in first fsc, *ch 2, skip next fsc, sc in next fsc: repeat from * across bottom edge to next corner, working in ends of rows, (ch 2, sc) in each row-end st up to collar, working across neck edge, ch 2, sc in every other stitch or ch-space across to next corner, working in ends of rows, (ch 2, sc) in each row-end st down to bottom edge, ch 2, join with a sl st in first sc.
Notes: Change to larger hook. Turn at the end of each round. -
Round 2 (right side):Slip st in first ch-2 space, ch 3, 6 dc in same space, *skip next 2 ch-2 spaces, shell in next ch-2 space; repeat from * as evenly as possible around, join with slip st in top of beginning ch, turn.
Note: It may be necessary to skip only 1 ch-2 space near the end to come out even. -
Round 3 (wrong side): Ch 1, sc in space between shells, *skip next dc, (ch 1, dc) in each of next 5 dc, ch 1 skip next dc, sc in space between shells; repeat from * around, join with slip st in first sc, turn.
-
Round 4 (right side): Slip st in next 4 sts, ch 3 (counts as dc, ch 1), (dc, ch 1) in each of next 2 dc, *dc2tog worked across next 2 dc, ch 1, (dc, ch 1) in each of next 3 dc; repeat from * around, join with slip st in 2nd ch of beginning ch-3, turn.
-
Round 5 (wrong side): Ch 1, *sc in next ch-1 space, ch 2, skip next dc2tog, sc in next ch-1 space, ch 2, skip next (dc, ch-1 space), sc in next dc, ch 2, skip next (ch-1 space, dc); repeat from * around, join with slip st in first sc, turn.
-
Repeat Rounds 2-5 twice, then repeat rounds 2-3 once. Fasten off.
-
Sleeve Edging
With smaller hook, join yarn in Sleeve seam on cuff edge of sleeve, working across ch edge of fsc, ch 1, sc in first fsc, *ch 2, skip next fsc, sc in next fsc: repeat from * around, join with slip st in first sc.
Repeat Rounds 2-5 of Edging, then repeat Round 2 once.
Fasten off. Repeat Sleeve Edging on other sleeve.
Finishing
Weave in ends.
-
Sew button to lower left front, using opening in stitches on right front for buttonhole.
Editor's Note: Click on image below to enlarge.
Up Next:
56 Easy Crochet Cardigan Patterns
What would you name this crochet cardigan?
Read NextArlo Granny Square Cardigan
bunky
Oct 30, 2024
Beautiful design but the direction leave a lot to be desired. Might add I have been knitting and crocheting for many years so I know how to read directions. In the case of this pattern there is no explanation about the collar and if all the pieces are crocheted together as on piece on the bottom. The creator needs to revise the directions to address the ambiguity and explain the structure of the sweater. I am finding this more and more with directions today, poorly written with few explanations.
olivia95138
Feb 16, 2020
I would name this sweater "Cross my Heart". I am adding this as a future project. I really like it.
janeramsey 2543107
Nov 10, 2018
Would appreciate any help - I've made all the pieces, and sewed the sides and shoulders - but there doesn't seem to be any instructions for the collar that folds over and down the front? I love the cardigan, really want to finish it for a gift, so please, please, any help would be greatly appreciated. many thanks, jane
EditorLP
Nov 12, 2018
Hi janeramsey 2543107, we're sorry you're having trouble with this pattern. It seems as though the collar section you're referring to is actually the front pieces folded toward the shoulders, not a separate piece. Perhaps if you try adding the button as shown above, this will be easier to visualize. We hope this helps! - Editors of AllFreeCrochet
janeramsey 2543107
Nov 19, 2018
Many thanks for your reply. I've finally figured it out! On the pattern instructions, it is called 'lower edging', and is listed after the diagram of the sleeves. The actual finishing of the sleeves is after this instruction. Oops. I've found a couple of errors, mostly just an incorrect number in the size conversion data. But, all is well now, it was just a matter of the order of the instructions. I've made notes for next time. many thanks!
Daughter of Light
Feb 28, 2018
This is a lovely cardigan! I'm definitely placing it on my "future" list because I'll need to work up to it but that's okay. A lady needs some things to look forward to! In the meanwhile I'll need to learn the shell stitch and the dc2tog. I am soooo pleased that they remembered us larger women with the plus sizes included and for no "extra charge". Thanks for this beautiful free pattern!
Morehouse17
Feb 28, 2018
What a beautiful sweater. The title says it all. A lacy buttoned cardigan, how can you go wrong with that? I was reading the directions to this intermediate design to determine if I was going to attempt to make it. There are 3 special crochet stitches and the pieces are made separately and then attached. I may just give it a go.
Delphine Bryant
Feb 25, 2018
I appreciate that this pattern is written in more than one size. There are a lot of rows but reading over the directions they seem to pretty clear. Anytime I start a project and I run into a little snag I typically give up. This lacy button cardigan is the perfect gift for my little sister so I will not give up on this project.
Zeemer
Jan 30, 2018
At first you'd take this cardigan for granted but the many times you'd see this piece all over again, you will have a second look. I like the teal yarn used and the stitches are so intricate, very appropriate for this Victorian Romance Cardigan project.
princess6860504
Jan 11, 2018
If I feel confident enough, I would surely like to take on this lacy teal colored sweater shrug. It is amazingly beautiful. I love the full range of sizes that are offered, as I am a plus sized gal. The 52 inch bust is perfect for me. I think the design should be very figure flattering, as the cut is tapered in at the bust/high waist.
FireFightersMoM
May 23, 2017
I can't say how darling this sweater is. I made it up for my daughter so of course, it had to be done in a pretty teal. I personally can't wait to crochet one or two for myself. I think it's perfect for a dressy affair, or in the fall with a pair of leggings and boots.
Hippie Chick
Apr 28, 2017
I love the look of this cardigan sweater. So feminine looking. The length is perfect for me because I do not care for sweaters or shorts that go too far below the waistline. It does look very comfy and inviting. Would look great paired with a pair of jeans or a dress or skirt. Sorry I missed the contest. Maybe I can catch the next one.
andrealuxton 00859 53
Jan 26, 2017
I made this pattern in a rich plum colour and it worked out perfectly. I love wearing it with an ankle length bohemian hippy skirt that I have had for well on 15 years! However, the cardi is versatile as I wear it to work, with jeans and even over summer dresses.
soffity34 2074758
Jul 18, 2016
Im doing the back and it's huge. Im using a 6 mm hook and Aran yarn as it says. The front seems to be ok but the back goes right around me it's so big. Any help or suggestions for me?,
Editor AllFreeCroc het
Feb 02, 2016
Thank you for your comments! The prize goes to spida1023 for the suggestion "Victorian Romance".
Crafter 4163040
Feb 02, 2016
Edwardian Lace Cardi - reminds me of the lacy doilies popular in the late 1800s
mdonovan 2525918
Jan 31, 2016
Because the cardigan looks lacy and has loops along the edges I would call this cardigan a "Loopy Lace Cardigan"
mswillits 7602952
Jan 31, 2016
Name Smoky Isle Bolero. Imagine a young woman in Maine. She is gazing at the Atlantic waiting for her lover to return. She is wearing the Smoky Isle Bolero.
sam3399
Jan 31, 2016
Hi, for my own opinion, I would say name this The Victorian Shells cardigan. As it looks kinda Victorian and there are some shell /fan stitches . Hope to win the prize ) Thanks Sam
mal122883
Jan 31, 2016
Love the colors and design. I think it should be called the " Cozy Teal Cardi" $
cderbis 1012405
Jan 31, 2016
My favorite cardigan - it's gorgeous! or - if we're going with the teal, ocean colors as shown, could call it "Sea Shells" Cardi. As the Bard would say, "A rose by any other name...." I love it and it was just added to my To-Do's for 2016! Thank you!
Cher
Jan 30, 2016
I would name this pattern " Lacy Scalloped Jacket/Sweater ". I see it in many colors to go with a pretty dress as the pics I included.
shesinparadise
Jan 30, 2016
I would name this Cardigan, "Tealing my nights away" because of the color and it is nice enough to wear to an evening event
DC
Jan 30, 2016
I would call it "Ocean Dream" because it reminds me of the ocean and its a dream of a Cardigan.
semomom42
Jan 30, 2016
It should be named Kim's Cardi after the designer. 'Course I could be bias since that's my name also.
tazwoman56 6829831
Jan 30, 2016
I would name this (True Love Cardigan) because it is very beautiful and has a romantic look to it.
sunnyosborn
Jan 30, 2016
Lacey Scallops Cardigan. It's beautiful would look great on my daughter!
Member 2628837
Jan 30, 2016
I would name this shawl," Maid Miriam" because of it's innate charm, it's coloring (more of a Hooker's Green than Teal) and because it reminds me of Robin Hood's fair lady, Maid Miriam.
SWFLsweetie
Jan 29, 2016
Sarina's Dream Cardigan, I made this for my daughter using a 4.00 mm hook and she sleeps in it!
CATurner52 5767952
Jan 28, 2016
My suggestion for a name for this pattern is Scallops and Lace Cardi.
witsend1 7771870
Jan 28, 2016
"Love is in the air" would be what I call this romantic sweater.
cdrdog452 7766725
Jan 28, 2016
"Sansa's Wrap" I've been watching Game of Thrones and this looks like something she would wear. Beautiful pattern! )
beverleylongrigg 7 648047
Jan 28, 2016
I would name it the Demelza Poldark Cardi. It looks so like that period of cornish culture.
Asgranny13 8649919
Jan 28, 2016
I would call it "A touch of classy Lacy cardigan" It is elegant enough for any occasion
dbzfand
Jan 28, 2016
Cutaway Cardigan because the front reminded me of a man's cutaway tux jacket.
hummingbird71261
Jan 28, 2016
The first thing that came to mind, was "Ruffled Bolero Cardigan". Very pretty pattern.
Ronda B
Jan 28, 2016
The waves on this pattern remind me of being on the beach early in morning when its still cool, so I would name it "Seaside Cardi"
ljs9419
Jan 28, 2016
I would call it "Flirtatious and Feminine Sweater" because that's what it is. It's so pretty!
skelnav88 7689693
Jan 28, 2016
I would like to suggest The Sweet Irish Las Cardigan. It is simply lovely!
faolan
Jan 28, 2016
How about... maybe "Tidal Pool Cardi"? "Del Mar Shrug"? It looks very ocean-wavey to me, especially with the color used.
gwamah 6244050
Jan 26, 2016
I haven't made this yet,but I plan to do so in the near future - right after I finish the four afghans that are currently under construction. My name for this sweater is Sweet Breanna -because it reminds me of my grand-daughter.
KLC
Jan 25, 2016
Gorgeous! It reminds me of Lord of the Rings, particularly something a (very trendy) hobbit might wear. I would call it "Hobbiton Home Cardigan".
Emily Michelle
Jan 25, 2016
This is so pretty! I'd call it Arielle's "Under the Sea" Cardigan.
Plusk24
Jan 25, 2016
"The Modern Outlander Cardigan"!!! It would be perfect. And it looks like something from the Outlander series!
EditorLP
Jan 25, 2016
This cardigan is so cute, I would definitely wear this! I'd call it the "Trendy in Teal Buttoned Cardigan" because trendy is one of the only t-adjectives I can think of.
jamieegee
Jan 25, 2016
"Slouchy Sweetheart Sweater." This is such a cute pattern. If I was crafty in any way, shape or form, I'd try making it.
bambakes7
Jan 25, 2016
Oh man, my creativity is nowhere to be found this morning. The first name that came to mind was "Classic Blue Cardigan".
KathrynAllison
Jan 25, 2016
Cute pattern! I would name it "Terrifically Teal Topper" or something along those lines.
caitlinmm
Jan 25, 2016
Countryside Stroll Cardigan. It reminds me of something a Jane Austin character would wear while walking through the English countryside.
SaraR
Jan 25, 2016
I think I'd name it something like "Jewel Tone Delight" or "This Sweater Will Look Amazing on Literally Everyone." That might be too long. Maybe "Date Night Sweater."
ESC
Jan 25, 2016
Ooo, looks comfy. Could call it something like the Cozy Boho Cardigan. Also, the woman in the photo looks like Marni from "Girls"!
Editor for AllFree CrochetAfghanPatte rns
Jan 25, 2016
I really like this pattern! I would name it Beautiful Emerald City Cardigan.
Report Inappropriate Comment
Are you sure you would like to report this comment? It will be flagged for our moderators to take action.
Thank you for taking the time to improve the content on our site.

