Sugar Skull Garland
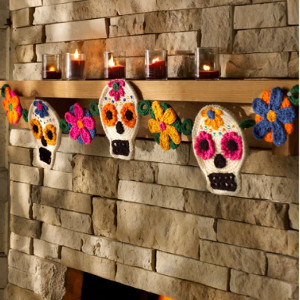
Can't get enough sugar skulls? They're the perfect blend of spooky and sweet. Whether you're decorating for Dia de Los Muertos or Halloween, this Sugar Skull Garland is a trendy, colorful Halloween decoration. Your mantel will stand out with these alternating flowers and skulls danging beneath it. Your friends will envy this eye-catching crochet Halloween decoration. They'll think your decorating skills are scary good.

Crochet HookH/8 or 5 mm hook
Yarn Weight(4) Medium Weight/Worsted Weight and Aran (16-20 stitches to 4 inches)
MATERIALS:
- RED HEART Super Saver: 1 skein each 313 Aran A, 312 Black B, 718 Shocking Pink C, 254 Pumpkin D, 321 Gold E, 368 Paddy Green F, and 3945 Blue Suede G
- Susan Bates Crochet Hook: 5 mm [US H-8]
- Yarn needle, Removable stitch marker, Sewing pins, 8 plastic 1” (25 mm) rings, 24 rhinestones or sequins (about ¼” (6 mm) diameter) in various colors, Craft glue to attach the sequins, rhinestones and felt, Glitter fabric paint in various colors, Felt to back each piece.
GAUGE:
Rounds 1–8 of skull = 4” (10 cm) diameter. CHECK YOUR GAUGE. Use any size hook to obtain the gauge.
SIZE:
Garland measures about 44” (112 cm) long. Each skull measures about 5½” (14 cm) wide x 7” (18 cm) long.
SPECIAL STITCH:
hdc2tog = [Yarn over, insert hook in next stitch, yarn over and pull up loop] 2 times, yarn over and draw through all 5 loops on hook.
SPECIAL TECHNIQUES:
Adjustable-ring = Wrap yarn into a ring, ensuring that the tail falls behind the working yarn. Pinch ring and tail between middle finger and thumb. Insert hook through center of ring, yarn over (with working yarn) and draw up a loop. Work stitches of first round in the ring. After the first round of stitches is worked, pull gently on tail to tighten ring.
Covering-sc (covering single crochet) = Place a slip knot on hook (1 loop on hook). *Take working yarn over ring to back of ring.Insert hook from front to back through center of ring. Yarn over with working yarn and draw loop to front (2 loops on hook). Bring working yarn back over top of ring to front. Yarn over and draw through both loops on hook (one covering-sc made); repeat from * until the specified number of sc have been worked.
NOTES:
1. The main section of each skull is worked in continuous rounds (spiral). Do not join rounds with a slip stitch and do not turn rounds. The jaw is worked back and forth in rows.
2. Flowers, nose, and teeth are worked separately and sewn to skull.
3. Each skull and flower motif is backed with a piece of felt. The felt backing stiffens the pieces, hides the stitching on the back side, and keeps each piece from curling.
4. The garland can be made longer or shorter by making more or fewer skull and flower motifs.
SKULL (make 3)
With A, make an adjustable ring.
Round 1 (right side): Work 6 sc in ring; do not join with sl st, work in continuous rounds (spiral)—6 sc. Place marker for beginning of round and move marker up as each round is completed.
Round 2: Work 2 sc in each st around—12 sc.
Round 3: [Sc in next st, 2 sc in next st] 6 times—18 sts.
Round 4: [Sc in next 2 sts, 2 sc in next st] 6 times—24 sts.
Round 5: [Sc in next st, 2 sc in next st, sc in next 2 sts] 6 times—30 sts.
Round 6: [Sc in next 3 sts, 2 sc in next st, sc in next st] 6 times—36 sts.
Round 7: [Sc in next 3 sts, 2 sc in next st, sc in next 2 sts] 6 times—42 sts.
Round 8: [Sc in next 6 sts, 2 sc in next st] 6 times—48 sts.
Round 9: [Sc in next 4 sts, 2 sc in next st, sc in next 3 sts] 6 times—54 sts.
Round 10: [2 sc in next st, sc in next 8 sts] 6 times—60 sts.
Round 11: [Sc in next 6 sts, 2 sc in next st, sc in next 3 sts] 6 times—66 sts. Do not fasten off.
JAW
Row 1: Ch 2 (does not count as a st here and throughout), turn, hdc2tog, hdc in next st, sc in next 6 sts, hdc in next st, hdc2tog; leave remaining sts unworked—10 sts.
Row 2: Ch 2, turn, hdc in next 2 sts, sc in next 6 sts, hdc in last 2 sts.
Row 3: Ch 1, turn, sc in each st across.
Edging Round (right side): Ch 1, turn, 2 sc in first st, sc in next 8 sts, 2 sc in last st; work 4 sc evenly spaced across side edge of jaw, slip st in next 54 sts around top of skull; work 4 sc evenly spaced across other side edge of jaw; join with slip st in first sc. Fasten off.
EYE FLOWERS (make 6 – 2 per skull; 2 each with C, D, and E)
Make an adjustable ring. Rounds 1–3: Work same as Rounds 1–3 of skull—18 sts.
Round 4: [(Sc, hdc) in next st, (hdc, slip st) in next st (petal made)] 9 times—9 petals. Fasten off, leaving a long tail for sewing.
EYE FLOWER CENTER (make 6 – 2 per skull)
With B , make an adjustable ring.
Round 1: Work 6 sc in ring; join with slip st in first sc. Fasten off, leaving a long tail for sewing.
FOREHEAD FLOWERS (make 3 – 1 per skull; 1 each with C, E, and G)
Round 1 (right side): Work same as Round 1 of skull—6 sc. Place marker for beginning of round and move marker up as each round is completed.
Round 2: [Slip st in next st, ch 5, working into back bumps of chain, hdc in 3rd ch from hook, sc in next ch, slip st in next ch (petal made)] 5 times, 2 sc in last st—5 petals. Slip st in next st and fasten off, leaving a long tail for sewing.
FOREHEAD FLOWER CENTER (make 3 – 1 per skull; 1 each with C, F, and G)
Make same as eye flower center.
NOSE (make 3 – 1 per skull)
With B , make and adjustable ring.
Round 1: [Sc in ring, hdc in ring, sc in ring] 3 times; join with slip st in first sc—9 sts. Fasten off, leaving a long tail for sewing.
TEETH (make 3 – 1 per skull)
With B, ch 12.
Row 1: Working in back bumps of chain only, dc in 6th ch from hook (beginning ch counts as one foundation ch, first dc and first ch-1 space), [ch 1, skip next ch, dc in next ch] 3
times—4 ch-1 spaces and 5 dc.
Row 2: Ch 4 (counts as dc, ch 1), turn, skip first ch-1 space, dc in next dc, [ch 1, skip next ch-1 space, dc in next dc] 2 times, ch 1, skip next ch of turning ch, dc in next ch of turning ch. Fasten off, leaving a long tail for sewing.
LARGE FLOWER (make 4 – 1 each with C, D, E, G)
Make an adjustable ring.
Round 1 (right side): Work 5 sc in ring; do not join with slip st, work in continuous rounds (spiral)—5 sc. Place marker for beginning of round and move marker up as each round is completed.
Round 2: [Slip st in next st, ch 7, sc in 2nd ch from hook and in next 5 ch (axis made)] 5 times—5 axes.
Round 3: [Skip next sl st, working in chains at base of sts of next axis, slip st in next 2 ch, sc in next 2 ch, hdc in next ch, 3 hdc in next ch; working in sc on other side of same axis, 3 hdc in first sc, hdc in next sc, sc in next 2 sc, slip st in last 2 sc (petal made)] 5 times—5 petals. Fasten off, leaving a long tail for sewing.
LARGE FLOWER CENTER (make 4 – 1 each with C, D, E, and F)
Make same as eye flower center.
FLOWER BACKGROUND (make 4 – 1 each with C, D, F, and G)
Rounds 1–5: Work same as Rounds 1–5 of skull—30 sts.
Round 6: [Sc in next st, hdc in next st, (dc, tr) in next st, (tr, dc) in next st, hdc in next st, sc in next st] 5 times—40 sts. Fasten off.
CONNECTOR RINGS (make 8)
With F , leaving a long beginning tail, work 16 covering-sc into ring; join with slip st in first sc. Fasten off, leaving a long tail. With yarn needle, weave the ending tail through 8 of the sc stitches so that it is positioned opposite the beginning yarn tail.
FINISHING
Block pieces if needed.
Prepare Felt Backings: Cut one piece of felt to the size and shape of each of the skulls and each of the flower backgrounds. Set aside.
Skulls:
Arrange eye flowers, forehead flowers, and forehead flower centers on skulls using the following color combinations:
Skull #1: Eye flower: E Forehead flower: G Forehead flower center: C
Skull #2: Eye flower: D Forehead flower: C Forehead flower center: F
Skull #3: Eye flower: C Forehead flower: E Forehead flower center: G
Using photograph as a guide, pin teeth, nose, eye flowers, and forehead flower to each skull. With yarn tails, sew around all edges of each of the pieces to secure them to the skull. Pin eye flower centers and forehead flower centers to the center of the eye flowers and forehead flowers, respectively. With yarn tails, sew around edges of the centers to secure them in place. With B, sew several stitches on each eye flower center that radiate outward from the center toward the scalloped outer edges of the eye flower.
Flower Motifs:
Arrange large flowers and flower centers on flower backgrounds using the following color combinations:
Flower Motif #1: Background: C Large flower: D Large Flower center: F
Flower Motif #2: Background: G ,Large flower: C Large Flower center: D
Flower Motif #3: Background: F Large flower: E Large Flower center: C
Flower Motif #1: Background: D Large flower: G Large Flower center: E
Using photograph as a guide, pin each large flower to a flower background. The center of the flower should be directly on top of the center of the back ground and the bumps around the outer edge of the flower back ground should fit between petals of the large flower. With tails, sew around the edges of the large flowers to secure them to the backgrounds. You will not be able to sew the tips of the large flowers to anything as they stick out past the edges of the background. ,Pin large flower centers to the middle of the large flowers. With tails, sew around the outer edges of the centers to secure them in place.
Assemble Garland
Skulls, connector rings, and flower motifs should be arranged and sewn together in the following order: Connector ring, flower motif ,#1, connector ring, skull #1, connector ring, flower motif #2, connector ring, skull #2 connector ring, flower motif #3, connector ring, skull #3, connector ring, flower motif #4, connector ring.
Connector Rings:
With tails of connector rings, sew one connector ring to each side of each skull as follows: Slide yarn needle into the side edge of the skull near the top of the eye flowers. Be careful not to let your stitches show on the right side of the skull. The edging round of slip stitches will help mask your stitches. Weave yarn needle back and forth through the loops on the wrong side of skull to anchor your stitches. Make sure that the ring is pulled up next to the side edge of the skull, and there is no space between the ring and the edge of the skull. Once you have woven the yarn in securely, trim excess. Once you have sewn a connector ring to each side of each skull, you can sew a flower background to the unsewn side of the connector rings, by sewing the flower background to the connector rings, in the same way. There should be one extra connector ring on each end of the garland for hanging. Weave in any mremaining ends.
Felt Backing:
Glue each felt piece to the back of the appropriate crochet piece and allow to dry. Using photograph as a guide, glue four rhinestones or sequins above each eye flower, in an angle that slopes downward toward the center of face. Use glitter fabric paint to outline each flower and each flower center.
ABBREVIATIONS:
A , B , C = Color A, Color B, Color C etc; ch= chain; dc = double crochet; hdc = half double crochet; sc = single crochet; st(s) = stitch (es); tr = treble (triple) crochet; ( ) = work directions in parentheses into same st; [ ] = work directions in brackets the number of times specified; * = repeat whatever follows the * as indicated.
Read NextCrochet Monster Baby Bibs
hoppytoad79 389164 8
Sep 19, 2014
Sugar skulls are NOT a Halloween decoration. They are a decoration specific to the holiday of Dia de Los Muertos. If you are not celebrating Dia de Los Muertos--and the majority of the population of the United States does not--you should not be decorating with sugar skulls. There are hundreds of years of cultural significance and meaning behind sugar skulls that those who do not celebrate Dia de Los Muertos are not familiar with and do not appreciate, so we have absolutely no business appropriating sugar skulls because we think they are "cute" or "cool" or "spooky", or any other reason.
Report Inappropriate Comment
Are you sure you would like to report this comment? It will be flagged for our moderators to take action.
Thank you for taking the time to improve the content on our site.

