Dancing Skeleton Crochet Applique
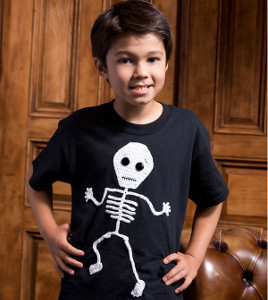
Create a spooky shirt for your kids with this Dancing Skeleton Crochet Applique from Red Heart Yarns. It's easy to work up and leaves you with a festive shirt that you didn't have to buy at the store. Once sewn on, this skeleton crochet applique looks like it's dancing and is sure to put a smile on peoples' faces in the midst of all the scariness. Make your Halloween this year a little more fun with this crochet applique pattern!

Crochet HookD/3 or 3.25 mm hook
Yarn Weight(0) Lace (33-40 stitches to 4 inches). Includes crochet thread.
MATERIALS:
- Aunt Lydia's Classic Crochet Thread, Size 10:
- A: 1 White (1 ball)
- B: 12 Black (1 ball)
- Crochet Hook (Size D/3, 3 mm)
- Two black shank buttons, 19mm diameter
- Sewing Needle and Matching Thread
- Black Cotton T-Shirt
- Yarn Needle
SIZE:
Skelton Applique measures 12” [30 cm] tall.
GAUGE:
Gauge is not critical for this project.
SPECIAL ABBREVIATIONS:
sc2tog: [draw up a loop in next st] twice, yarn over and draw through all 3 loops on hook.
NOTES:
Pieces are worked with thread held doubled throughout.
SKELETON HEAD
Holding 2 strands of A together, ch 9.
Row 1: Working in back loops only, sc in 2nd ch from hook and each ch across – 8 sts.
Row 2: Ch 1, turn, sc in next st, 2 sc in next st, sc in next 4 sts, 2 sc in next st, sc in next st – 10 sts.
Row 3: Ch 1, turn, sc in each st across.
Row 4: Ch 1, turn, sc in next st, 2 sc in next st, sc in next 6 sts, 2 sc in next st, sc in next st – 12 sts.
Row 5: Ch 1, turn, sc in each st across.
Row 6: Ch 1, turn, sc in next st, 2 sc in next st, sc in next 8 sts, 2 sc in next st, sc in next st – 14 sts.
Row 7: Ch 1, turn, sc in each st across.
Row 8: Ch 1, turn, sc in next st, 2 sc in next st, sc in next 10 sts, 2 sc in next st, sc in next st – 16 sts.
Row 9: Ch 1, turn, sc in each st across.
Row 10: Ch 1, turn, sc in next st, 2 sc in next st, sc in next 12 sts, 2 sc in next st, sc in next st – 18 sts.
Row 11: Ch 1, turn, sc in each st across.
Row 12: Ch 1, turn, sc in next st, 2 sc in next st, sc in next 14 sts, 2 sc in next st, sc in next st – 20 sts.
Rows 13-16: Ch 1, turn, sc in each st across.
Row 17: Ch 1, turn, skip first st, sc in next 17 sts, sc2tog – 18 sts.
Row 18: Ch 1, turn, sc in each st across.
Row 19: Ch 1, turn, skip first st, sc in next 15 sts, sc2tog – 16 sts.
Row 20: Ch 1, turn, sc in each st across.
Row 21: Ch 1, turn, skip first st, sc in next 13 sts, sc2tog – 14 sts.
Row 22: Ch 1, turn, sc in each st across.
Row 23: Ch 1, turn, skip first st, sc in next 11 sts, sc2tog – 12 sts.
Row 24: Ch 1, turn, skip first st, sc in next 9 sts, sc2tog – 10 sts.
Row 25: Ch 1, turn, skip first st, sc in next 7 sts, sc2tog – 8 sts.
Row 26: Ch 1, turn, skip first st, sc in next 5 sts, sc2tog – 6 sts. Do Not Fasten Off.
Edging: Ch 1, sc evenly spaced around entire Head, slip st in first sc to join.
Fasten off.
BODY
Body is worked along foundation ch to make spine, from top to bottom on first side and from bottom back to top along opposite side to form hips, ribs and shoulders.Holding 2 strands of A together, ch 27 for Spine.
Row 1: Slip st in 2nd ch from hook and next 5 ch to form neck, ch 12, slip st in 2nd ch from hook and next 11 ch for shoulder, slip st in next ch of foundation ch, slip st in next 4 ch, [ch 10, slip st in 2nd ch from hook and next 9 ch, slip st in next ch of foundation ch, slip st in next 2 ch] 3 times for 3 ribs, ch 7, slip st in 2nd ch from hook and next 6 ch for rib, slip st in next ch of foundation ch, slip st in next 4 ch, ch 12, slip st in 2nd ch from hook and next 11 ch for hip, slip st in next ch of foundation ch, turn work to work along opposite edge of foundation ch, ch 12, slip st in 2nd ch from hook and next 11 ch for second hip, slip st in same ch of foundation ch, slip st in next 4 ch, ch 7, slip st in 2nd ch from hook and next 6 ch for rib, slip st in next ch of foundation ch, [slip st in next 2 ch ch 10, slip st in 2nd ch from hook and next 9 ch, slip st in next ch of foundation ch] 3 times for 3 ribs, slip st in next 4 ch, ch 12, slip st in 2nd ch from hook and next 11 ch for shoulder, slip st in next ch of foundation ch, slip st in remaining chs to first st. Fasten off.
ARMS (Make 2)
Holding 2 strands of A together, ch 21.
Row 1: Working in back loops only, sc in 2nd ch from hook and each ch across – 20 sts.
Row 2: Ch 1, do not turn, sc 4 sts in last ch.
Row 3: Ch 1, turn, sc in each st – 4 sts.
Row 4: Ch 1, turn, skip first st, sc in next 3 sts – 3 sts.
Row 5: Slip st in row end next to last st just made, ch 3, turn, slip st in 2nd ch from hook and next ch to form first finger, [slip st in next st, ch 4, slip st in 2nd ch from hook and next ch] 3 times to form 3 fingers, slip st in row end next to last st just made, ch 3, turn, slip st in 2nd ch from hook and next ch, to form last finger. Fasten off.
LEGS (Make 2)
Holding 2 strands of A together, ch 21.
Row 1: Working in back loops only, sc in 2nd ch from hook and each ch across – 20 sts.
RIGHT FOOT
Holding 2 strands of A together, ch 7.
Row 1: Working in back loops only, sc in 2nd ch from hook and each ch across – 6 sts.
Row 2: Ch 1, turn, sc in next 5 sts, 2 sc in next st, turn to work along opposite edge of foundation ch, sc in next 4 sts – 10 sts.
Round 3: Working in continuous rounds, 2 sc in first st, sc in next 5 sts, 2 sc in next 2 sts, sc in next 5 sts, slip st in next st.
Row 4: [Ch 3, slip st in same space and in next space] 4 times for 4 toes, ch 4, slip st in same place and in next st for big toe. Fasten off.
LEFT FOOT
Holding 2 strands of A together, ch 7.
Row 1: Working in back loops only, sc in 2nd ch from hook and each ch across – 6 sts.
Row 2: Ch 1, turn, sc in next 5 st, 2 sc in next st, turn to work along opposite edge of foundation ch, sc in next 4 sts – 10 sts.
Round 3: Working in continuous rounds, 2 sc in first st, sc in next 5 sts, 2 sc in next 2 sts, sc in next 5 sts, slip st in next st.
Row 4: Ch 4, slip st in same place and in next st for big toe, [ch 3, slip st in same space and in next space] 4 times for 4 toes. Fasten off.
FINISHING
Following photo and using 1 strand of B, embroider mouth on Head with straight stitches. Sew on buttons for eyes. Embroider eye brows above eyes. For best results, lay tee-shirt flat and insert a piece of cardboard inside and smooth the shirt front. Referring to the photo, pin Skeleton pieces to upper middle portion of shirt. Arrange limbs as desired. Carefully hand-stitch pieces using matching thread, being careful not to pull the thread too tightly in order to prevent puckering.
Read NextCrochet Monster Baby Bibs
Your Recently Viewed Projects
JaneEK
Aug 18, 2017
I really like this project, but I dont see why you cant use a thicker yarn than the #10 crochet thread, especially since you have to double the #10 thread anyway. I worked up a sample of the leg and right foot using a D hook and baby yarn, and got pretty similar results. Just be sure to keep your stitches fairly tight like making an amigurumi. This is still a fiddly project though as theres a LOT of sewing involved when you attach it to a t-shirt.
Report Inappropriate Comment
Are you sure you would like to report this comment? It will be flagged for our moderators to take action.
Thank you for taking the time to improve the content on our site.

