Tutti Frutti Toddler Hat
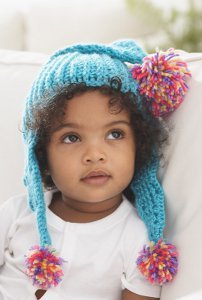
Multicolored pompoms make this cute crocheted hat perfect for any baby. The pattern directions for the Tutti Frutti Toddler Hat are written to fit a 12 month old, but could easily be adjusted for other ages. Four different colors of worsted weight yarn are needed to complete this free crochet pattern. It is worked in the round and the pompoms are tied on once the hat is crocheted. It measures approximately 16 inches in circumference and 10 inches tall, not including the ear flaps. *Thanks to user falascok 5952827 for helping us name this pattern!

Crochet HookH/8 or 5 mm hook
Yarn Weight(4) Medium Weight/Worsted Weight and Aran (16-20 stitches to 4 inches)
SIZE:
12 months
FINISHED MEASUREMENTS:
Hat measures approximately 16"/40.5cm circumference x 10 1/4"/26cm tall, unstretched and not including earflaps
MATERIALS:
-
Caron International's Simply Soft (100% Acrylic, 6 oz/170g, 315 yd/288 m):
#9608 Blue Mint (E): 1 skein
#9604 Watermelon (F): 1 skein
#9610 Grape (G): 1 skein
#9606 Lemonade (H): 1 skein
- One size US H-8 (5mm), or size to obtain gauge.
- Stitch markers
- Yarn needle
GAUGE
In Pompom Hat pattern, 18 sts and 12 rows = 4"/10cm.
STITCHES USED:
Chain (ch), double crochet (dc), half double crochet (hdc), single crochet (sc), slip stitch (sl st),
SPECIAL TERMS:
BPdc: Back-post double crochet—Yarn over, insert hook from back to front and then to back again around post of stitch, yarn over and draw up loop, complete as dc.
dc2tog: Double crochet 2 together—[Yarn over, insert hook in next stitch and draw up a loop, yarn over and draw through 2 loops on hook] twice, yarn over and draw through all 3 loops on hook.
dc3tog: Double crochet 3 together—[Yarn over, insert hook in next stitch and draw up a loop, yarn over and draw through 2 loops on hook] 3 times, yarn over and draw through all 4 loops on hook.
FPdc: Front-post double crochet—Yarn over, insert hook from front to back and then to front again around post of stitch, yarn over and draw up loop, complete as dc.
FPslst: Front-post slip stitch—Insert hook from front to back and then to front again around post of stitch, yarn over, complete as sl st.
hdc2tog: Half double crochet 2 together—[Yarn over, insert hook in next stitch and draw up a loop] twice, yarn over and draw through all 5 loops on hook.
SPECIAL TECHNIQUE
Adjustable-ring method—Wrap yarn into a ring, ensuring that the tail falls behind the working yarn. Grip ring and tail firmly between middle finger and thumb. Insert hook through center of ring, yarn over (with working yarn) and draw up a loop. Work stitches of first round in the ring. After the first round of stitches is worked, pull gently, but firmly, on tail to tighten ring.
NOTE
Hat is worked in rounds with RS facing throughout.
HAT
With E, ch 70. Taking care not to twist ch, join with sl st in first ch to form a ring.
Round 1: Ch 3 (counts as first dc here and throughout), dc in each remaining ch around; join with sl st in top of beginning ch—70 dc.
Rounds 2–4: Ch 3, BPdc around next dc, *FPdc around next dc, BPdc around next dc; repeat form * around; join with FPsl st around beginning ch.
Note: When working dc2tog in following rounds, work around the post of any post sts instead of into the top of the post sts.
Round 5: Ch 3, BPdc around next dc, [FPdc around next dc, BPdc around next dc] 5 times, dc2tog, *[FPdc around next dc, BPdc around next dc] 6 times, dc2tog; repeat from * around; join with FPslst around beginning ch—65 sts.
Round 6: Ch 3, BPdc around next dc, [FPdc around next dc, BPdc around next dc] 5 times, hdc in next st, *[FPdc around next dc, BPdc around next dc] 6 times, hdc in next st; repeat from * around; join with FPslst around beginning ch.
Round 7: Ch 3, BPdc around next dc, [FPdc around next dc, BPdc around next dc] 4 times, dc2tog, hdc in next st, *[FPdc around next dc, BPdc around next dc] 5 times, dc2tog, hdc in next st; repeat from * around; join with FPslst around beginning ch—60 sts.
Round 8: Ch 3, BPdc around next dc, [FPdc around next dc, BPdc around next dc] 4 times, hdc in next 2 sts, *[FPdc around next dc, BPdc around next dc] 5 times, hdc in next 2 sts; repeat from * around; join with FPslst around beginning ch.
Round 9: Ch 3, BPdc around next dc, [FPdc around next dc, BPdc around next dc] 3 times, dc2tog, hdc in next 2 sts, *[FPdc around next dc, BPdc around next dc] 4 times, dc2tog, hdc in next 2 sts; repeat from * around; join with FPslst around beginning ch—55 sts.
Round 10: Ch 3, BPdc around next dc, [FPdc around next dc, BPdc around next dc] 3 times, hdc in next 3 sts, *[FPdc around next dc, BPdc around next dc] 4 times, hdc in next 3 sts; repeat from * around; join with FPslst around beginning ch.
Round 11: Ch 3, BPdc around next dc, [FPdc around next dc, BPdc around next dc] twice, dc2tog, hdc in next 3 sts, *[FPdc around next dc, BPdc around next dc] 3 times, dc2tog, hdc in next 3 sts; repeat from * around; join with FPslst around beginning ch—50 sts.
Round 12: Ch 3, BPdc around next dc, [FPdc around next dc, BPdc around next dc] twice, hdc in next 4 sts, *[FPdc around next dc, BPdc around next dc] 3 times, hdc in next 4 sts; repeat from * around; join with FPslst around beginning ch.
Round 13: Ch 3, BPdc around next dc, FPdc around next dc, BPdc around next dc, dc2tog, hdc in next 4 sts, *[FPdc around next dc, BPdc around next dc] twice, dc2tog, hdc in next 4 sts; repeat from * around; join with FPslst around beginning ch—45 sts.
Round 14: Ch 3, BPdc around next dc, FPdc around next dc, BPdc around next dc, hdc in next 5 sts, *[FPdc around next dc, BPdc around next dc] twice, hdc in next 5 sts; repeat from * around; join with FPslst around beginning ch.
Round 15: Ch 3, BPdc around next dc, dc2tog, hdc in next 5 sts, *FPdc around next dc, BPdc around next dc, dc2tog, hdc in next 5 sts; repeat from * around; join with FPslst around beginning ch—40 sts.
Round 16: Ch 3, BPdc around next dc, hdc in next 6 sts, *FPdc around next dc, BPdc around next dc, hdc in next 6 sts; repeat from * around; join with FPslst around beginning ch.
Round 17: Ch 2 (does not count as a st), dc in next st, hdc in next 6 sts, *dc2tog, hdc in next 6 sts; repeat from * around; join with sl st in first dc—35 sts.
Round 18: Ch 2 (counts as hdc here and throughout), hdc in next 34 sts; join with sl st in top of beginning ch.
Round 19: Ch 2, hdc in next 4 sts, hdc2tog, *hdc in next 5 sts, hdc2tog; repeat from * around; join with sl st in top of beginning ch—30 sts.
Round 20: Ch 2, hdc in each remaining st around; join with sl st in top of beginning ch.
Round 21: Ch 2, hdc in next 3 sts, hdc2tog, *hdc in next 4 sts, hdc2tog; repeat from * around; join with sl st in top of beginning ch—25 sts.
Round 22: Ch 2, hdc in each remaining st around; join with sl st in top of beginning ch.
Round 23: Ch 2, hdc in next 2 sts, hdc2tog, *hdc in next 3 sts, hdc2tog; repeat from * around; join with sl st in top of beginning ch—20 sts.
Round 24: Ch 2, hdc in each remaining st around; join with sl st in top of beginning ch.
Round 25: Ch 2, hdc in next st, hdc2tog, *hdc in next 2 sts, hdc2tog; repeat from * around; join with sl st in top of beginning ch—15 sts.
Round 26: Ch 2, hdc in each remaining st around; join with sl st in top of beginning ch.
Round 27: Ch 2, hdc2tog, *hdc in next st, hdc2tog; repeat from * around; join with sl st in top of beginning ch—10 sts.
Round 28: Ch 2, hdc in each remaining st around; join with sl st in top of beginning ch.
Round 29: Ch 1, hdc in next st, [hdc2tog] 4 times; join with sl st in first hdc—5 sts.
Round 30: Ch 2, hdc in each remaining st around; join with sl st in top of beginning ch.
Fasten off.
Earflaps
With RS facing and working across opposite side of foundation ch of Hat, draw up a loop of E around base of any front post st.
Row 1 (RS): Ch 3 (counts as dc here and throughout), BPdc around next st, [FPdc around next st, BPdc in next st] 7 times, turn—16 sts.
Note: When working dc2tog in following rounds, work around the post of any post sts instead of into the top of the post sts.
Row 2: Ch 3, [BPdc around next st, FPdc around next st] 6 times, BPdc around next st, dc2tog, turn—15 sts.
Row 3: Ch 3, [FPdc around next st, BPdc around next st] 6 times, dc2tog, turn—14 sts.
Row 4: Ch 3, [FPdc around next st, BPdc around next st] 5 times, FPdc around next st, dc2tog, turn—13 sts.
Row 5: Ch 3, [BPdc around next st, FPdc around next st] 5 times, dc2tog, turn—12 sts.
Row 6: Ch 3, [BPdc around next st, FPdc around next st] 4 times, BPdc around next st, dc2tog, turn—11 sts.
Row 7: Ch 3, [FPdc around next st, BPdc around next st] 4 times, dc2tog, turn—10 sts.
Row 8: Ch 3, [FPdc around next st, BPdc around next st] 3 times, FPdc around next st, dc2tog, turn—9 sts.
Row 9: Ch 3, [BPdc around next st, FPdc around next st] 3 times, dc2tog, turn—8 sts.
Row 10: Ch 3, [BPdc around next st, FPdc around next st] 2 times, BPdc around next st, dc2tog, turn—7 sts.
Row 11: Ch 3, [FPdc around next st, BPdc around next st] 2 times, dc2tog, turn—6 sts.
Row 12: Ch 3, FPdc around next st, BPdc around next st, FPdc around next st, dc2tog, turn—5 sts.
Row 13: Ch 3, BPdc around next st, FPdc around next st, dc2tog, turn—4 sts.
Row 14: Ch 3, BPdc around next st, dc2tog, turn—3 sts.
Row 15: Ch 3, dc2tog, turn—2 sts.
Fasten off.
With RS facing, sk next 14 unworked sts of foundation ch of Hat (for back neck). Draw up a loop of E around next front post st. Work Rows 1–15 for 2nd Earflap, but do not fasten off.
Edging Round: Ch 1, sc evenly spaced around entire lower edge of Hat and Earflaps; join with sl st in first sc.
Fasten off.
Finishing
Use one strand each of F, G, and H held together when making pompoms. Following pompom maker package directions, make one 1 1/2"/4cm pompom for top of Hat, and make two 3/4"/2cm pompoms for ends of Earflaps. Tie larger pompom to top of Hat, tie one smaller pompom to end of each Earflap. Using yarn needle, weave in all ends.
Name the Pattern Contest Rules:
Contest open to US and Canada residents 18+
One comment/entry per person.
Contest closes July 26, 2013 at 11:59p CST.
Leave a comment on this pattern page to be entered to win.
Winner will be announced here and notified by email.
Read NextBunny Baby Crochet Hat Pattern
Your Recently Viewed Projects
JaneEK
Nov 30, 2017
When I see a complicated pattern like this and absolutely NO photos, Im really hesitant to even tackle it. I have a lot of trouble printing patterns out from the AllFreeCrochet site, so I usually either have to resort to cut and paste, or if Im lucky, I can find a download at the original site. Im not technically inclined to know how to fix this but it really does need to be addressed.
Marjoriemg
Jul 25, 2013
"Bouncing Pom Pom toddler hat" Looks super cute, can't wait to try it!!
marg63 4629070
Jul 25, 2013
I would name this pattern RAINBOW POMPOM HAT for the beautiful pompoms
mitri1 2161808
Jul 24, 2013
It is adorable, and will be loved by children and adults. Name: Angel Wings
martiewells19 7760 334
Jul 23, 2013
"Cotton Candy", because the colors remind me of the cotton candy we always got at the county fair.
marica47 2876557
Jul 23, 2013
I call it "Sky blue childhood" or "Blue butterfly on head, may be" Blue happiness".
Beth4life
Jul 22, 2013
I hope someone that can do this hat will have a tutorial to follow soon or I may never get the baby firework hat made.
Beth4life
Jul 22, 2013
The hat IS adorable. The child is even more adorable. What a cutie. I think you should name the hat ' Lil Miss Adorable OR 'Lil Snug in the Rug.
rdriggs 1792911
Jul 22, 2013
It reminds me of Smurfs. I would call it Elfin Magical Pom Pom hat.
bryld 6862855
Jul 22, 2013
The hat is sooo cute and put on the top of my crochet list - My name for the hat is 'AWESOME FIREWORKS'
iltillery 8638549
Jul 22, 2013
Adorable, my first thought was "Baby Court Jester hat" reminds me of a jesterrs hat.
dolart 4557489
Jul 22, 2013
My first thought when I saw this cap was "Pom de Pom-Pom" set to music of course.
DnDz mom
Jul 22, 2013
So cute! The pom poms remind me of the sprinkles you put on cookies or donuts. So, I would call it the Snowy Sprinkles hat.
lrobertson58 71825 69
Jul 22, 2013
Child's Hat with Three Balls Children love balls and this little hat has three to keep them interested! One at the end of the top and one on the end of each tie.
jeansalady
Jul 22, 2013
"Sparkle hat".. it's beautiful in blue makes the sparkles come out. I love it.. was going to get the pattern. And I know I will. Jeanne Houston
achavestie 5044405
Jul 22, 2013
Love the colors. Confetti hat would be my name for the hat. It has the fun that you get when playing with it.
crochet 4620010
Jul 22, 2013
neat hat will make it for my great-great niece and call Angel Hat
huntress711 347223 6
Jul 22, 2013
The poms remind me of July 4th so suggest Liberty Poms for a name
happy hooker72
Jul 22, 2013
I would call this adorable hat Pom Pom Precious, the name having been inspired by the child wearing it.
undomesticgoddess 5093326
Jul 22, 2013
Pom Kerchief Hat--reminds me of T'was the night before christmas...
sagearwen
Jul 22, 2013
when I saw the picture of this cute hat I saw a little Ice Fairy in a cute cap so my suggested name is "Ice Fairy Cap"
Lexi9
Jul 22, 2013
Call it "Little Bobbkey" which is an Eastern European affectionate term for the pompoms and, by extension, the little head that goes into the hat with the pompoms.
nanapaulagallant 2 842250
Jul 22, 2013
Very cool! Should be called"crazy confetti cap for kids"! Thanks!
Member 0127681
Jul 22, 2013
I like "Oops upside your head" which is also the name of a song...so, scratch that...and try Head Blankie
yomomma1933
Jul 22, 2013
Adorable little girl and the cap is darling...It reminds me of "fireworks" with the burst of color and the bluish sky behind.
Report Inappropriate Comment
Are you sure you would like to report this comment? It will be flagged for our moderators to take action.
Thank you for taking the time to improve the content on our site.

