How to Read Crochet Diagrams
Understanding crochet diagrams can seem difficult but not with this page! We have all the help you need.
Unlike crochet patterns, which use words and abbreviations to explain the design, crochet diagrams involve symbols, letters, colors, and other illustrated elements to explain a pattern without words.
This type of schematic can look intimidating but it's oftentimes less complicated than crochet patterns.
It all depends on what kind of learner you are. If you have more visual and spatial sense, than you may prefer crochet diagrams to crochet patterns.
Some designs actually have both a pattern and a diagram, too, or diagrams for certain aspects of the piece. Learn How to Read Crochet Diagrams with this guide.
This page will go over the types of diagrams, the symbols, and understanding it all. You'll be able to master diagrams in no time after reading everything we have for you here.
We even have a free infographic with symbols for you to download! Simply scroll down and get it to help you along. This is a helpful resource on crochet diagrams for beginners.
Crochet Symbols Chart
Before looking at crochet diagrams, it's vital to understand the symbols you will be seeing. Some diagrams come with a symbol key, however, many don't. You cannot understand most diagrams without first knowing what the symbols mean. Below, we have a chart with the symbols and what they mean. It's easy to learn how to read crochet charts with this PDF.
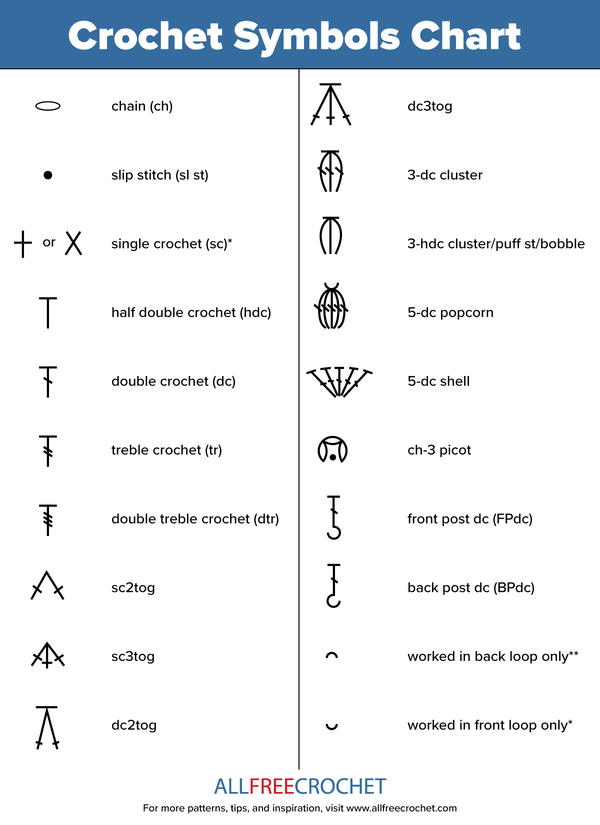
Click the button to download your own PDF of this chart. Keep this close on your computer or print it out as you start your diagram adventure because it will be a lifesaver.
If you look at the chart, you will see many stitches and actions you understand if you've been crocheting. If you're a beginner or need a refresher, check out our page, Crochet Abbreviations Explained.
Crochet Symbols Decoded
For further explanation, we'll quickly go over these common symbols and what they mean. Not that a diagram may have slightly different versions of what you see in the chart above but most are very close to what's shown.
Starting at the top of the left column and going down:
- The chain stitch (CH) is usually shown as a horizontal oval shape. This is the base set of stitches for most patterns.
- A slip stitch (sl st) is used to connect stitches and is usually shown as a back/colored dot, filled-in oval, or a dash.
- Single crochet (sc) is a basic crochet stitch that is shown as a cross or X on a crochet diagram.
- The half double crochet (hdc) is another basic stitch and is shown as a T shape.
- The double crochet (dc) is another basic stitch and is shown as a T shape with one short diagonal line through the vertical part of the symbol.
- The treble/triple crochet (tr) is another basic stitch and is shown as a T shape with two short diagonal lines through the vertical part of the symbol.
- The double treble/triple crochet (dtr) is a stitch that is shown as a T shape with three short diagonal lines through the vertical part of the symbol.
- Sc2tog means to single crochet 2 stitches together. The symbol for this looks like an isosceles triangle without the bottom. There is a short diagonal line going through each of the two sides.
- Sc3tog means to single crochet 3 stitches together. The symbol for this also looks like an isosceles triangle without the bottom but with a straight line in the middle. There is a short diagonal line going through each of the three sides.
- Dc2tog means to double crochet 2 stitches together. The symbol for this looks like a taller isosceles triangle without the bottom. There is a short diagonal line going through each of the two sides and a horizontal line across the top where the two points meet.
- Dc3tog means to double crochet 3 stitches together. The symbol for this looks like a taller isosceles triangle without the bottom but with a straight line in the middle. There is a short diagonal line going through each of the three sides and a horizontal line across the top where the three points meet.
- 3-dc cluster is a 3 double crochet cluster stitch. The symbol for this is a line curving inward on the left and the opposite on the right. There is also a straight line in the middle and a horizontal line at the top where the three meet. There is a short diagonal line through each of the three lines.
- 3-hdc cluster/puff st/bobble is a 3 half double crochet cluster, puff, or bobble stitch (your pattern should clarify which). The symbol for this is the same as the 3-dc cluster above but without the short diagonal lines.
- 5-dc popcorn is the 5 double crochet popcorn stitch. The symbol for this shows two lines curving inward on the left and the opposite on the right. There is also a straight line in the middle and a horizontal upward curved line at the top where the five meet. There is a short diagonal line through each of the five lines. It looks similar to a piece of popcorn.
- The 5-dc shell is for a 5 double crochet shell stitch. The symbol resembles a shell with five straight lines, two angled outward on the left and two angled outward on the right with a straight vertical line in the middle. Each has a horizontal line at the top and short diagonal lines through them.
- Ch-3 picot is a chain 3 picot stitch. It looks like three leaf shapes connect to make a circle that doesn't connect at the bottom. There's also a black/colored dot near the bottom/inside.
- The front post dc (FPdc) is a front post double crochet. This looks like a straight vertical line with a hook at the bottom facing left. There is a horizontal line at the top and a short diagonal line through the vertical line of the symbol.
- The back post dc (BPdc) is a back post double crochet. This looks like a straight vertical line with a hook at the bottom facing right. There is a horizontal line at the top and a short diagonal line through the vertical line of the symbol.
- The term worked in back loop only is shown as a small downward curve.
- The term worked in front loop only is shown as a small upward curve.
Types of Crochet Diagrams
Now we are going to go over the different types of diagrams you'll see in crochet. A normal crochet diagram can include the entire pattern or a part of the pattern that has complicated changes.
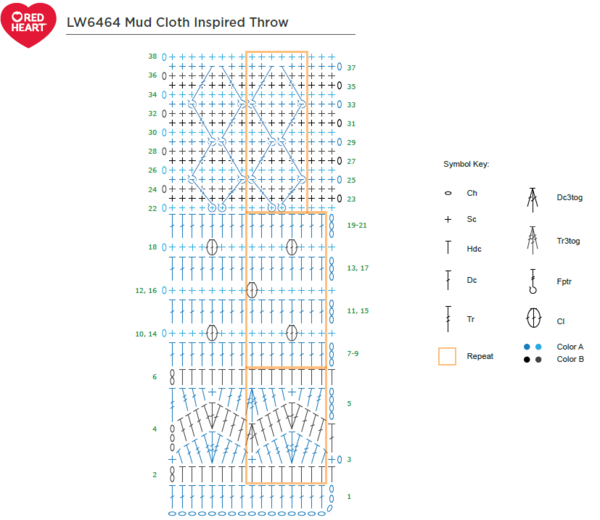
Below is Red Heart's Mud Cloth Inspired Throw diagram. As you can see, it includes a symbol key to make understanding the diagram easier.
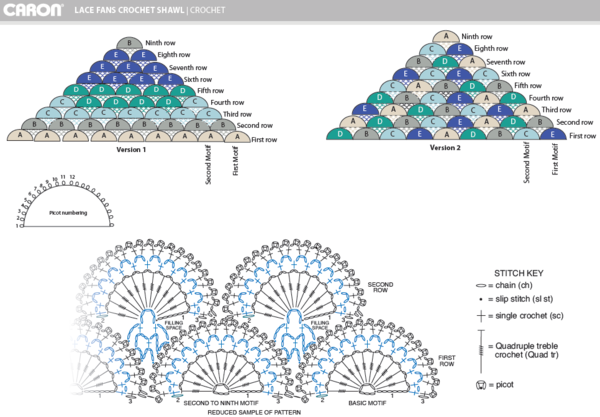
Below is the diagram for the Lace Fans Crochet Shawl from Caron. Along with the stitch key, it shows the two different versions, the picot numbering, and the motifs.
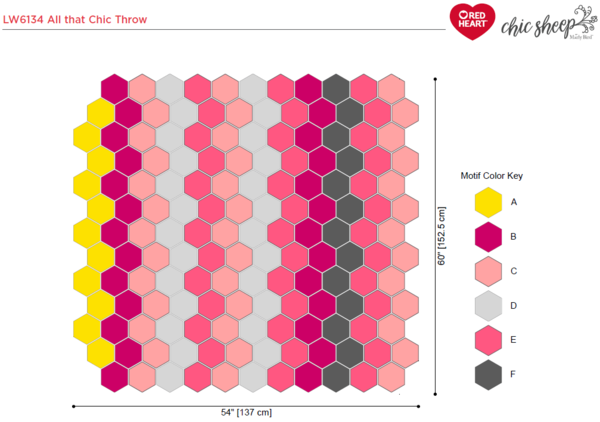
Speaking of motifs, there are also diagrams that simply show the color pattern. Below, you can see this from Red Heart's All That Chic Throw pattern.
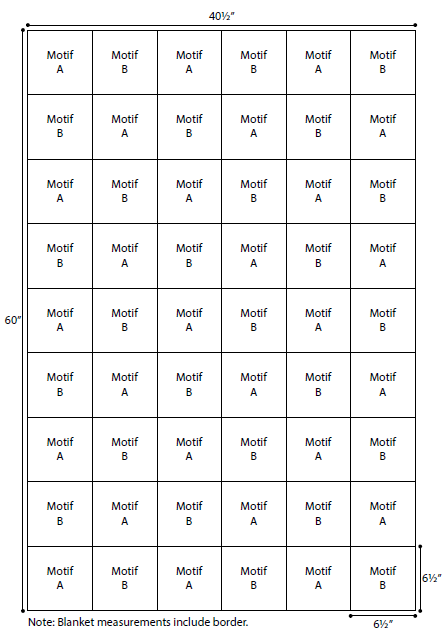
Similar to motif diagrams, assembly diagrams are used to help you assemble the pieces in the correct order and colors. They are often numbered, lettered, colored, or labeled in another clear way to show how it all goes together. Below, the Citrus Smoothie Throw from Red Heart shows the motif organization along with the finished size of the blanket.
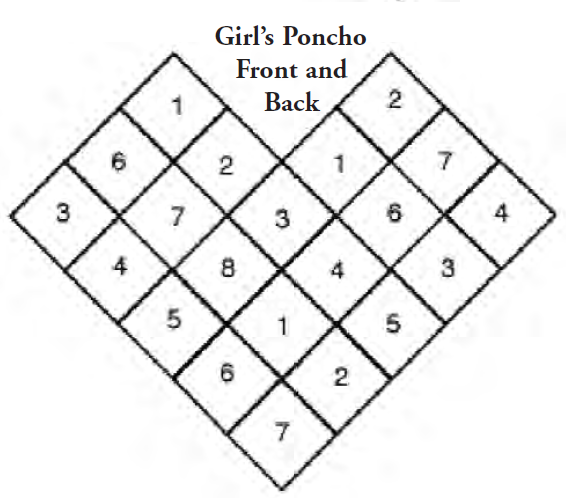
Here's another example. Bernat's Poncho Set shows several diagrams for the granny square assembly to create the ponho.
How to Read Crochet Diagrams
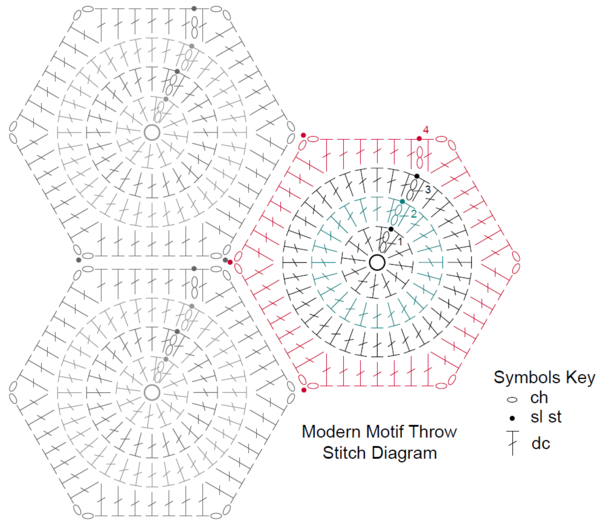
The best way to explain how to read a crochet diagram is to walk through a pattern. For this, we'll use the All That Chic Throw that was mentioned earlier. If you look at the diagram below, you will see three hexagons, which are the motifs for this pattern. It's an intermediate pattern but as you can see mostly uses the double crochet with slip stitches and the chains.
The majority of the pattern is double crochet as you can see with the T shape symbol in all four rows. At each corner of the hexagon, you will have two chains (oval symbol). In the top right of each hexagon, you will see a trail of chains and slip stitches, which are used to connect the hexagons. The colors on the right hexagon represent the rounds.
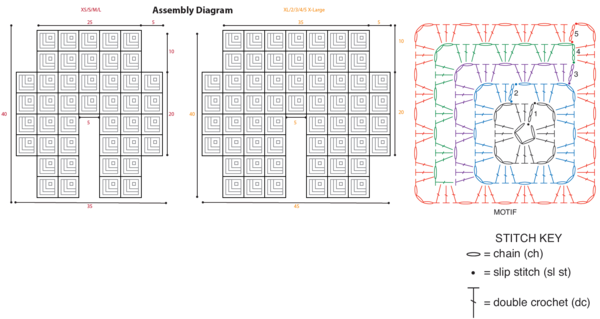
Let's explain one more example. This is for Caron's Crochet Kimono Cardigan. This pattern includes an assembly diagram and the motif stitches. As you can see, the XS/S/M/L diagram is on the left and the XL/2/3/4/5 X-Large diagram in the middle. These two diagrams also include numbers around the diagram. These numbers represent inches so when you measure your kimono, it should match what's shown.
On the right, you see the motif diagram. The colors represent the rounds. The corners show three chains and then the pattern alternates double crochets and chains. You'll also see three chains going down each round with slip stitches on either end (these are mostly on the right side), which is the process you use to connect the shape.
BONUS! The Crochet Crowd Diagram Video Tutorial
Our friend Mikey from The Crochet Crowd has an amazing and detailed video on how to read diagrams. Take a look:
Up Next:
Learn more beginner crochet tips >>>
What else do you want to know about crochet diagrams?
Let us know in the comments below and we'll add it to the page.
Report Inappropriate Comment
Are you sure you would like to report this comment? It will be flagged for our moderators to take action.
Thank you for taking the time to improve the content on our site.

