Crochet Pineapple Stitch Tutorial
Make beautiful vintage pineapple crochet patterns once you learn the pineapple stitch!
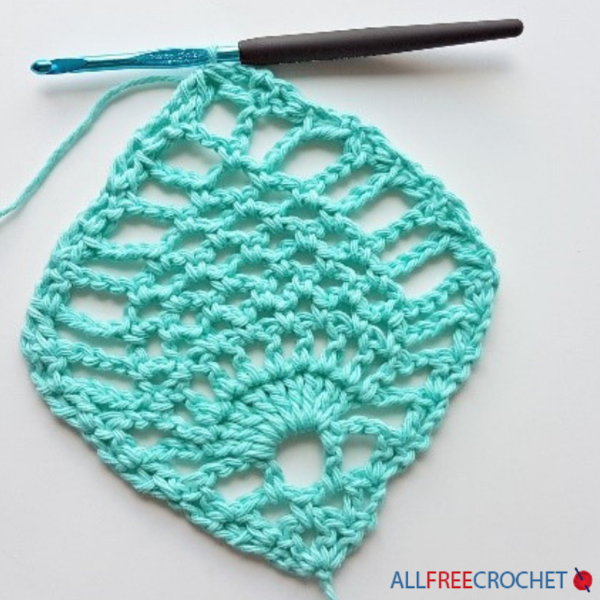
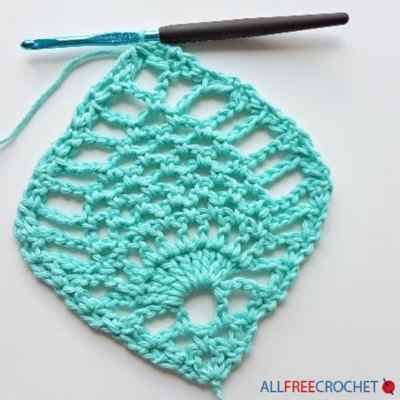
We love the pineapple crochet stitch because it is one of the most unique and beautiful of them all. Learn how to crochet a pineapple stitch with this full tutorial from Rhondda from Oombawka Designs. This tutorial is detailed and includes comprehensive images for each step.
We all know how helpful having images with the instructions are for any level of crochet.
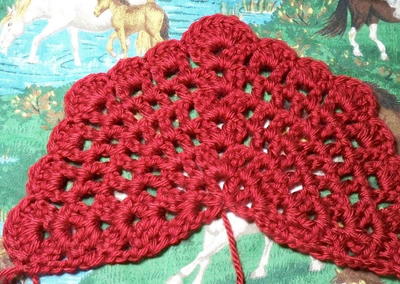
Once you go through our Crochet Pineapple Stitch Tutorial, you will be able to practice this new stitch and create the most amazing pieces of crochet imaginable. One of the reasons we love this crochet stitch is that this vintage version actually resembles a pineapple.
There are a few different versions of this stitch but you can't beat the artistic look of this variant.
This tutorial was written by Rhondda Mol from Oombawka Design Crochet. Visit her site for lots of tips for beginners, crochet tutorials, free patterns, round-ups, and more!
PLUS! If you're a visual learner, then watch this pineapple stitch crochet video tutorial right below from Heidi Gustad. It will show you how to make the movements in real time, which is always helpful when learning a new stitch.

Crochet HookH/8 or 5 mm hook
Yarn Weight(4) Medium Weight/Worsted Weight and Aran (16-20 stitches to 4 inches)
Materials List
- Yarn of choice
- Crochet hook suggested by yarn label or size of choice
Crochet Pineapple Stitch
Abbreviations:
US Terminology used
ch - chain
ch2sp - chain 2 space
ch3sp - chain 3 space
ch4sp - chain 4 space
dc - double crochet
dc2tog - double crochet 2 together
dc3tog - double crochet 3 together
dc4tog - double crochet 4 together
sc - single crochet
sk - skip
sl st - slip stitch
st - stitch
sts - stitches
( ) a set of stitches to be worked in a single stitch or space.
( ) at the end of the row includes the total stitches in the row
*-** repeat the instructions between the * and ** as indicated
Notes:
- Ch 3 at the beg of a row counts as 1 dc.
- Sl st does not count as a stitch and you do not work into it.
How to Crochet Pineapple Stitch:
This project is crocheted back and forth in rows, from the bottom point to the top point. If you would like to add an optional edging it has been included at the end of the post. The optional edging is worked in joined rounds.
-
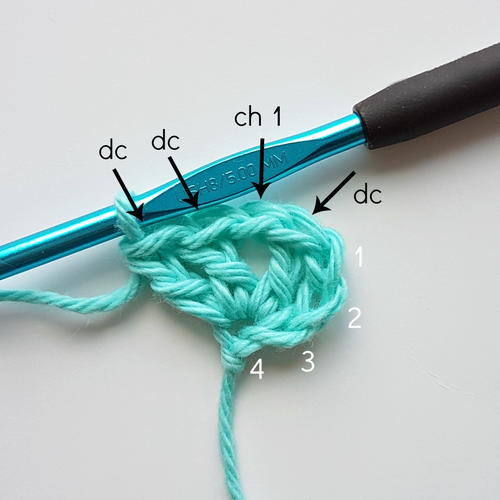
R1: Ch 4 [counts as 1 dc and 1 foundation ch]. Work (1 dc, ch 1, 2 dc) in the fourth ch from the hook. Turn. (2 dc, ch 1, 2 dc)
-
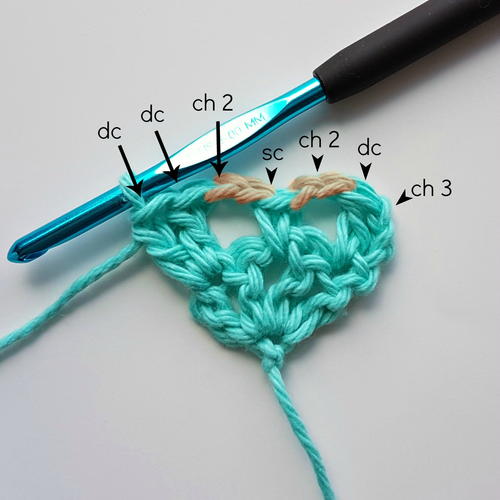
R2: Ch 3 [counts as 1 dc], 1 dc in the first dc, ch 2, sk the next dc, 1 sc in the ch1sp, ch 2, sk the next dc, 2 dc in the last dc. Turn. (1 sc, 4 dc, 2 ch2sp)
-
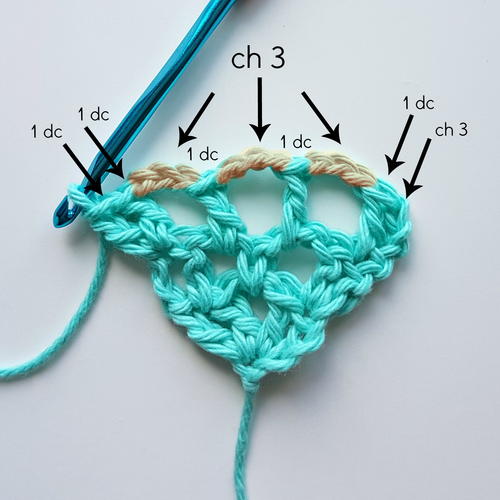
R3: Ch 3, 1 dc in the first dc, ch 3, sk the next dc, 1 dc in the next ch2sp, ch 3, sk the next sc, 1 dc in the next ch2sp, ch 3, sk the next dc, 2 dc in the last dc. Turn. (6 dc, 3 ch3sp)
-
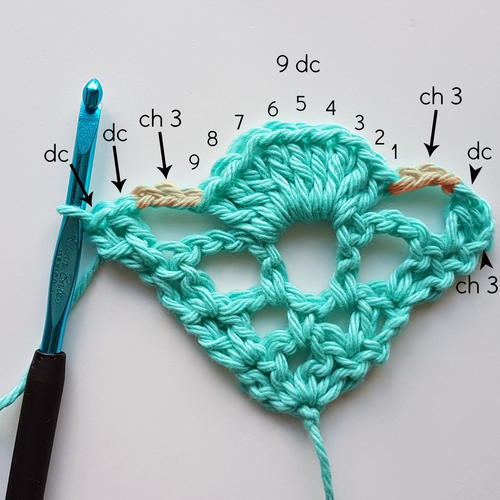
R4: Ch 3, 1 dc in the first dc, ch 3, sk the next dc, sk the next ch3sp, sk the next dc, 9 dc in the ch3sp, ch 3, sk the next dc, sk the ch3sp, sk the next dc, 2 dc in the last dc. Turn. (13 dc, 2 ch3sp)
-
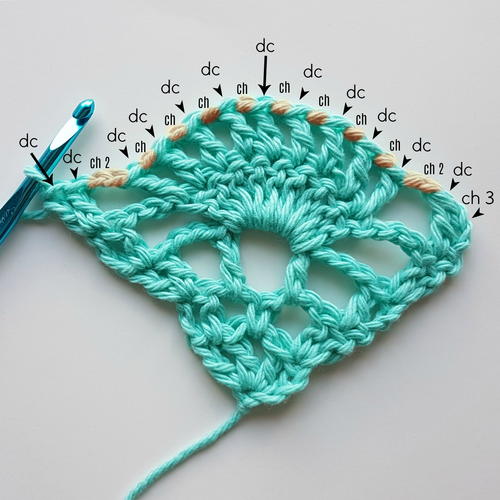
R5: Ch 3, 1 dc in the first dc, ch 2, sk the next dc, sk the next ch3sp, 1 dc in the next dc, *ch 1, 1 dc in the next dc**. Rep from * to ** 8 times. Ch 2, sk the next ch3sp, sk the next dc, 2 dc in the last dc. Turn. (13 dc, 8 ch1sp, 2 ch2sp)
-
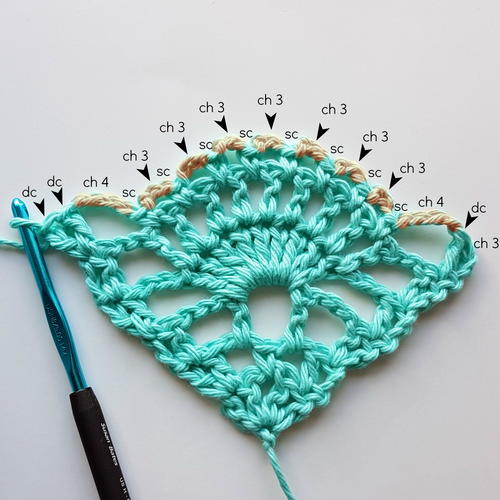
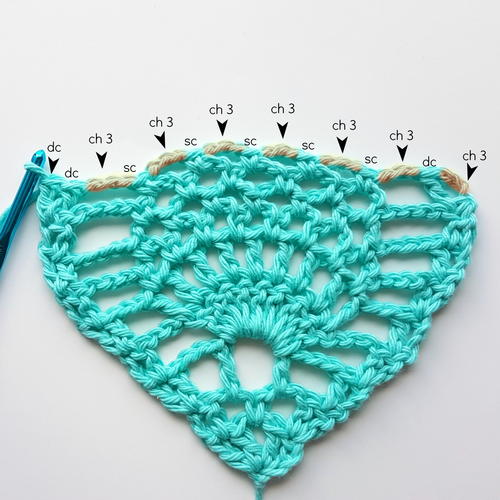
R6: Ch 3, 1 dc in the first dc, ch 4, sk the next dc, sk the ch2sp, sk the next dc, 1 sc in the next ch1sp, *ch 3, sk the next dc, 1 sc in the next ch1sp**. Rep from * to ** 7 times. Ch 4, sk the next dc, sk the ch2sp, sk the next dc, 2 dc in the last dc. Turn. (8 sc, 4 dc, 7 ch3sp, 2 ch4sp)
-
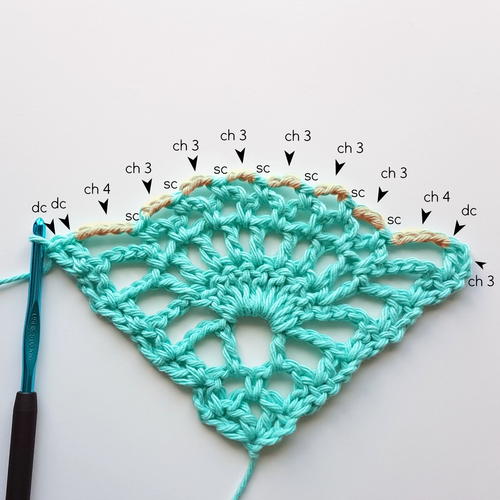
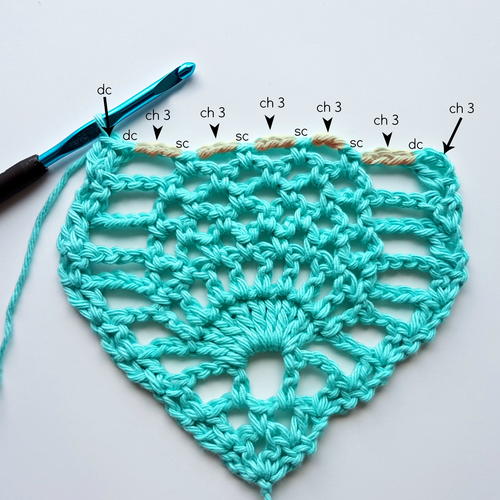
R7: Ch 3, 1 dc in the first dc, ch 4, sk the next dc, sk the next ch4sp, sk the next sc, 1 sc in the next ch3sp, *ch 3, sk the next sc, 1 sc in the next ch3sp**. Rep from * to ** 6 times. Ch 4, sk the next sc, sk the next ch4sp, sk the next dc, 2 dc in the last dc. Turn. (7 sc, 4 dc, 6 ch3sp, 2 ch4sp)
-
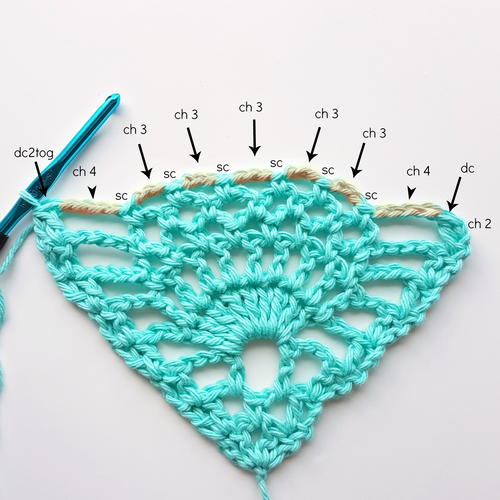
R8: (Ch 2, 1 dc) in the first dc [together counts as 1 dc2tog]. Ch 4, sk the next dc, sk the next ch4sp, sk the next sc, 1 sc in the next ch3sp, *ch 3, sk the next sc, 1 sc in the next ch3sp**. Rep from * to ** 5 times. Ch 4, sk the next sc, sk the next ch4sp, dc2tog. Turn. (6 sc, 2 dc, 5 ch3sp, 2 ch4sp)
-
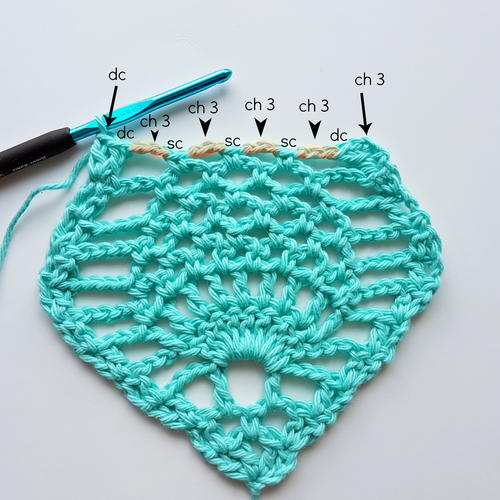
R9: Ch 3, 1 dc in the first dc, ch 3, sk the next ch4sp, sk the next sc, 1 sc in the next ch3sp, *ch 3, sk the next sc, 1 sc in the next ch3sp**. Rep from * to ** 4 times. Ch 3, sk the next sc, sk the next ch4sp, 2 dc in last dc. Turn. (5 sc, 4 dc, 6 ch3sp)
-
R10: Ch 3, 1 dc in the first dc, ch 3, sk the next dc, sk the next ch3sp, sk the next sc, 1 sc in the next ch3sp, *ch 3, sk the next sc, 1 sc in the next ch3sp**. Rep from * to ** 3 times. Ch 3, sk the next sc, sk the next ch3sp, sk the next dc, 2 dc in the last dc. Turn. (4 sc, 4 dc, 5 ch3sp)
-
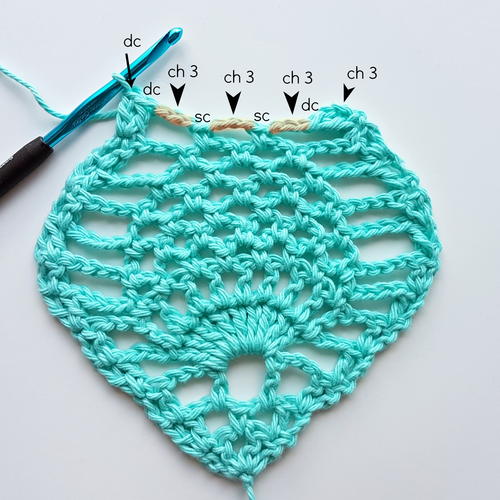
R11: Ch 3, 1 dc in the first dc, ch 3, sk the next dc, sk the ch3sp, sk the next sc, 1 sc in the next ch3sp, *ch 3, sk the next sc, 1 sc in the next ch3sp**. Rep from * to ** 2 times. Ch 3, sk the next sc, sk the next ch3sp, sk the next dc, 2 dc in the last dc. Turn. (3 sc, 4 dc, 4 ch3sp)
-
R12: Ch 3, 1 dc in the first dc, ch 3, sk the next dc, sk the ch3sp, sk the next sc, 1 sc in the next ch3sp, ch 3, sk the next sc, 1 sc in the next ch3sp. Ch 3, sk the next sc, sk the next ch3sp, sk the next dc, 2 dc in the last dc. Turn. (2 sc, 4 dc, 3 ch3sp)
-
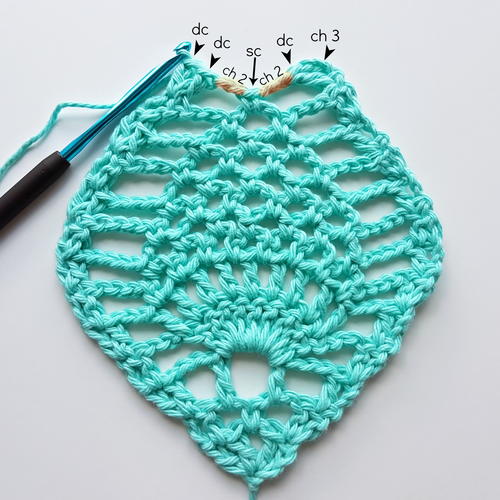
R13: Ch 3, 1 dc in the first dc, ch 2, sk the next dc, sk the ch3sp, sk the next sc, 1 sc in the next ch3sp, ch 2, sk the next sc, sk the next ch3sp, sk the next dc, 2 dc in the last dc. Turn. (1 sc, 4 dc, 2 ch2sp)
-
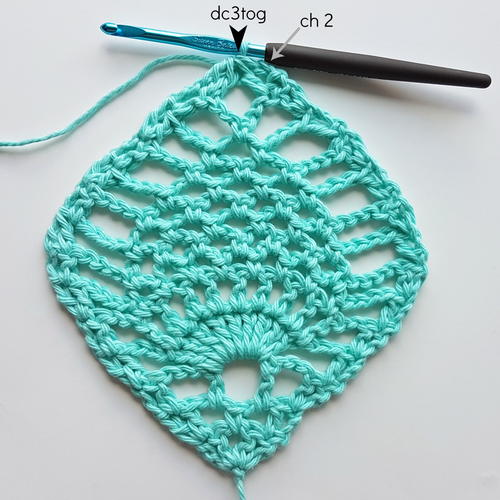
R14: (Ch 2, dc3tog) [together counts as dc4tog], sk the next ch2sp, sk the next sc, sk the next ch2sp. (1 dc)
How to Crochet Pineapple Stitch Edging (Optional):
-
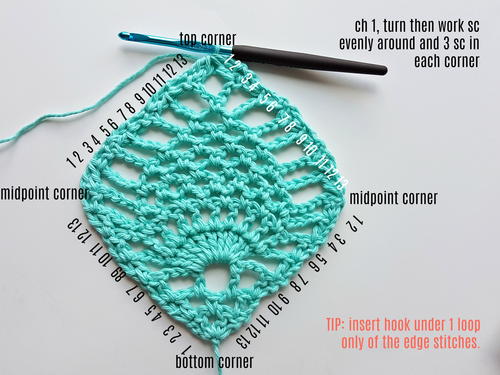
Ch 1, turn.
-
You will be working sc stitches evenly across the edges of the rows. I worked approximately 2 sc for every dc edge.
Round 1: Work 13 sc evenly across to the midpoint, 3 sc in the next edge, work 13 sc evenly to the bottom corner. 3 sc in the bottom corner. Work 13 sc evenly across to the other midpoint, 3 sc in the next edge, work 13 sc evenly to the top corner, 2 sc in the corner. Sl st to the first sc to join, ch 1, turn. (64)
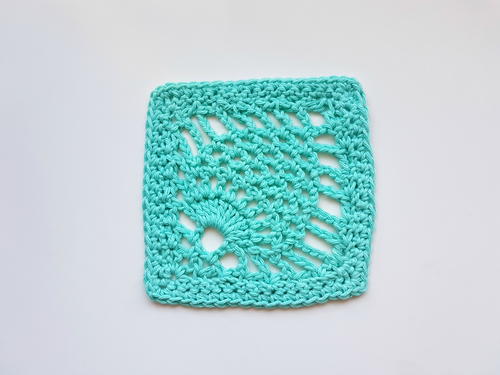
Round 2: 1 sc in the first sc, (1 sc, ch 1, 1 sc) in the next sc [top corner], 1 sc in each of the next 15 sc, (1 sc, ch 1, 1 sc) in the next sc [midpoint corner], 1 sc in each of the next 15 sc, (1 sc, ch 1, 1 sc) in the next sc [bottom corner], 1 sc in each of the next 15 sc, (1 sc, ch 1, 1 sc) in the next sc [midpoint corner], 1 sc in each of the next 14 sc. Finish off and weave in your ends. (72)
Crochet Pineapple Stitch Tutorial Printable PDF
Want to save this pattern for later or print it out in an easy-to-follow format? Get our free printable PDF.
Click Here to Download
the Crochet Pineapple Stitch Tutorial PDF
How to Print the PDF:
Printing this is as easy as 1-2-3! If you're not familiar with printing PDFs, here's the step-by-step, along with a few tips.
- Click the red button right above this section that reads, "Click Here to Download the Crochet Pineapple Stitch Tutorial PDF". Or, just click this link here to download.
- Find and open the PDF.
Pro tip: You may see the download appear at the bottom of your browser window, and you can open it from there. Or check wherever your downloads are set to save to (the Downloads folder is often a default location).
- Click the "Print File" button, choose the printer, choose how many copies you want, make any additional adjustments needed for personal preference, and click the "Print" button.
- Grab your hook, yarn, any other supplies needed, and you'll be ready to crochet this beauty!
Up Next
Looking for more? Sign up for one (or more) of our awesome free newsletters!
What do you think of this crochet pineapple stitch tutorial?
Your Recently Viewed Projects
flowergirl
Oct 23, 2018
Talk about a well detailed tutorial. Even in the step by step pictures there's some more help so you don't get a different result. I followed this tutorial religiously, I loved this stitch but I didn't know it was this cool.
mulberrygalprinces s
Oct 08, 2018
Th d pineapple stitch is a classic. It's been around since before I was born. It's the first pattern my grand mother taught me. She used it for table cloths and be d spreads. This is an excellent project. It's written in a way that is easy to understand and follow.
Report Inappropriate Comment
Are you sure you would like to report this comment? It will be flagged for our moderators to take action.
Thank you for taking the time to improve the content on our site.

