Aqua Dream Lace Topper
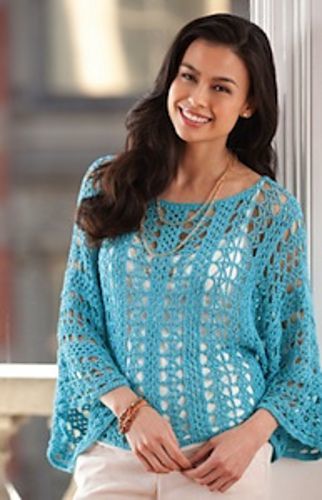
Ladies, this is a beautiful pattern to add to your wardrobe. Use any color bamboo thread to complete this free crochet pattern. The Aqua Dream Lace Topper is ideal for any time of the year. Wear it over a tank top in the summer months and over a long sleeved top in the winter. Red Heart's Aunt Lydia crochet thread is perfect for this pattern. Thanks to GalSmiley for her great name suggestion of Aqua Dream Lace Topper!

Crochet HookE/4 or 3.5 mm hook
Yarn Weight(0) Lace (33-40 stitches to 4 inches). Includes crochet thread.
SUPPLIES:
- AUNT LYDIA’S® Iced BambooTM: 7 (10) balls 3501 Aqua Ice.
- Crochet Hook: 3.5mm [US E-4].
- Stitch holder or safety pin
- Yarn needle
- Chart
SIZE:
Directions are for size Small/Medium; changes for size Large/XLarge are in parentheses.
Finished Waist: 30 (35)” Finished Length: 20 (23)”
GAUGE: 20 sts = 4”; 13 rows = 4” in patterns. CHECK YOUR GAUGE. Use any size hook to obtain the gauge.
UPDATE 5/5/14: The instructions for the Topper begin at the heading “TOP”. The Topper begins at the edge of one sleeve and is worked across to the other sleeve. You will find the foundation row (foundation single crochet) at the beginning of the first “Sleeve” section following the heading “TOP”.
Special Stitches
Fsc (foundation single crochet) =
First St: Ch 2, insert hook under top 2 strands of first ch, yarn over, draw up a loop, yarn over, draw through 1 loop, yarn over, draw through both loops (first fsc complete).
Remaining sts: Insert hook under both loops of previous st, yarn over, draw up a loop, yarn over, draw through 1 loop, yarn over, draw through both loops. sc2tog = [Draw up a loop in next st] 2 times, yarn over and draw through all 3 loops on hook.
Pattern Stitches
Lace Panel (multiple of 5 sts + 3)
Row 1: Ch 1, sc in first 2 sc, *ch 6, skip next 4 sc, sc in next sc; repeat from * to last sc, sc in last sc, turn.
Row 2: Ch 1, dc in first 2 sc, *ch 2, sc in next ch-6 space, ch 2, dc in next sc; repeat from * to last sc, dc in last sc, turn.
Row 3: Ch 1, dc in first 2 dc, *ch 4, slip st in next sc, ch 4, dc in next dc; repeat from * to last dc, dc in last dc, turn.
Row 4: Ch 1, sc in first 2 dc, *ch 4, sc in next dc; repeat from * to last dc, sc in last dc, turn.
Row 5: Ch 1, sc in first 2 sc, *ch 6, sc in next sc; repeat from * to last sc, sc in last sc, turn.
Rows 6–8: Repeat Rows 2–4.
Solid Panel
Note: Row 1 is worked over a multiple of 5 sts + 3. Rows 2–4 are the solid panel pattern which is a multiple of 3 sts + 2. Row 5 produces a multiple of 5 sts + 3 in preparation for working the Lace Panel.
Row 1: Ch 1, sc in first 2 sc, *4 sc in next ch-4 space, sc in next sc; repeat from * to last sc, 2 sc in last sc, turn.
Row 2: Ch 1, hdc in first 2 sc, *ch 1, skip next sc, hdc in next 2 sc; repeat from * across, turn.
Row 3: Ch 1, hdc in first 2 hdc, 2 hdc in next ch-1 space, *ch 1, skip next 2 hdc, 2 hdc in next ch-1 space; repeat from * to last 2 hdc, hdc in last 2 hdc, turn.
Row 4: Ch 1, hdc in first 2 hdc, ch 1, skip next 2 hdc, *2 hdc in next ch-1 space, ch 1, skip next 2 hdc; repeat from * to last 2 hdc, hdc in last 2 hdc, turn.
Row 5: Ch 1, sc in first hdc, skip next hdc, sc in next ch-1 space, *sc in next 2 hdc, sc in next ch-1 space; repeat from * to last 2 hdc, sc in last 2 hdc.
Notes
1. Top is intended to be oversized and flowy. The most important measurement is the waist. Make sure the top fits your waist as desired.
2. Top is worked in one piece, from side-to-side, beginning at one sleeve edge and ending at the other sleeve edge.
DIRECTIONS:
TOP
Sleeve
Fsc 133, turn.
Set-Up Row: Ch 1, sc in each Fsc across.
Rows 1–8: Work Rows 1–8 of Lace Panel pattern—26 pattern repeats.
Rows 9–13: Work Rows 1–5 of Solid Panel pattern.
Rows 14–26: Repeat Rows 1–13. Note: If a longer sleeve is desired, repeat Rows 1–13 one more time.
Rows 27–34: Work Rows 1–8 of Lace Panel pattern.
Add Stitches for Sides
Set sleeve aside, but do not fasten off.
With new ball of yarn, Fsc 36 (51). Do not remove last loop from hook. Cut yarn leaving a long tail for weaving in later. Pick up sleeve and yarn attached to sleeve.
Row 1: Working across last row of sleeve sts, sc2tog, 4 sc in next ch-4 space, *sc in next sc, 4 sc in next ch-4 space; repeat from * to last 2 sc, sc2tog, Fsc 36 (51), turn—203 (233) sc.
Rows 2–5: Work Rows 2–5 of Solid Lace Panel pattern.
Rows 6–9: Work Rows 1-4 of Lace Panel pattern—40 (46) pattern repeats.
Divide for Front and Back
Front
Row 1: Sc in first 2 sc, [ch 6, sc in next sc] 18 (21) times, sc in next ch-4 space, turn; leave remaining sts unworked for neck and back—18 (21) pattern repeats.
Rows 2–4: Work Rows 6–8 of Lace Panel pattern.
Row 5: Ch1, 2 sc in first sc, sc in next sc, *4 sc in next
ch-4 space, sc in next sc; repeat from * to last sc, 2 sc in
last sc, turn—95 (110) sts.
Rows 6–9: Work Rows 2–5 of Solid Panel pattern.
Rows 10–13 (17): Work Rows 1–4 (8) of Lace Panel pattern.
Row 14 (18): Repeat Row 5—95 (110) sts..
Rows 15 (19)–18 (22): Work Rows 2–5 of Solid Panel pattern.
Rows 19 (23)–27 (35): Repeat Rows 10–18 (22).
Rows 28–30 (38): Work Rows 1–3 of Lace Panel pattern.
Place last loop on a stitch holder or safety pin.
Back
Row 1: Skip next 2 unworked ch-4 spaces following front, join new ball of yarn with sc in next ch-4 space, sc in next sc, *ch 6, sc in next sc; repeat from * to last sc, sc in last sc, turn.
Rows 2–30 (38): Work same as Rows 2–30 (38) of front. Fasten off.
Join Front and Back
Place loop attached to front (on holder) back on hook.
Row 1: Ch 1, sc in first 2 dc, *ch 4, sc in next dc; repeat from * across to last 2 sts of front, sc2tog, ch 19 (for neck edge), sc2tog in first 2 dc of back, **ch 4, sc in next dc; repeat from ** across to last dc, sc in last dc, turn.
Row 2: Ch 1, sc in first 2 sc, *ch 6, sc in next sc; repeat from * to ch-19 space, [ch 6, skip next 4 ch, sc in next ch] 3 times, ch 6, skip last 4 ch, sc in next sc, **ch 6, sc in next sc; repeat from ** to last sc, sc in last sc, turn.
Rows 3–5: Work Rows 6–8 of Lace Panel pattern.
Rows 6–10: Work Rows 1–5 of Solid Panel pattern.
Begin Second Sleeve
Row 1: Ch 1, sc in first 37 (52) sc, [ch 6, skip next 4 sc, sc in next sc] 26 times, sc in each sc to end of row, turn. Fasten off.
Row 2: Skip first 35 (50) sc, join yarn with sl st in next sc, ch 1, dc in same sc as join, dc in next sc, [ch 2, sc in next ch-6 space, ch 2, dc in next sc] 26 times, dc in next sc, turn; leave remaining sts unworked.
Rows 3–8: Work Rows 3–8 of Lace Panel pattern.
Rows 9–13: Work Rows 1–5 of Solid Panel pattern.
Rows 14–21: Work Rows 1–8 of Lace Panel pattern.
Rows 22–35: Repeat Rows 9–21. Note: If a longer sleeve is desired, repeat Rows 8–21 one more time.
Rows 36 and 37: Ch 1, sc in each sc across, turn. Fasten off.
FINISHING
Fold piece across shoulder line. Sew side and sleeve seams.
Neck Edging
Round 1 (Right Side): With Right Side facing join yarn in neck edge, in ch-space about 9 sts before shoulder line, work sc evenly spaced around neck edging (working 2 sc in each ch-space and sc in each sc); join with slip st in first sc.
Round 2: Ch 1, [sc in next sc, sc2tog] 6 times (to decrease over shoulder), sc in each sc to about 9 sts before next shoulder, [sc2tog, sc in next sc] 6 times, sc in each remaining sc around; join with slip st in first sc. Fasten off.
Check out Red Heart's company profile and other great patterns!
Read NextTelegraph Shawl
Your Recently Viewed Projects
mulberrygalprinces s
Jul 27, 2017
I made this awhile back and gave it as a gift. It's very pretty and very easy to make. The directions are well written and you can follow along. Plus they are all right here on one page so either copy and paste or print it. Thank you again for this one.
Hippie Chick
Jul 27, 2017
The issues with the picture not showing up have been taken care of because I see a very nice picture of this aqua colored top. It does need more than one picture, but I realize this came from a stock photo from Red Heart and they dont usually supply more than just a stock photo of a finished project.
lakeladypatti 7313 187
Jul 26, 2017
How do I know if I like it if there isn't a picture shown? I cannot possibly tell from the pattern directions what this will look like.
AFC Editor Julia
Jul 27, 2017
Hi lakeladypatti, We transferred a lot of our older patterns to a newer template, and so a lot of our older patterns had images that are too small for this template. We're in the process of finding and replacing these images so please be patient with us! Julia, editor for AllFreeCrochet
kupplerski1954 395 7523
Jul 26, 2017
Where is the picture of this item?
AFC Editor Julia
Jul 27, 2017
Hi kupplerski, We transferred a lot of our older patterns to a newer template, and so a lot of our older patterns had images that are too small for this template. We're in the process of finding and replacing these images so please be patient with us! Julia, editor for AllFreeCrochet
Lynn K
May 06, 2017
This is such a lovely top so I am trying to ignore problems other people have commented on in the hopes that I do not find the same issues with the pattern, lol! I have been looking for a top like this for quite a while (need a black one to finish off an outfit) so I am going to make it regardless of what anyone else has said. So here I go!
Hippie Chick
Feb 09, 2017
This is such a beautiful top. After seeing all the comments from others that they are having difficulty completing this pattern, I am not even going to attempt it until an update is made on the pattern. Please correct the issues and let us know when it has been updated. Thanks.
Alysanne
Feb 06, 2017
Love the look of the topper but it seems lots of folks have had problems with the pattern. Guess I will have to try it before making a comment about it. I have, however, recently learned to make the FSC so that is a plus. Looked at several examples on YouTube before one clicked.
janice 9516973
Nov 13, 2016
To get a printable version of this pattern, go to Red Heart.com and search for "Lace Topper".
lanaconnelly 01187 52
May 03, 2016
The last 2 rows of the back DO NOT have 2 dc at beginning to start the join together. I have made up my own way, adding sleeve my own way.MOST DIFFICULT pattern ever to figure out. The owner needs to rewrite this pATTERN AS YOU CAN SEE FROMALL THE OTHER COMMENTS....LOVELY DESIGN BUT NEEDS CLARIFIED INSTRUCTIONS.
lanaconnelly 01187 52
Mar 20, 2016
PLEASE HELP, LOVE PATTERN BUT CANT FIGURE OUT THE add stitiches for sides part.....add where, chart doesnt help, I need to know the number and where. never had this kind of trouble before. please help don't want to undo all that I have done. please send instructions to lanaconnelly@hotmail.com
Member 3605256
Feb 23, 2015
I am using alpaca yarn for this patter at a 2 ply. I am making a larger size and it still doesn't fit my friend who I am making it for. My gauge is correct. I tried getting the aunt Lydia's iced bamboo yarn but it is discontinued. I just bought aunt Lydia's bamboo size 10 (not sure what that means) and it also has a big 0 on the side. It seems very thin. Does anyone have any help for me? I could really use it. It is a beautiful patter but I do not know what yarn I should use and/or if I should change my needle size from an E to something bigger. Help, please!!!
oldyooper
Jun 02, 2015
Aunt Lydia's Iced Bamboo is a category 3, or fingering weight yarn. The size 10 thread you mentioned would be a category 0, making it quite a bit thinner. Hope any of this helps!
KayShepherd 041383 9
Oct 16, 2014
using a size E crochet hook, my pattern is MUCH smaller... the lace is great, but tiny... I would suggest a J or larger hook... or did I miss something??? My work is much smaller than the picture and I don't know how the patter will all come together... I'm going to start over with a larger hook.
SGANGONE2227
Apr 22, 2014
Can someone explain to me how to start this project? Im a little confused at the very beginning. Multipe of 5sts + 3, row 1. ch1, sc in first 2sc. How many chains should i have before beginning row 1? Thank you
pweidmann 1301538
May 09, 2014
Go to utube.com and type in "Foundation Single Crochet. There's a great tutorial that shows how to do it.
Ande
Apr 05, 2014
Can you use a sport weight yarn for this???????I have an abundance of "said" yarn Thank you
alabao 8047533
Dec 12, 2013
Hello, I live in Montreal Canada and I cannot find this kind of yarn (AUNT LYDIAS Iced BambooTM). Is there any other yarn that I could use to make this pattern. I just love it. I have to do it. Thank you for your help, Ana
stardust44 7692146
Nov 20, 2013
I am making "Aqua Dream Lace Topper" and am very confused in the "Add Stitches for Side" section, specifically "FSC". 1. After making the first "Fsc", what do I do with the 1 stitch left on hook? How and when is it attached? 2. At the end of Row 1 after "sc2tog"...do I then chain 36(51), then work "Fsc" back toward sleeve?......continuing then to work Row 2 of Solid Panel across sleeve and 1st FSC? If so, the 2nd "Fsc" doesn't have the pattern of Row 2 of Solid Panel worked across it. I'm afraid my questions are as confusing as the pattern is to me. I'd appreciate help, please. Thank you
pweidmann 1301538
May 09, 2014
Under "DIRECTIONS, Pattern Stitches" the direction for for the "sc2tog" (single crochet 2 together) should be in a new paragraph so it won't be confused to be part of the "Fsc (foundation single crochet) instruction.
gracefullikeagazel le
Sep 03, 2013
I'm already confused & haven't even picked up the yarn to start crocheting. What do I do with the "new ball of yarn" after I cut off a long tail for weaving in later? Am I supposed to work with two balls at the same time (one for sleeve; one for body)?? Please explain the "Add Stitches For Sides" part of the instructions more thoroughly for those of us who have been crocheting for only 10 years or so "
stardust44 7692146
Nov 19, 2013
I too am confused with the "Add Stitches for Side". I can't seem to find what to do with the "FSC" sections. Please could someone enlighten me. Thank you
pweidmann 1301538
Jun 09, 2014
No, there won't be two balls of yarn attached to the topper. The first ball will still be attached to the sleeve which you have set aside. The new ball is to be used to make more Fsc's. You will then leave the last loop on the hook, cut the yarn of the second ball, and pick up the sleeve and continue with the next row of sleeve (described in Row 1 of "Add Stitches for Sides"). You are now using the original ball of yarn. At the end of that row you will make more Fsc's. When you turn at the end of the row you will have added stitches to both sides. Then continue with the next rows in pattern. At least this is the way I understood it and I have made this topper.
aknitter1934 50615 47
Aug 19, 2013
Why can't I copy this pattern into Word? I save all my patterns that aren't PDFd in Word because I don't want to print all the advertising, but this one won't allow it. I'd love to make it as a swimsuit coverup, but can't if I can't get the pattern. I tried to save it, but I don't know where it did so. Judith
Inaknot
Jun 20, 2013
I would love to make this, but the directions are very confusing. Are you starting where it says TOP and are you going from bottom to top or? How is it put together. A diagram would sure help.
liv
May 14, 2013
I got it!!! The pattern begins at the sleeve!!! It is really beautiful even though I am not finished yet. Also, I added stitches to make it one size larger, a 1X
pweidmann 1301538
Jun 09, 2014
I also added stitches because I'm also a 1X. I made the sleeves longer by repeating 1-13. For the length I added 20 more stitches on both sides when making the Fsc's (in "Add Stitches to Sides") to make it longer. I also repeated the pattern stitches twice to make it wider across. I also did this on the other side when working the front and back after the neck opening.
liv
Apr 26, 2013
I would LOVE to make this, but I dont see how many foundation stitches to make and I dont understand what " multiple of 5 sts + 3" is. Can you help?
Crafter 2735100
Apr 26, 2013
ladies, I just found this pattern and wanted to say that all your entries for naming this pattern sound wonderful. Clearly, it shows that all of you are innovative & eclectic.
ladyTrolley
Apr 26, 2013
This such a beautiful top that I want to make if for one of my sister-in-laws but I can't find a foundation row. It tells you how to make FSC but no amount. Could you please help here? I noticed there are a fe people looking for this.
peekaboosmom902msn com
Apr 25, 2013
Is there a foundation chain? I don't see the parentheses for larger sizes. Can someone explain, please.
iluvcats4 8290619
Apr 23, 2013
This topper is absolutely Beautiful! But, it's so frustrating when you offer a pattern but do not include plus sizes in the instructions. Don't you realize that us big gals like to look fashionable and show off our handiwork too??? PLEASE include more plus sizes in your apparel patterns!!!!!
rcrafty 2381165
Apr 23, 2013
I don't see any foundation row. How many chains do you start with?
dozenlyons 7494277
Mar 03, 2013
name for this No Name Lace Topper......Peek-a-boo lace topper.............from Adrienne Lyon
craftingwithlove
Mar 03, 2013
I would name the No Name Lacey Topper either "Blue Belle" or "Garden Trellis."
sdpsalm34 5139416
Mar 01, 2013
I was in Paris recently. This pattern makes me think of the beautiful structure of the Eiffel Tower. I think it should be called Parisian Lattice.
Crafter 17906
Mar 01, 2013
Lacey Anne is my idea. I like patterns with girl's names and the main feature is the lacey look.
gkarlinski 9231968
Mar 01, 2013
It's so beautiful - light & airy & fabulous color - name it "Whisper"
jetburnes 5475408
Mar 01, 2013
"Lovely in Lace" would be my suggestion for this beautiful lacy top. It is just beautiful in this color and would be in any color!
dannegirl5970
Mar 01, 2013
Island Paradise Tank Topper It would be the perfect garment for that Island Paradise Dream vacation!
minnyme2 5647544
Mar 01, 2013
I would name this project ''Le Suave Bleu '' It looks so soft in that particular color.
rosandianbennett 8 526063
Mar 01, 2013
I think a good name for this beautiful topper which I can't wait to start. FAIRY DUST as the lace is so gorgeous
barbiedoll1012010 6063278
Feb 28, 2013
I think it should be called "ladders of lace topper" Love this pattern, will be making it for a Christmas present.
elliesr 2143194
Feb 28, 2013
Princess, as in Princess Lace. It reminds me of something Princess Grace would have worn. Delicate & intricate.
iowastargal 567595 2
Feb 28, 2013
It has a cheerful, warm, natural look (and I'm guessing feel) to it so my name sugestion is: Serengety Serenity
Crafter 14912
Feb 28, 2013
This top should be called Ocean Breeze because it is light and airy.
justforthis917 891 6112
Feb 28, 2013
I love this! I wish there was another picture to show how the arms are shaped or if it's more poncho like. But it's very pretty! My suggestion: Flight of Fancy Topper
rsvpproductions 37 31972
Feb 28, 2013
Lacey Icey Blue, Blue Ice Lace, Cool Blue Lace, Cool Icey Blue Lace, Bella Butterfly Blue Lace
smwilson317 095598 9
Feb 28, 2013
Papillon, which means butterfly in French. The sleeves remind me of the delicate and graceful movement of a butterfly's wings.
rsvpproductions 37 31972
Feb 28, 2013
1) "Bella Ice Blue" 2) "Zanzibar Lacey Blue" 3) "Zanzibar Blue Lace" 4) "Lacey Bella Ice Blue" 5) "Icey Bella Blue Lace" 6) "Icey Blue Lace" 7) "Bella Blue Lace"
Report Inappropriate Comment
Are you sure you would like to report this comment? It will be flagged for our moderators to take action.
Thank you for taking the time to improve the content on our site.

