Floppy Sun Hat
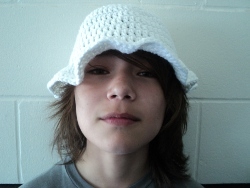
Make a fabulous Floppy Sun Hat with this free crochet hat pattern. Work the hat in rounds using double crochet and you'll have a hat ready in no time. Take your newly crocheted sun hat to the beach and have a relaxing day.

Crochet HookJ/10 or 6 mm hook
Yarn Weight(4) Medium Weight/Worsted Weight and Aran (16-20 stitches to 4 inches)
Materials:
- 6.00 mm Crochet Hook
- 1 Skein of Yarn
- Scissors
- Yarn Needle
Instructions:
Ch 3, sl st in 1st ch to form ring.
Round 1: ch 3 (counts as dc), dc 9 times in the center of the ring for a total of 10 dc's. sl st at the top of the ch 3.
Round 2: ch 3 (counts as dc), dc in the same st as last sl st. dc 2 times in each st until there is a total of 20 dc's. sl st at the top of the ch 3.
Round 3: ch 3 (counts as dc), dc in the same st as last sl st. *dc in next st. dc 2 times in next*. repeat ** until there is a total of 30 dc's. sl st at the top of the ch 3.
Round 4: ch 3 (counts as dc), dc in the same st as last sl st. *dc in the next 2. dc 2 times in next st*. repeat ** until there is a total of 40 dc's. sl st at the top of the ch 3.
Round 5 to desired circumference of head: Keep crocheting in this method until the hat measures the circumference of the persons head.
For round 5 should have a total of 50 dc's.
For round 6 should have a total of 60 dc's.
Circumference to desired length: ch 3 (counts as dc), dc crochet in each st across. sl st at the top of the ch 3.
Brim:
Round 1: ch 3 (counts as dc), dc in the same st as last sl st. dc 2 times in each st until you have gone all the way around. sl st at the top of the ch 3.
Round 2: ch 3 (counts as dc), dc in same st a s last sl st. *dc in next st. dc 2 times in next st*. repeat ** until you have gone all the way around. sl st at the top of the ch 3. Fasten off.
Read NextRetro Summer Dress
Your Recently Viewed Projects
Jennifer Edwards
Jan 12, 2015
Mine came out perfect. Thank you for making the video and pattern.
pmaturo 2653620
Mar 11, 2013
I followed the instructions for the straight brim and my brim is still ruffled. On round 2, I chained 3, in next stitch I put 2 dc, in next stitch I put 1 dc and repeated this step until I got all the way around. It is still more ruffled than his picture.
wwwfag 2455667
Jun 04, 2012
This is a great project. I found it easy and I like the boy wearing the sun hat in the picture. What is his name? Please Tell!!
Dianenarin592
Aug 22, 2012
Well, whoever this boy Wyatt is he is so cute! You should of captured his face.
sleepygirl68
Jun 02, 2012
I started this hat by following the pattern. I chained 3 and slip stiched to first chain. I then watched the video and followed mostly that. For row 5, you dc twice in first stitch and then dc once in next 3 stitches, dc twice in next stitch, then dc once in next 3 stitches. Repeat around and join to top of chain 3 with slip stitch. Row 6 is dc twice in first stitch, dc once in next 4 stitches, dc twice in next stitch, dc once in next 4 stitches. Repeat around and join to top of chain 3 with slip stitch. Row 7 is increase to 5 dc's once between 2 dc if you need a row 7 which I did. I am presently working on the brim of the hat and like how it is turning out. I hope I helped make it clear.
nancyau45 8337037
Jun 02, 2012
The written instructions said to start with ch 3 - the video said 4. Also, instructions for row 3 said to dbl ch in the sl st place but in viedo you went to the next dbl ch. I'm really getting confused by this. Can you tell us which is correct? I would really love to make this hat. And one more question, row 5? all it says is "to desired circumference and should end up with 50 - same goes for row 6. This doesn't tell us the pattern/stiches needed to get to 50, and 60 st in row 6...How is this accomplished? PLEASE ADVISE! thanks
Lillian1608
Jun 04, 2012
Just keep increasing until the hat measures the circumference of your head.
Report Inappropriate Comment
Are you sure you would like to report this comment? It will be flagged for our moderators to take action.
Thank you for taking the time to improve the content on our site.

