This project was submitted by one of our readers, just like you.
Stretchiest Balaclava
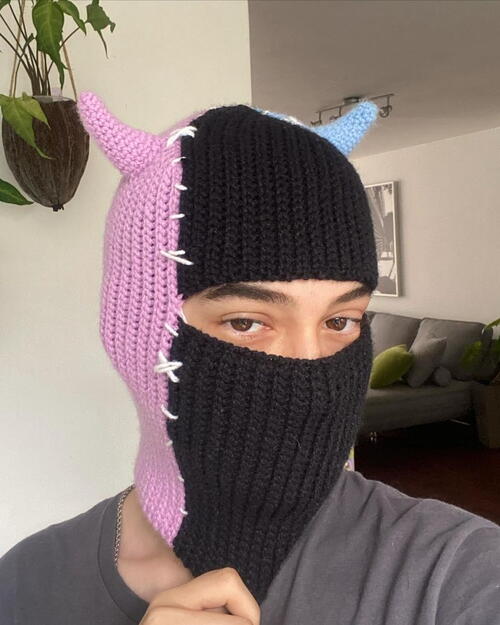
"Learn how to make the stretchiest balaclava! Made with short rows and BLO slip stitches, this piece is very entertaining to make and also fairly fast. You can make it all in one color or in many colors like I did :)) The white stitches and horns are completely optional, I included instructions for the horns as well. Level: intermediate One size fits most but it's easily customizable Yarn: around 350 grams of light DK Hook: 4mm Other materials: stitch marker, scissors, yarn needle"

Crochet HookG/6 or 4 mm hook
Yarn Weight(3) Light/DK (21-24 stitches to 4 inches)
Crochet Gauge20 sts X 30 rows = 10cm
Worked over BLO slst
Finished SizeThis will fit around the head up to the neck, above the shoulders. Depending on your gauge and yarn choice, it may result in a bigger/smaller size. To make sure you get the right length, chain a long enough chain that goes from the crown of your head down
Materials List
- Color A: 1 skein of 50 grams
- Color B: 1 skein of 50 grams
- Color C: 1 skein of 50 grams
- Leftover white yarn for the detailing
- Accessories: Stitch markers, scissors and yarn needle
Abbreviations
BL back loop
BLO back loop only
FO fasten off
MR Magic Ring
WS wrong side
ch Chain
rep repeat
sc single crochet
sl st slip stitch
st stitch
sts stitches
Portion A: first side
The balaclava is worked sideways.
1. ch 70. Work BLO sl st in each ch. Place a stitch marker on your 18th stitch. Ch1 and turn (make sure you always turn the same way, otherwise your edge will look uneven).
2. BLO sl st in each st, making the last one on the st before the marker. Leave the rest unworked. ch1, turn.
3. BLO sl st in each st, making your last st under both loops. ch1, turn.
4. BLO sl st in each st. After doing the last one, insert your hook under the bar next to the stitch (that belongs to the turning ch) and through the BL of the unworked st with the marker, which you can now remove. Make a BLO sl st. ch1, turn.
5. Same as row 3.
6. Same as row 4, making the very last st in the st next to the one where the marker was.
7-38. Continue repeating rows 5 and 6 until you run out of unworked stitches. On your last row 6 repeat, make the last st under both loops and change color to B before finishing the st.
Portion B: top opening and bottom of the balaclava
1. With B: BLO sl st 33. Make the next st under both loops and leave the rest unworked. ch1, turn
2. BLO sl st until 18 sts remain, leave them unworked. ch1, turn
3. Ch1, BLO sl st in each st, making the last under both loops. ch1, turn
4. BLO sl st in each st. After doing the last one, insert your hook under the bar next to the stitch (that belongs to the turning ch) and through the BL of the unworked st below, making a BLO sl st. ch1, turn
5-37. Repeat rows 3 and 4 of this portion. Your last rep is a row 3 rep.
38. Rep row 4 and make the last st under both loops, changing color to C before completing the stitch. ch1 and add a stitch marker to the working loop so it doesn't unravel. Ignore for now that you have that yarn ball attached. This you just did is the top part above the eye opening, the next thing you'll do is the bottom.
1. Rejoin B next to the first row of portion B, leaving one st unworked between. ch1 and make a BLO sl st in the same st. Make BLO sl st in each st, and the last one under both loops. ch1, turn
2. Make BLO sl st in each st, and under both loops in the last st. ch1, turn. 3-38. Same as row 2. FO
Portion C: the second side
Go back to the loop you had on hold. Make a BLO sl st in each st across the top part of the balaclava. Once you reach the end, ch1 (to keep up the st count as in portion B we left 1 st unworked), then keep doing BLO sl st along the bottom of the balaclava. Make the very last st under both loops. Place a st marker in the 18th st. ch1, turn
2-38. Same as rows 2-38 of portion A. After the last st of row 38, ch1 and turn, don't FO yet.
39. Join both sides of the balaclava (WS facing each other) using the sl st join. ch1 and FO leaving a long tail to cinch up the top. You can also FO after row 38 and sew it instead.


Read NextEasy Ombre Crochet Hat


