Punky's Funky Hat
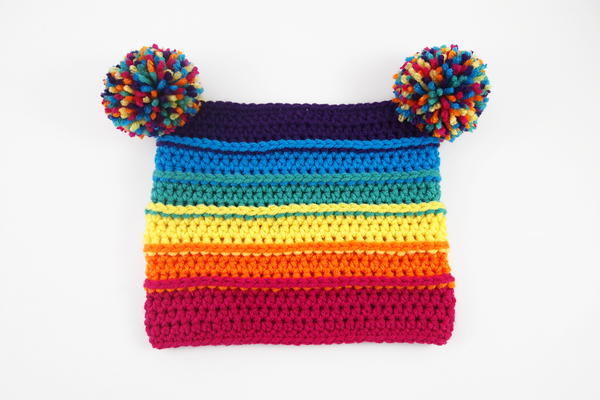
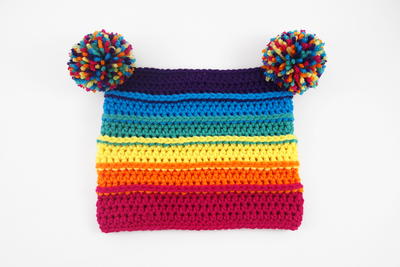
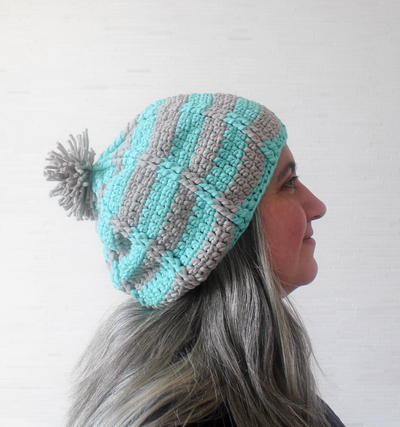
Are you taking a big family photo soon and need some ideas? Some families wear matching sweaters for their big family pictures, but maybe you'd like to do something a bit more whimsical. With this delightfully colorful Punky's Funky Hat, you can add quite a few bold splashes of color in a design that is anything but ordinary. This crochet pattern is easy to make and is available in 10 sizes ranging from preemies to large adults. And what's better than colorful pompoms? This adorable crochet hat pattern might be just what you need if you're looking for something unique for your next family get-together.
Notes-This hat is worked from the brim up; make the foundation chain loosely to allow for stretching.
-Starting chain of each round does not count as a stitch.
-Each round is started in the same stitch as your starting chain.
-The end of each round is joined by slip stitching in the first stitch of the round, not the starting chain.
-This crochet pattern is available in sizes for Preemie, Newborn, 0-3 Months, 3-6 Months, 6-12 Months, Toddler, Child, Teen/Small Adult, Medium Adult, and Large Adult.
-Back Post Half Double Crochet: Yarn over, working from back to front, insert hook around the post of the next stitch, yarn over and pull up a loop, yarn over and draw through all 3 loops on hook

Crochet HookH/8 or 5 mm hook
Yarn Weight(4) Medium Weight/Worsted Weight and Aran (16-20 stitches to 4 inches)
Crochet Gauge14 stitches and 11 rows = 4" (10 cm) PLEASE CHECK YOUR GAUGE
Materials List
- Worsted weight yarn such as Red Heart With Love
- H/8 or 5 mm hook, or size needed to obtain the gauge
- Yarn needle for weaving in ends
Patterns
Preemie
Head Circumference = 10" - 12" • Hat Circumference = 10" • Hat Height = 4.25"
-
Round 1: Ch 36, hdc in the 2nd chain from hook and in each chain across, bring the ends together and sl st to join in the first hdc (35)
Round 2: Ch 1, hdc in each stitch around, join (35)
Round 3: Change Color - Ch 1, BPhdc in each stitch around, join (35)
Round 4 - 5: Ch 1, hdc in each stitch around, join (35)
Round 6: Change Color - Ch 1, BPhdc in each stitch around, join (35)
Round 7 - 8: Ch 1, hdc in each stitch around, join (35)
Round 9: Change Color - Ch 1, BPhdc in each stitch around, join (35)
Round 10 - 11: Ch 1, hdc in each stitch around, join (35) -
Fasten off. The last round worked will be the top of the hat. Flatten the finished piece so the seam is centered at the back of the hat. Starting at one end and working through both layers, join and sc across the top of the hat.
-
Finishing the Brim: Using the same color as Round 1, join to the right of the seam on the foundation chain.
-
Round 12: Ch 1, sc in each stitch around, join in first stitch and fasten off (35)
-
Weave in all ends. Attach a pompom to both top corners.
Newborn
Head Circumference = 13" - 15" • Hat Circumference = 13" • Hat Height = 5.25"
-
Round 1: Ch 46, hdc in the 2nd chain from hook and in each chain across, bring the ends together and sl st to join in the first hdc (45)
Round 2: Ch 1, hdc in each stitch around, join (45)
Round 3: Change Color - Ch 1, BPhdc in each stitch around, join (45)
Round 4 - 5: Ch 1, hdc in each stitch around, join (45)
Round 6: Change Color - Ch 1, BPhdc in each stitch around, join (45)
Round 7 - 8: Ch 1, hdc in each stitch around, join (45)
Round 9: Change Color - Ch 1, BPhdc in each stitch around, join (45)
Round 10 - 11: Ch 1, hdc in each stitch around, join (45)
Round 12: Change Color - Ch 1, BPhdc in each stitch around, join (45)
Round 13 - 14: Ch 1, hdc in each stitch around, join (45) -
Fasten off. The last round worked will be the top of the hat. Flatten the finished piece so the seam is centered at the back of the hat. Starting at one end and working through both layers, join and sc across the top of the hat.
-
Finishing the Brim: Using the same color as Round 1, join to the right of the seam on the foundation chain.
-
Round 15: Ch 1, sc in each stitch around, join in first stitch and fasten off (45)
-
Weave in all ends. Attach a pompom to both top corners.
0 to 3 Months
Head Circumference = 14" - 16" • Hat Circumference = 14" • Hat Height = 5.5"
-
Round 1: Ch 49, hdc in the 2nd chain from hook and in each chain across, bring the ends together and sl st to join in the first hdc (48)
Round 2: Ch 1, hdc in each stitch around, join (48)
Round 3: Change Color - Ch 1, BPhdc in each stitch around, join (48)
Round 4 - 5: Ch 1, hdc in each stitch around, join (48)
Round 6: Change Color - Ch 1, BPhdc in each stitch around, join (48)
Round 7 - 8: Ch 1, hdc in each stitch around, join (48)
Round 9: Change Color - Ch 1, BPhdc in each stitch around, join (48)
Round 10 - 11: Ch 1, hdc in each stitch around, join (48)
Round 12: Change Color - Ch 1, BPhdc in each stitch around, join (48)
Round 13 - 15: Ch 1, hdc in each stitch around, join (48) -
Fasten off. The last round worked will be the top of the hat. Flatten the finished piece so the seam is centered at the back of the hat. Starting at one end and working through both layers, join and sc across the top of the hat.
-
Finishing the Brim: Using the same color as Round 1, join to the right of the seam on the foundation chain.
-
Round xx: Ch 1, sc in each stitch around, join in first stitch and fasten off (xx)
-
Weave in all ends. Attach a pompom to both top corners.
3 to 6 Months
Head Circumference = 15" - 17" • Hat Circumference = 15" • Hat Height = 6"
-
Round 1: Ch 53, hdc in the 2nd chain from hook and in each chain across, bring the ends together and sl st to join in the first hdc (52)
Round 2 - 3: Ch 1, hdc in each stitch around, join (52)
Round 4: Change Color - Ch 1, BPhdc in each stitch around, join (52)
Round 5 - 6: Ch 1, hdc in each stitch around, join (52)
Round 7: Change Color - Ch 1, BPhdc in each stitch around, join (52)
Round 8 - 9: Ch 1, hdc in each stitch around, join (52)
Round 10: Change Color - Ch 1, BPhdc in each stitch around, join (52)
Round 11 - 12: Ch 1, hdc in each stitch around, join (52)
Round 13: Change Color - Ch 1, BPhdc in each stitch around, join (52)
Round 14 - 16: Ch 1, hdc in each stitch around, join (52) -
Fasten off. The last round worked will be the top of the hat. Flatten the finished piece so the seam is centered at the back of the hat. Starting at one end and working through both layers, join and sc across the top of the hat.
-
Finishing the Brim: Using the same color as Round 1, join to the right of the seam on the foundation chain.
-
Round 17: Ch 1, sc in each stitch around, join in first stitch and fasten off (52)
-
Weave in all ends. Attach a pompom to both top corners.
6 to 12 Months
Head Circumference = 16" - 18" • Hat Circumference = 16" • Hat Height = 6.5"
-
Round 1: Ch 57, hdc in the 2nd chain from hook and in each chain across, bring the ends together and sl st to join in the first hdc (56)
Round 2: Ch 1, hdc in each stitch around, join (56)
Round 3: Change Color - Ch 1, BPhdc in each stitch around, join (56)
Round 4 - 5: Ch 1, hdc in each stitch around, join (56)
Round 6: Change Color - Ch 1, BPhdc in each stitch around, join (56)
Round 7 - 8: Ch 1, hdc in each stitch around, join (56)
Round 9: Change Color - Ch 1, BPhdc in each stitch around, join (56)
Round 10 - 11: Ch 1, hdc in each stitch around, join (56)
Round 12: Change Color - Ch 1, BPhdc in each stitch around, join (56)
Round 13 - 14: Ch 1, hdc in each stitch around, join (56)
Round 15: Change Color - Ch 1, BPhdc in each stitch around, join (56)
Round 16 - 17: Ch 1, hdc in each stitch around, join (56) -
Fasten off. The last round worked will be the top of the hat. Flatten the finished piece so the seam is centered at the back of the hat. Starting at one end and working through both layers, join and sc across the top of the hat.
-
Finishing the Brim: Using the same color as Round 1, join to the right of the seam on the foundation chain.
-
Round 18: Ch 1, sc in each stitch around, join in first stitch and fasten off (56)
-
Weave in all ends. Attach a pompom to both top corners.
Toddler
This size is for chlidren approximately 1 to 3 years - please measure for a more accurate fit. Head Circumference = 17" - 19" • Hat Circumference = 17" • Hat Height = 7.25"
-
Round 1: Ch 61, hdc in the 2nd chain from hook and in each chain across, bring the ends together and sl st to join in the first hdc (60)
Round 2 - 3: Ch 1, hdc in each stitch around, join (60)
Round 4: Change Color - Ch 1, BPhdc in each stitch around, join (60)
Round 5 - 6: Ch 1, hdc in each stitch around, join (60)
Round 7: Change Color - Ch 1, BPhdc in each stitch around, join (60)
Round 8 - 9: Ch 1, hdc in each stitch around, join (60)
Round 10: Change Color - Ch 1, BPhdc in each stitch around, join (60)
Round 11 - 12: Ch 1, hdc in each stitch around, join (60)
Round 13: Change Color - Ch 1, BPhdc in each stitch around, join (60)
Round 14 - 15: Ch 1, hdc in each stitch around, join (60)
Round 16: Change Color - Ch 1, BPhdc in each stitch around, join (60)
Round 17 - 19: Ch 1, hdc in each stitch around, join (60) -
Fasten off. The last round worked will be the top of the hat. Flatten the finished piece so the seam is centered at the back of the hat. Starting at one end and working through both layers, join and sc across the top of the hat.
-
Finishing the Brim: Using the same color as Round 1, join to the right of the seam on the foundation chain.
-
Round 20: Ch 1, sc in each stitch around, join in first stitch and fasten off (60)
-
Weave in all ends. Attach a pompom to both top corners.
Child
This size is for approximately 4 to 10 years - please measure for a more accurate fit. Head Circumference = 18" - 20" • Hat Circumference = 18" • Hat Height = 7.5"
-
Round 1: Ch 65, hdc in the 2nd chain from hook and in each chain across, bring the ends together and sl st to join in the first hdc (64)
Round 2: Ch 1, hdc in each stitch around, join (64)
Round 3: Change Color - Ch 1, BPhdc in each stitch around, join (64)
Round 4 - 5: Ch 1, hdc in each stitch around, join (64)
Round 6: Change Color - Ch 1, BPhdc in each stitch around, join (64)
Round 7 - 8: Ch 1, hdc in each stitch around, join (64)
Round 9: Change Color - Ch 1, BPhdc in each stitch around, join (64)
Round 10 - 11: Ch 1, hdc in each stitch around, join (64)
Round 12: Change Color - Ch 1, BPhdc in each stitch around, join (64)
Round 13 - 14: Ch 1, hdc in each stitch around, join (64)
Round 15: Change Color - Ch 1, BPhdc in each stitch around, join (64)
Round 16 - 17: Ch 1, hdc in each stitch around, join (64)
Round 18: Change Color - Ch 1, BPhdc in each stitch around, join (64)
Round 19 - 20: Ch 1, hdc in each stitch around, join (64) -
Fasten off. The last round worked will be the top of the hat. Flatten the finished piece so the seam is centered at the back of the hat. Starting at one end and working through both layers, join and sc across the top of the hat.
-
Finishing the Brim: Using the same color as Round 1, join to the right of the seam on the foundation chain.
-
Round 21: Ch 1, sc in each stitch around, join in first stitch and fasten off (64)
-
Weave in all ends. Attach a pompom to both top corners.
Teen/Small Adult
Head Circumference = 20" - 21.5" • Hat Circumference = 19.5" • Hat Height = 7.5"
-
Round 1: Ch 69, hdc in the 2nd chain from hook and in each chain across, bring the ends together and sl st to join in the first hdc (68)
Round 2: Ch 1, hdc in each stitch around, join (68)
Round 3: Change Color - Ch 1, BPhdc in each stitch around, join (68)
Round 4 - 5: Ch 1, hdc in each stitch around, join (68)
Round 6: Change Color - Ch 1, BPhdc in each stitch around, join (68)
Round 7 - 8: Ch 1, hdc in each stitch around, join (68)
Round 9: Change Color - Ch 1, BPhdc in each stitch around, join (68)
Round 10 - 11: Ch 1, hdc in each stitch around, join (68)
Round 12: Change Color - Ch 1, BPhdc in each stitch around, join (68)
Round 13 - 14: Ch 1, hdc in each stitch around, join (68)
Round 15: Change Color - Ch 1, BPhdc in each stitch around, join (68)
Round 16 - 17: Ch 1, hdc in each stitch around, join (68)
Round 18: Change Color - Ch 1, BPhdc in each stitch around, join (68)
Round 19 - 20: Ch 1, hdc in each stitch around, join (68) -
Fasten off. The last round worked will be the top of the hat. Flatten the finished piece so the seam is centered at the back of the hat. Starting at one end and working through both layers, join and sc across the top of the hat.
-
Finishing the Brim: Using the same color as Round 1, join to the right of the seam on the foundation chain.
-
Round 21: Ch 1, sc in each stitch around, join in first stitch and fasten off (68)
-
Weave in all ends. Attach a pompom to both top corners.
Medium Adult
Head Circumference = 21.5" - 23" • Hat Circumference = 20.5" • Hat Height = 7.75"
-
Round 1: Ch 73, hdc in the 2nd chain from hook and in each chain across, bring the ends together and sl st to join in the first hdc (72)
Round 2: Ch 1, hdc in each stitch around, join (72)
Round 3: Change Color - Ch 1, BPhdc in each stitch around, join (72)
Round 4 - 5: Ch 1, hdc in each stitch around, join (72)
Round 6: Change Color - Ch 1, BPhdc in each stitch around, join (72)
Round 7 - 8: Ch 1, hdc in each stitch around, join (72)
Round 9: Change Color - Ch 1, BPhdc in each stitch around, join (72)
Round 10 - 11: Ch 1, hdc in each stitch around, join (72)
Round 12: Change Color - Ch 1, BPhdc in each stitch around, join (72)
Round 13 - 14: Ch 1, hdc in each stitch around, join (72)
Round 15: Change Color - Ch 1, BPhdc in each stitch around, join (72)
Round 16 - 17: Ch 1, hdc in each stitch around, join (72)
Round 18: Change Color - Ch 1, BPhdc in each stitch around, join (72)
Round 19 - 21: Ch 1, hdc in each stitch around, join (72) -
Fasten off. The last round worked will be the top of the hat. Flatten the finished piece so the seam is centered at the back of the hat. Starting at one end and working through both layers, join and sc across the top of the hat.
-
Finishing the Brim: Using the same color as Round 1, join to the right of the seam on the foundation chain.
-
Round 22: Ch 1, sc in each stitch around, join in first stitch and fasten off (72)
-
Weave in all ends. Attach a pompom to both top corners.
Large Adult
Head Circumference = 23" - 24" • Hat Circumference = 22" • Hat Height = 8"
-
Round 1: Ch 77, hdc in the 2nd chain from hook and in each chain across, bring the ends together and sl st to join in the first hdc (76)
Round 2 - 3: Ch 1, hdc in each stitch around, join (76)
Round 4: Change Color - Ch 1, BPhdc in each stitch around, join (76)
Round 5 - 6: Ch 1, hdc in each stitch around, join (76)
Round 7: Change Color - Ch 1, BPhdc in each stitch around, join (76)
Round 8 - 9: Ch 1, hdc in each stitch around, join (76)
Round 10: Change Color - Ch 1, BPhdc in each stitch around, join (76)
Round 11 - 12: Ch 1, hdc in each stitch around, join (76)
Round 13: Change Color - Ch 1, BPhdc in each stitch around, join (76)
Round 14 - 15: Ch 1, hdc in each stitch around, join (76)
Round 16: Change Color - Ch 1, BPhdc in each stitch around, join (76)
Round 17 - 18: Ch 1, hdc in each stitch around, join (76)
Round 19: Change Color - Ch 1, BPhdc in each stitch around, join (76)
Round 20 - 22: Ch 1, hdc in each stitch around, join (76) -
Fasten off. The last round worked will be the top of the hat. Flatten the finished piece so the seam is centered at the back of the hat. Starting at one end and working through both layers, join and sc across the top of the hat.
-
Finishing the Brim: Using the same color as Round 1, join to the right of the seam on the foundation chain.
-
Round 23: Ch 1, sc in each stitch around, join in first stitch and fasten off (76)
-
Weave in all ends. Attach a pompom to both top corners.
Abbreviations
- ch
- chain
- sl
- slip
- st
- stitch
- sc
- single crochet
- hdc
- half double crochet
- BPhdc
- back post half double crochet
Your Recently Viewed Projects
Hippie Chick
Mar 29, 2017
This is certainly a very colorful hat. Very cute and totally different from anything I have seen lately. I dont think it would be a very good hat to wear in a family portrait, but it would be a fun hat for everyone to wear to a family reunion or a family or company picnic. The pompoms add to the quirky look.
JaneEK
Mar 28, 2017
My kids loved watching Punky Brewster and I even have the doll in my collection. This quirky hat certainly does reflect the philosophy of her character. I appreciate that there is such a wide range of sizes included with the pattern. The lack of photos doesnt seem to be a problem as the pattern is so simple. Hardest part are the poms, and those are a cinch with a pompon maker.
JaneEK
Mar 15, 2017
This is such a fun design, and it comes in all sizes, too! What a wonderful Christmas gift for a entire familymake some smaller ones for the pets, too! This is a great scrap buster, too, since you dont need full skeins to complete the project. Just make sure you have enough yarn for those great fluffy pompons! You can make them multicolored, or solid to match one of the colored bands.
Report Inappropriate Comment
Are you sure you would like to report this comment? It will be flagged for our moderators to take action.
Thank you for taking the time to improve the content on our site.

