Cute and Easy Crochet Cat Hat
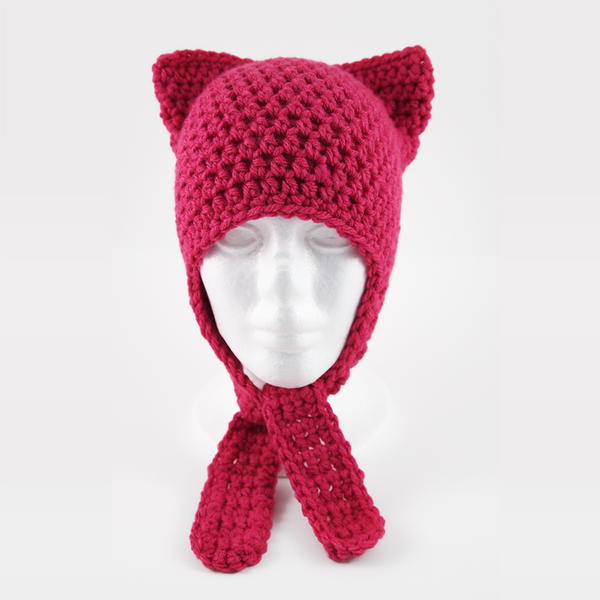
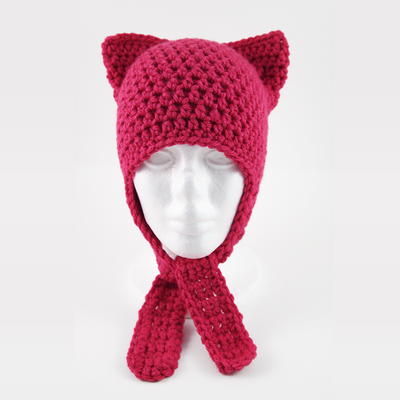
When a standard crochet winter hat just won't do, try working up the Cute and Easy Crochet Cat Hat instead. This crochet hat pattern is worked up in much the same way as a typical hat, but with the extra addition of crochet earflaps that also tie to keep your head and ears super warm against the cold wind. Not only that, it also features little cat ears at the top, giving this hat pattern a youthful, fun vibe. Available in sizes preemie through large adult and worked up in bulky yarn, this easy crochet pattern is an absolute joy to work up.
NotesNotes:
-The hat is made in the shape of a square and then sewn across the corners to create the ears.
-The beginning chain does not count as a stitch.
-Each round is started in the same stitch as your beginning chain.
-The end of each round is joined by slip stitching in the first stitch of the round, not the beginning chain.
-Instructions for the bow can be found at the end of the file.

Crochet HookJ/10 or 6 mm hook
Yarn Weight(5) Bulky/Chunky (12-15 stitches for 4 inches)
Crochet Gauge11 stitches and 9 rows = 4" (10 cm)
Finished SizePreemie, Newborn, 0-3 Months, 3-6 Months, 6-12 Months, Toddler, Child, Teen/Small Adult, Medium Adult, Large Adult
Materials List
- Bulky weight # 5 yarn such as Brava Bulky or Loops & Threads Charisma: 1 Skein for Newborn - Toddler; 2 skeins for Child - Large Adult
- 6.0 mm (J-10) crochet hook or size needed to obtain the gauge
- For Preemie size only, use worsted weight yarn and a 5.0 mm (H-8) crochet hook
- Yarn needle for weaving in ends
Patterns
-
Preemie • Head Circumference = 10" - 12" • Hat Circumference = 10" • Hat Height = 4.25"
For this size only - use Worsted Weight yarn and a 5 mm (H-8) hook. Gauge: 14 sts and 12 rows = 4" (10 cm)
Round 1: Ch 36, hdc in the 2nd chain from hook and in each chain across, bring the ends together and sl st to join in the first hdc (35)
Round 2: Ch 1, hdc in each stitch around, join (35)
Round 3 - 11: Repeat Round 2 - Hat should measure approximately 4" after the last round; adjust the number of rounds if needed and fasten off. Flatten the piece so the seam is centered at what will be the back of the hat. Starting at one end, sew the top of the hat closed. If preferred, you can slip stitch across instead.
Ear Flap #1: Instructions for long ties not included. Most hospitals do not allow them.
Join in the 5th stitch from the starting seam. Ch 1 does not count as a stitch; do not work into it.
Row 1: Ch 1, sc in same stitch, sc in next 6 stitches, turn (7)
Row 2: Ch 1, sc in first stitch and in each stitch across, turn (7)
Row 3: Ch 1, skip the first st, sc in the next stitch and in each stitch across, turn (6)
Row 4: Ch 1, skip the first st, sc in the next stitch and in each stitch across, turn (5)
Row 5: Ch 1, skip the first st, sc in the next stitch, sc2tog, sc in last stitch (3) - Fasten off.
Ear Flap #2: Leave 13 stitches unworked across the front of the hat and join in the 14th stitch. Repeat the instructions from Ear Flap #1 but do not fasten off after the last row; continue working around the hat making 1 sc in each stitch around, including the ends of each Ear Flap row.
When you get to the last row of Ear Flap # 1: sc in the first stitch, make 2 sc in the next stitch, sc in the last stitch of the row and continue working around the rest of the hat. Repeat the instructions on the last row of Ear Flap # 2. You should be back at the starting point - join in the first sc and fasten off.
Cut a piece of yarn that is approximately 18" long. Working diagonally across the corners at the top of the hat, seam the ears. Weave in all ends. -
Newborn • Head Circumference = 13" - 15" • Hat Circumference = 13" • Hat Height = 5.25"
Round 1: Ch 36, hdc in the 2nd chain from hook and in each chain across, bring the ends together and sl st to join in the first hdc (35)
Round 2: Ch 1, hdc in each stitch around, join (35)
Round 3 - 11: Repeat Round 2 - Hat should measure approximately 5" after the last round; adjust the number of rounds if needed and fasten off. Flatten the piece so the seam is centered at what will be the back of the hat. Starting at one end, sew the top of the hat closed. If preferred, you can slip stitch across instead.
Ear Flap #1: Join in the 5th stitch from the starting seam.
(Ch 1 does not count as a stitch; do not work into it.)
Row 1: Ch 1, sc in same stitch, sc in next 6 stitches, turn (7)
Row 2: Ch 1, sc in first stitch and in each stitch across, turn (7)
Row 3: Ch 1, skip the first st, sc in the next stitch and in each stitch across, turn (6)
Row 4: Ch 1, skip the first st, sc in the next stitch and in each stitch across, turn (5)
Row 5: Ch 1, skip the first st, sc in the next stitch and in each stitch across, turn (4)
Row 6: Ch 1, skip the first st, sc in the next stitch and in each stitch across, turn (3)
Row 7 - 25: Ch 1, sc in each stitch, turn (3) - Fasten off.
Ear Flap #2: Leave 13 stitches unworked across the front of the hat and join in the 14th stitch. Repeat the instructions from Ear Flap #1 but do not fasten off after the last row; continue working around the hat making 1 sc in each stitch around, including the ends of each Ear Flap row.
When you get to the last row of Ear Flap # 1: sc in the first stitch, make 2 sc in the next stitch, sc in the last stitch of the row and continue working around the rest of the hat. Repeat the instructions on the last row of Ear Flap # 2. You should be back at the starting point - join in the first sc and fasten off.
Cut a piece of yarn that is approximately 18" long. Working diagonally across the corners at the top of the hat, seam the ears. Weave in all ends.
-
0 - 3 Months • Head Circumference = 14" - 16" • Hat Circumference = 14" • Hat Height = 5.5"
Round 1: Ch 39, hdc in the 2nd chain from hook and in each chain across, bring the ends together and sl st to join in the first hdc (38)
Round 2: Ch 1, hdc in each stitch around, join (38)
Round 3 - 12: Repeat Round 2 - Hat should measure approximately 5.25" after the last round; adjust the number of rounds if needed and fasten off. Flatten the piece so the seam is centered at what will be the back of the hat. Starting at one end, sew the top of the hat closed. If preferred, you can slip stitch across instead.
Ear Flap #1: Join in the 5th stitch from the starting seam.
(Ch 1 does not count as a stitch; do not work into it.)
Row 1: Ch 1, sc in same stitch, sc in next 7 stitches, turn (8)
Row 2: Ch 1, sc in first stitch and in each stitch across, turn (8)
Row 3: Ch 1, skip the first st, sc in the next stitch and in each stitch across, turn (7)
Row 4: Ch 1, skip the first st, sc in the next stitch and in each stitch across, turn (6)
Row 5: Ch 1, skip the first st, sc in the next stitch and in each stitch across, turn (5)
Row 6: Ch 1, skip the first st, sc in the next stitch and in each stitch across, turn (4)
Row 7: Ch 1, skip the first st, sc in the next stitch and in each stitch across, turn (3)
Row 8 - 26: Ch 1, sc in each stitch, turn (3)
Fasten off.
Ear Flap #2: Leave 14 stitches unworked across the front of the hat and join in the 15th stitch. Repeat the instructions from Ear Flap #1 but do not fasten off after the last row; continue working around the hat making 1 sc in each stitch around, including the ends of each Ear Flap row.
When you get to the last row of Ear Flap # 1: sc in the first stitch, make 2 sc in the next stitch, sc in the last stitch of the row and continue working around the rest of the hat. Repeat the instructions on the last row of Ear Flap # 2. You should be back at the starting point - join in the first sc and fasten off.
Cut a piece of yarn that is approximately 18" long. Working diagonally across the corners at the top of the hat, seam the ears. Weave in all ends. -
3 - 6 Months • Head Circumference = 15" - 17" • Hat Circumference = 15" • Hat Height = 6"
Round 1: Ch 42, hdc in the 2nd chain from hook and in each chain across, bring the ends together and sl st to join in the first hdc (41)
Round 2: Ch 1, hdc in each stitch around, join (41)
Round 3 - 13: Repeat Round 2 - Hat should measure approximately 5.75" after the last round; adjust the number of rounds if needed and fasten off. Flatten the piece so the seam is centered at what will be the back of the hat. Starting at one end, sew the top of the hat closed. If preferred, you can slip stitch across instead.
Ear Flap #1: Join in the 6th stitch from the starting seam.
(Ch 1 does not count as a stitch; do not work into it.)
Row 1: Ch 1, sc in same stitch, sc in next 7 stitches, turn (8)
Row 2: Ch 1, sc in first stitch and in each stitch across, turn (8)
Row 3: Ch 1, skip the first st, sc in the next stitch and in each stitch across, turn (7)
Row 4: Ch 1, skip the first st, sc in the next stitch and in each stitch across, turn (6)
Row 5: Ch 1, skip the first st, sc in the next stitch and in each stitch across, turn (5)
Row 6: Ch 1, skip the first st, sc in the next stitch and in each stitch across, turn (4)
Row 7: Ch 1, skip the first st, sc in the next stitch and in each stitch across, turn (3)
Row 8 - 28: Ch 1, sc in each stitch, turn (3)
Fasten off.
Ear Flap #2: Leave 15 stitches unworked across the front of the hat and join in the 16th stitch. Repeat the instructions from Ear Flap #1 but do not fasten off after the last row; continue working around the hat making 1 sc in each stitch around, including the ends of each Ear Flap row.
When you get to the last row of Ear Flap # 1: sc in the first stitch, make 2 sc in the next stitch, sc in the last stitch of the row and continue working around the rest of the hat. Repeat the instructions on the last row of Ear Flap # 2. You should be back at the starting point - join in the first sc and fasten off.
Cut a piece of yarn that is approximately 18" long. Working diagonally across the corners at the top of the hat, seam the ears. Weave in all ends. -
6 - 12 Months • Head Circumference = 16" - 18" • Hat Circumference = 16" • Hat Height = 6.5"
Round 1: Ch 45, hdc in the 2nd chain from hook and in each chain across, bring the ends together and sl st to join in the first hdc (44)
Round 2: Ch 1, hdc in each stitch around, join (44)
Round 3 - 14: Repeat Round 2 - Hat should measure approximately 6.25" after the last round; adjust the number of rounds if needed and fasten off. Flatten the piece so the seam is centered at what will be the back of the hat. Starting at one end, sew the top of the hat closed. If preferred, you can slip stitch across instead.
Ear Flap #1: Join in the 6th stitch from the starting seam.
(Ch 1 does not count as a stitch; do not work into it.)
Row 1: Ch 1, sc in same stitch, sc in next 8 stitches, turn (9)
Row 2: Ch 1, sc in first stitch and in each stitch across, turn (9)
Row 3: Ch 1, skip the first st, sc in the next stitch and in each stitch across, turn (8)
Row 4: Ch 1, skip the first st, sc in the next stitch and in each stitch across, turn (7)
Row 5: Ch 1, skip the first st, sc in the next stitch and in each stitch across, turn (6)
Row 6: Ch 1, skip the first st, sc in the next stitch and in each stitch across, turn (5)
Row 7: Ch 1, skip the first st, sc in the next stitch and in each stitch across, turn (4)
Row 8: Ch 1, skip the first st, sc in the next stitch and in each stitch across, turn (3)
Row 9 - 29: Ch 1, sc in each stitch, turn (3)- Fasten off.
Ear Flap #2: Leave 16 stitches unworked across the front of the hat and join in the 17th stitch. Repeat the instructions from Ear Flap #1 but do not fasten off after the last row; continue working around the hat making 1 sc in each stitch around, including the ends of each Ear Flap row.
When you get to the last row of Ear Flap # 1: sc in the first stitch, make 2 sc in the next stitch, sc in the last stitch of the row and continue working around the rest of the hat. Repeat the instructions on the last row of Ear Flap # 2. You should be back at the starting point - join in the first sc and fasten off.
Cut a piece of yarn that is approximately 18" long. Working diagonally across the corners at the top of the hat, seam the ears. Weave in all ends. -
Toddler (Approximately 1 to 3 years - please measure for a more accurate fit)
Head Circumference = 17" - 19" • Hat Circumference = 17" • Hat Height = 7"
Round 1: Ch 48, hdc in the 2nd chain from hook and in each chain across, bring the ends together and sl st to join in the first hdc (47)
Round 2: Ch 1, hdc in each stitch around, join (47)
Round 3 - 15: Repeat Round 2 - Hat should measure approximately 6.75" after the last round; adjust the number of rounds if needed and fasten off. Flatten the piece so the seam is centered at what will be the back of the hat. Starting at one end, sew the top of the hat closed. If preferred, you can slip stitch across instead.
Ear Flap #1: Join in the 7th stitch from the starting seam.
(Ch 1 does not count as a stitch; do not work into it.)
Row 1: Ch 1, sc in same stitch, sc in next 8 stitches, turn (9)
Row 2: Ch 1, sc in first stitch and in each stitch across, turn (9)
Row 3: Ch 1, skip the first st, sc in the next stitch and in each stitch across, turn (8)
Row 4: Ch 1, skip the first st, sc in the next stitch and in each stitch across, turn (7)
Row 5: Ch 1, skip the first st, sc in the next stitch and in each stitch across, turn (6)
Row 6: Ch 1, skip the first st, sc in the next stitch and in each stitch across, turn (5)
Row 7: Ch 1, skip the first st, sc in the next stitch and in each stitch across, turn (4)
Row 8: Ch 1, skip the first st, sc in the next stitch and in each stitch across, turn (3)
Row 9 - 29: Ch 1, sc in each stitch, turn (3) - Fasten off.
Ear Flap #2: Leave 17 stitches unworked across the front of the hat and join in the 18th stitch. Repeat the instructions from Ear Flap #1 but do not fasten off after the last row; continue working around the hat making 1 sc in each stitch around, including the ends of each Ear Flap row.
When you get to the last row of Ear Flap # 1: sc in the first stitch, make 2 sc in the next stitch, sc in the last stitch of the row and continue working around the rest of the hat. Repeat the instructions on the last row of Ear Flap # 2. You should be back at the starting point - join in the first sc and fasten off.
Cut a piece of yarn that is approximately 18" long. Working diagonally across the corners at the top of the hat, seam the ears. Weave in all ends. -
Child (Approximately 4 to 10 years - please measure for a more accurate fit)
Head Circumference = 18" - 20" • Hat Circumference = 18" • Hat Height = 7.25"
Round 1: Ch 51, hdc in the 2nd chain from hook and in each chain across, bring the ends together and sl st to join in the first hdc (50)
Round 2: Ch 1, hdc in each stitch around, join (50)
Round 3 - 16: Repeat Round 2 - Hat should measure approximately 7" after the last round; adjust the number of rounds if needed and fasten off. Flatten the piece so the seam is centered at what will be the back of the hat. Starting at one end, sew the top of the hat closed. If preferred, you can slip stitch across instead.
Ear Flap #1: Join in the 7th stitch from the starting seam.
(Ch 1 does not count as a stitch; do not work into it.)
Row 1: Ch 1, sc in same stitch, sc in next 9 stitches, turn (10)
Row 2: Ch 1, sc in first stitch and in each stitch across, turn (10)
Row 3: Ch 1, skip the first st, sc in the next stitch and in each stitch across, turn (9)
Row 4: Ch 1, skip the first st, sc in the next stitch and in each stitch across, turn (8)
Row 5: Ch 1, skip the first st, sc in the next stitch and in each stitch across, turn (7)
Row 6: Ch 1, skip the first st, sc in the next stitch and in each stitch across, turn (6)
Row 7: Ch 1, skip the first st, sc in the next stitch and in each stitch across, turn (5)
Row 8: Ch 1, skip the first st, sc in the next stitch and in each stitch across, turn (4)
Row 9: Ch 1, skip the first st, sc in the next stitch and in each stitch across, turn (3)
Row 10 - 32: Ch 1, sc in each stitch, turn (3) - Fasten off.
Ear Flap #2: Leave 18 stitches unworked across the front of the hat and join in the 19th stitch. Repeat the instructions from Ear Flap #1 but do not fasten off after the last row; continue working around the hat making 1 sc in each stitch around, including the ends of each Ear Flap row.
When you get to the last row of Ear Flap # 1: sc in the first stitch, make 2 sc in the next stitch, sc in the last stitch of the row and continue working around the rest of the hat. Repeat the instructions on the last row of Ear Flap # 2. You should be back at the starting point - join in the first sc and fasten off.
Cut a piece of yarn that is approximately 18" long. Working diagonally across the corners at the top of the hat, seam the ears. Weave in all ends. -
Teen / Small Adult • Head Circumference = 20" - 21.5" • Hat Circumference = 19.5" • Hat Height = 7.5"
Round 1: Ch 54, hdc in the 2nd chain from hook and in each chain across, bring the ends together and sl st to join in the first hdc (53)
Round 2: Ch 1, hdc in each stitch around, join (53)
Round 3 - 17: Repeat Round 2 - Hat should measure approximately 7.25" after the last round; adjust the number of rounds if needed and fasten off. Flatten the piece so the seam is centered at what will be the back of the hat. Starting at one end, sew the top of the hat closed. If preferred, you can slip stitch across instead.
Ear Flap #1: Join in the 8th stitch from the starting seam.
(Ch 1 does not count as a stitch; do not work into it.)
Row 1: Ch 1, sc in same stitch, sc in next 9 stitches, turn (10)
Row 2: Ch 1, sc in first stitch and in each stitch across, turn (10)
Row 3: Ch 1, skip the first st, sc in the next stitch and in each stitch across, turn (9)
Row 4: Ch 1, skip the first st, sc in the next stitch and in each stitch across, turn (8)
Row 5: Ch 1, skip the first st, sc in the next stitch and in each stitch across, turn (7)
Row 6: Ch 1, skip the first st, sc in the next stitch and in each stitch across, turn (6)
Row 7: Ch 1, skip the first st, sc in the next stitch and in each stitch across, turn (5)
Row 8: Ch 1, skip the first st, sc in the next stitch and in each stitch across, turn (4)
Row 9: Ch 1, skip the first st, sc in the next stitch and in each stitch across, turn (3)
Row 10 - 34: Ch 1, sc in each stitch, turn (3)
Fasten off.
Ear Flap #2: Leave 19 stitches unworked across the front of the hat and join in the 20th stitch. Repeat the instructions from Ear Flap #1 but do not fasten off after the last row; continue working around the hat making 1 sc in each stitch around, including the ends of each Ear Flap row.
When you get to the last row of Ear Flap # 1: sc in the first stitch, make 2 sc in the next stitch, sc in the last stitch of the row and continue working around the rest of the hat. Repeat the instructions on the last row of Ear Flap # 2. You should be back at the starting point - join in the first sc and fasten off.
Cut a piece of yarn that is approximately 24" long. Working diagonally across the corners at the top of the hat, seam the ears. Weave in all ends. -
Medium Adult • Head Circumference = 21.5" - 23" • Hat Circumference = 20.5" • Hat Height = 7.75"
Round 1: Ch 57, hdc in the 2nd chain from hook and in each chain across, bring the ends together and sl st to join in the first hdc (56)
Round 2: Ch 1, hdc in each stitch around, join (56)
Round 3 - 18: Repeat Round 2 - Hat should measure approximately 7.5" after the last round; adjust the number of rounds if needed and fasten off. Flatten the piece so the seam is centered at what will be the back of the hat. Starting at one end, sew the top of the hat closed. If preferred, you can slip stitch across instead.
Ear Flap #1: Join in the 9th stitch from the starting seam.
(Ch 1 does not count as a stitch; do not work into it.)
Row 1: Ch 1, sc in same stitch, sc in next 9 stitches, turn (10)
Row 2: Ch 1, sc in first stitch and in each stitch across, turn (10)
Row 3: Ch 1, skip the first st, sc in the next stitch and in each stitch across, turn (9)
Row 4: Ch 1, skip the first st, sc in the next stitch and in each stitch across, turn (8)
Row 5: Ch 1, skip the first st, sc in the next stitch and in each stitch across, turn (7)
Row 6: Ch 1, skip the first st, sc in the next stitch and in each stitch across, turn (6)
Row 7: Ch 1, skip the first st, sc in the next stitch and in each stitch across, turn (5)
Row 8: Ch 1, skip the first st, sc in the next stitch and in each stitch across, turn (4)
Row 9: Ch 1, skip the first st, sc in the next stitch and in each stitch across, turn (3)
Row 10 - 34: Ch 1, sc in each stitch, turn (3) - Fasten off.
Ear Flap #2: Leave 20 stitches unworked across the front of the hat and join in the 21st stitch. Repeat the instructions from Ear Flap #1 but do not fasten off after the last row; continue working around the hat making 1 sc in each stitch around, including the ends of each Ear Flap row.
When you get to the last row of Ear Flap # 1: sc in the first stitch, make 2 sc in the next stitch, sc in the last stitch of the row and continue working around the rest of the hat. Repeat the instructions on the last row of Ear Flap # 2. You should be back at the starting point - join in the first sc and fasten off.
Cut a piece of yarn that is approximately 24" long. Working diagonally across the corners at the top of the hat, seam the ears. Weave in all ends. -
Large Adult • Head Circumference = 23" - 24" • Hat Circumference = 22" • Hat Height = 8"
Round 1: Ch 61, hdc in the 2nd chain from hook and in each chain across, bring the ends together and sl st to join in the first hdc (60)
Round 2: Ch 1, hdc in each stitch around, join (60)
Round 3 - 19: Repeat Round 2 - Hat should measure approximately 7.75" after the last round; adjust the number of rounds if needed and fasten off. Flatten the piece so the seam is centered at what will be the back of the hat. Starting at one end, sew the top of the hat closed. If preferred, you can slip stitch across instead.
Ear Flap #1: Join in the 9th stitch from the starting seam.
(Ch 1 does not count as a stitch; do not work into it.)
Row 1: Ch 1, sc in same stitch, sc in next 9 stitches, turn (11)
Row 2: Ch 1, sc in first stitch and in each stitch across, turn (11)
Row 3: Ch 1, skip the first st, sc in the next stitch and in each stitch across, turn (10)
Row 4: Ch 1, skip the first st, sc in the next stitch and in each stitch across, turn (9)
Row 5: Ch 1, skip the first st, sc in the next stitch and in each stitch across, turn (8)
Row 6: Ch 1, skip the first st, sc in the next stitch and in each stitch across, turn (7)
Row 7: Ch 1, skip the first st, sc in the next stitch and in each stitch across, turn (6)
Row 8: Ch 1, skip the first st, sc in the next stitch and in each stitch across, turn (5)
Row 9: Ch 1, skip the first st, sc in the next stitch and in each stitch across, turn (4)
Row 10: Ch 1, skip the first st, sc in the next stitch and in each stitch across, turn (3)
Row 11 - 35: Ch 1, sc in each stitch, turn (3)
Fasten off.
Ear Flap #2: Leave 22 stitches unworked across the front of the hat and join in the 23rd stitch. Repeat the instructions from Ear Flap #1 but do not fasten off after the last row; continue working around the hat making 1 sc in each stitch around, including the ends of each Ear Flap row.
When you get to the last row of Ear Flap # 1: sc in the first stitch, make 2 sc in the next stitch, sc in the last stitch of the row and continue working around the rest of the hat. Repeat the instructions on the last row of Ear Flap # 2. You should be back at the starting point - join in the first sc and fasten off.
Cut a piece of yarn that is approximately 24" long. Working diagonally across the corners at the top of the hat, seam the ears. Weave in all ends.
Finishing
-
Seaming the Top of the Hat
Flatten the finished piece so the seam is centered at what will be the back of the hat. Starting at one end, sew the top of the hat closed. I recommend using a whip stitch or mattress stitch; however, you could also slip stitch or SC through both layers instead. -
Creating the Ears
1. Visually divide the hat into three sections (vertical dashed lines)
2. Starting at the right side of the hat, sew diagonally across the first corner as indicated by the arrow (I used a back stitch)
3. Weave the yarn through the stitches at the top of the hat (between the dashed lines)
4. Sew diagonally across the second corner of the hat
Read NextThrough Thick and Thin Hooded Scarf
Your Recently Viewed Projects
JaneEK
Aug 08, 2017
I love the long ties on this hat. I make a lot of hats for kids, and I might just swap this style of earflap out for some of the others I use. Its certainly a lot easier to make than the braided ties. While I appreciate all the different sizes this pattern offers, a few photos would be very helpful, especially when it comes to flattening the hat and sewing across to form the ears.
AFC Editor Annalis a
Nov 11, 2016
This would make a great Christmas gift for the cat lover in your life!
Report Inappropriate Comment
Are you sure you would like to report this comment? It will be flagged for our moderators to take action.
Thank you for taking the time to improve the content on our site.

