Sunkissed Lace Cover Up

Prepare your wardrobe for the sunny days of summer with this stylish cover up. This light and lacy crochet design is an intermediate crochet pattern to complete. The instructions include three different sizes to choose from. Wear this trendy item over a tank top, t-shirt or swimsuit. The bright yellow color shown here is perfect for a bright summer day, but feel free to use any other color yarn you prefer. Thanks to boricuaphoenix777 who suggested the name of "Sunkissed Lace".

Crochet HookJ/10 or 6 mm hook
Yarn Weight(4) Medium Weight/Worsted Weight and Aran (16-20 stitches to 4 inches)
MATERIALS:
- STITCH NATION by Debbie Stoller™ “Bamboo Ewe™”: 4 (5, 6) balls 5230 Buttercup.
- Crochet Hooks: 6mm [US J-10] and 6.5mm [US K-10½]
- Yarn needle
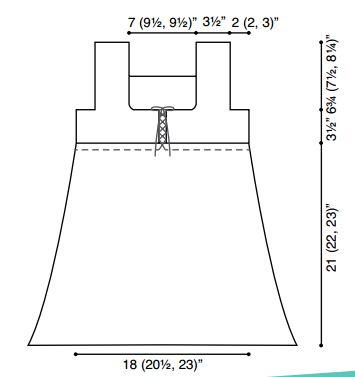
- Diagram
SIZE:
- Directions are for size Small. Changes for Medium and Large are in parentheses.
- Finished Bust: 36 (41, 46)”.
- Finished Length: 31¼ (33, 34¾)”.
GAUGE/TENSION: With smaller hook, 12 sts and 4 rows dc = 4”; 1 rows dc and 1 row tr = 1¾”.
SPECIAL STITCHES
V-st: (Dc, ch 1, dc) in same st or space.
Tr-V-st: (Tr, ch 1, tr) in same st or space.
INSTRUCTIONS:
COVER UP
Left Back
Starting at left side, ch 15.
Row 1 (wrong side): Sc in 2nd ch from hook and in each ch across; turn—14 sc.
Row 2 (right side): Ch 3 (counts a dc here and throughout), skip first 2 sc, *V-st in next sc, skip next 2 sc; repeat from * twice, V-st in next sc, skip next sc, dc in last sc; turn—4 V-sts.
Row 3: Ch 4 (counts as dc, ch 1), (dc, ch 2) in each of next 3 ch-1 spaces, dc in last ch-1 space, ch 1, dc in top of turning chain; turn.
Size L Only
Rows 4-5: Repeat Rows 2-3 once.
Shape Armhole
Row 1: Ch 3, skip next ch-1 space, V-st in each of next 4 dc, dc in 3rd ch of turning chain; ch 28 (31, 34); turn.
Row 2: Sc in 2nd ch from hook and in each of next 26 (29, 32) ch sts, sc in each st and each ch-1 space across, ending with sc in 3rd ch of turning chain; turn—41 (44, 47) sc.
Row 3: Ch 3, skip first 2 sts, *V-st in next st, skip next sts; repeat from * across to last 2 sts, skip next st, dc in last st; turn—13 (14, 15) V-sts.
Row 4: Ch 4 (counts as dc, ch 1), (dc, ch 2) in each ch-1 space across to last ch-1 space, dc in last ch-1 space, ch 1, dc in top of turning chain; turn—12 (13, 14) ch-2 spaces.
Rows 5-8: Repeat Rows 3-4 twice.
Row 9: Ch 3, skip first 2 sts, *V-st in next dc, skip next ch-2 space; repeat from * 8 (9, 10) times, dc in next dc; turn—9 (10, 11) V-sts.
Row 10: Ch 4 (counts as dc, ch 1), (dc, ch 2) in each ch-1 space across to last ch-1 space, dc in last ch-1 space, ch 1, dc in top of turning chain; turn—8 (9, 10) ch-2 spaces. Rows 11-13 (15, 17): Repeat Rows 9-10 (1 [2, 3] times); then repeat Row 9 once. Fasten off.
Right Back
Work same as Left Back through Row 3 (3, 5).
Shape Armhole
Row 1: Ch 3, skip next ch-1 space, V-st in each of next 4 dc, dc in 3rd ch of turning chain, turn. Drop loop from hook. Join a separate strand of yarn in top of first st in Row 1 of Armhole
Shaping, ch 27 (30, 33). Fasten off strand.
Row 2: Pick up dropped loop at end of Row 1 of Armhole Shaping, ch 1, sc in first st, sc in each st and ch-1 space across, sc in each ch of added ch; turn—41 (44, 47) sc.
Rows 3-8: Work same as Rows 3-8 of Left Front. Fasten off.
Row 9: With right side facing, skip first 5 ch-2 spaces, join yarn in next dc, ch 3, *V-st in next dc, skip next ch-2 space; repeat from * 8 (9, 10) times, dc in last sc; turn—9 (10, 11) V-sts.
Rows 10-13 (15, 17): Work same as Rows 10-13 (15, 17) of Left Back. Fasten off.
Right Front
Work same as Left Back through Row 1 of Armhole Shaping.
Row 2: Sc in 2nd ch from hook and in each of next 26 (29, 32) ch sts, hdc in each st and each ch-1 space across, ending with sc in 3rd ch of turning chain; turn—27 (30, 33) sc; 14 hdc.
Row 3: Ch 3, skip first 2 sts, *V-st in next st, skip next 2 sts; repeat from * across to last 2 sts, skip next st, dc in last st; turn—13 (14, 15) V-sts.
Row 4: Ch 4 (counts as dc, ch 1), (dc, ch 2) in each of next 8 (9, 10) ch-1 spaces, (tr, ch 2) in each ch-1 space across to last ch-1 space, tr in last ch-1 space, ch 1, tr in top of turning chain; turn—12 (13, 14) ch-2 spaces; 9 (10, 11) dc; 6 tr.
Rows 5-8: Repeat Rows 3-4 twice.
Row 9: Ch 3, skip first 2 sts, *V-st in next dc, skip next ch-2 space; repeat from * 4 (5, 6) times, dc in next dc; turn—5 (6, 7) V-sts.
Row 10: Ch 4 (counts as dc, ch 1), (dc, ch 2) in each ch-1 space across to last ch-1 space, dc in last ch-1 space, ch 1, dc in top of turning chain; turn—4 (5, 6) ch-2 spaces.
Row 11: Repeat Row 9. Fasten off S.
Sizes M and L Only
Rows 12-13: Repeat Rows 10-11 once. Fasten off.
Left Front
Work same as Right Back through Row 1 of Armhole Shaping.
Drop loop from hook. Join a separate strand of yarn in top of first st in Row 1 of Armhole Shaping, ch 27 (30, 33). Fasten off strand.
Row 2: Pick up dropped loop at end of Row 1 of Armhole Shaping, ch 2 (counts as hdc), hdc in each st and each ch-1 space across to added ch, sc in each ch across; turn—27 (30, 33) sc; 14 hdc.
Row 3: Ch 3, skip first 2 sts, *V-st in next st, skip next 2 sts; repeat from * across to last 2 sts, skip next st, dc in last st; turn—13 (14, 15) V-sts.
Row 4: Ch 5 (counts as tr, ch 1), (tr, ch 2) in each of next 5 ch-1 spaces, (dc, ch 2) in each of ch-1 space across to last ch-1 space, dc in last ch-1 space, ch 1, dc in top of turning chain; turn—12 (13, 14) ch-2 spaces; 9 (10, 11) dc; 6 tr.
Rows 5-8: Repeat Rows 3-4 twice. Fasten off.
Row 9: With right side facing, skip first 7 ch-2 spaces, join yarn in next dc, ch 3, skip next ch 2 space *V-st in next st, skip next ch-2 space; repeat from * 4 (5, 6) times, dc in last 4th ch of turning ch ; turn—5 (6, 7) V-sts.
Row 10: Ch 4 (counts as dc, ch 1), (dc, ch 2) in each ch-1 space across to last ch-1 space, dc in last ch-1 space, ch 1, dc in top of turning chain; turn—4 (5, 6) ch-2 spaces.
Row 11: Repeat Row 3.
Fasten off.
Sizes M and L Only
Rows 15-16: Repeat Rows 13-14 once. Fasten off.
With right sides facing, whipstitch center back seam. Whipstitch Fronts to Back at sides and shoulders.
Skirt
Round 1: With right side facing, join yarn on bottom edge of Back at center seam, ch 1, work 35 (39, 43) sc evenly spaced across to side seam; work 35 (39, 43) sc evenly spaced across to bottom edge of Right Front; starting in bottom left-hand corner of Left Front, work 35 (39, 43) sc evenly spaced across bottom edge of Left Front to side seam; work 35 (39, 43) sc evenly spaced across to center back seam; join with slip st in first sc—140 (156, 172) sc.
Round 2: Ch 4 (counts as dc, ch 1), skip first 2 sts, *dc in next sc, ch 1, skip next sc; repeat from * around; join with a slip st in 3rd ch of ch-4 tch—70 (78, 86) ch-1 spaces.
Round 3: Ch 3, dc in each dc and ch-1 space around; join with slip st in top of turning chain.
Round 4: Ch 4, dc in same st (counts as V-st),ch 1, skip next 3 sts, *V-st in next st, ch 1, skip next 3 sts; repeat from * around; join with slip st in 3rd ch of beginning ch-4—35 (39, 43) V-sts.
Round 5: Ch 3, dc in each st and ch-1 space around; join with slip st in top of turning chain—140 (156, 172) dc.
Rounds 6-9: Repeat Rounds 4-5 (twice).
Round 10: Ch 5 (counts as tr, ch 1), tr in same st (counts as Tr-V-st), skip next 3 sts, *Tr-V-st in next st, ch 1, skip next 3 sts; repeat from * around; join with slip st in 4th ch of beginning ch-5—35 (39, 43) Tr-V-sts.
Round 11: Ch 2 (counts as hdc), hdc in each st and ch-1 space around; join with slip st in top of turning chain.
Rounds 12-17: Repeat Rounds 10-11 (3 times).
Round 18: Ch 4 (counts as dc, ch 1), skip first 2 sts, *dc in next st, ch 1, skip next st; repeat from * around; join with slip st in 3rd ch of beginning ch-4.
Round 19: Ch 2 (counts as hdc), hdc in each st and ch-1 space around to last ch-1 space, work 2 (1, 0) hdc in last ch-1 space; join with slip st in top of turning chain—141 (156, 165) hdc.
Round 20: Ch 5 (counts as tr, ch 1), tr in same st (counts as TrV-st), skip next 2 sts, *Tr-V-st in next st, skip next 2 sts; repeat from * around; join with slip st in 4th ch of beginning ch-5—47 (52, 58) Tr-V-sts.
Round 21 (S): Slip st in next ch-1 space, ch 5 (counts as tr, ch 1), tr in same space (counts as Tr-V-st), Tr-V-st in each of next 2 ch-1 spaces, *(tr, ch 1, tr, ch 1, tr) in next ch-1 space, Tr-V-st in each of next 3 ch-1 spaces; repeat from * 10 (11, 12) times.
Sizes M and L Only: (tr, ch 1, tr, ch 1, tr) in next ch-1 space.
Size L Only: Tr-V-st in each of next 2 ch-1 spaces. All sizes: Join with slip st in 4th ch of beginning ch-5—58 (65, 72) ch-1 spaces.
Round 22: Slip st in next ch-1 space, ch 5 (counts as tr, ch 1), tr in same space (counts as Tr-V-st), Tr-V-st in each ch-1 space around, join with slip st in 4th ch of beginning ch-5—58 (65, 72) Tr-V-sts.
Round 23: Ch 3, dc in each st and ch-1 space around, inc 2 (1, 0) dc evenly spaced around; join with slip st in top of tch—176 (196, 216) dc.
Round 24: Ch 4 (counts as dc, ch 1), skip first 2 sts, *dc in next st, ch 1, skip next st; repeat from * around; join with slip st in 3rd ch of beginning ch-4—88 (98, 108) ch-1 spaces.
Round 25: Ch 3, dc in each st and ch-1 space around; join with slip st in top of turning chain—176 (196, 216) dc.
Round 26: Repeat Round 24.
Sizes M and L Only
Repeat Rounds 25-26 (1 [2] times).
Ruffle
Change to larger hook.
Rounds 1-3: Slip st in next ch-1 space, ch 5 (counts as tr, ch 1), tr in same space (counts as Tr-V-st), ch 1, skip next ch-1 space, *TrV-st in next ch-1 space, ch 1 skip next ch-1 space; repeat from * around; join with slip st in 4th ch of beginning ch-5—44 (49, 54) Tr-V-sts.
Round 4: Ch 4 (counts as dc, ch 1), skip first st, (dc, ch 1) in each st and ch-1 space around, join with sl st in 3rd ch of beginning ch-4—176 (196, 216) ch-1 spaces. Fasten off. Weave in ends.
FINISHING
With smaller hook, make a ch approximately 84 (90, 96)” long.
Fasten off. Tie an overhand knot at each end of drawstring.
Beginning at center back, weave one end of drawstring through eyelet round (Round 2) on either side of body to center front, then crisscross ends and weave through eyelets along front of each bodice. Tighten or loosen drawstring to adjust fit as desired. Tie drawstring in a bow at top of Front.
Armhole Trim (optional)
Round 1: For a tighter armhole, using smaller hook, join yarn at bottom of one armhole, ch 2, hdc evenly around armhole; join with slip st in top of turning chain. Fasten off.
Repeat Armhole Trim around other armhole.
Visit Red Heart's company profile for more great patterns!
Read NextIsla Top
princess6860504
Mar 29, 2018
I like this type of top for the summer. It's a little bit longer for coverage, the color is a pretty sunny yellow, and it has an open lace or mesh style- I can wear my own tank underneath. But!.... Does anyone have any idea how I can adjust this to make it an xl-xxl? The only thing I can think of is to size up my hook a couple sizes.
Daughter of Light
Feb 21, 2018
This Lace Cover Up would be a good basic for my spring/summer wardrobe since I live in the south of the US. If I make it up in a white I can layer it over multiple colors of different tank tops allowing those colors to peek through and accent the beautiful lace design. The empire waistline is flattering for almost any body shape too! It's very nice that they've included several sizes in this one pattern. Thanks for the freebie!
FireFightersMoM
Jul 23, 2017
This little cover up is so darn cute. I like to wear this that hide flaws I have lol. The pattern has been corrected which caused it to get a lot of negatives. It is always a good idea to completely read the comments and then check the pattern out to make sure you see that it has been fixed. This pattern would be nice in blacks, whites oh heck what color wouldn't it look great in?
Zeemer
May 18, 2017
By simply looking at the pattern with a well-written text and clear diagram, I am tempted to make this project in time for summer. This Sunkissed Lace Cover up in yellow is perfect to wear over a one piece or a two-piece swim wear in black or in multicolors. It is so refreshing to the eyes, you want to wear it to the beach to show it off to beach goers. This tunic style top is perfect as over blouse. Those who want to do this project may want to do this in other vibrant colors or in multicolored yarn. White would also look good for this top. Cheers!
Hippie Chick
Apr 28, 2017
A bright and happy shade of yellow. Yellow is one color that is missing from my wardrobe. It looks very nice with her hair color also. I had that color of hair but changed it back to blonde because my clothes didnt match and looked so awkward. She rocks the two together though. Love the look of this cover up.
Lynn K
Apr 16, 2017
I loved this as soon as I saw it and then I saw complaints in the comments about the pattern being incorrect. I decided to trust Julia that the problems had been corrected so I made it for my daughter and am happy to say that I had no problems at all! It was really simple to follow, apart from me not reading the pattern correctly, lol! Sadly my laptop has a major issue uploading photos but it really is not that difficult to make. Enjoy!
melissasea22
Jul 12, 2016
Honestly I never do any RedHeart Patterns anymore no one there cares whether or not these patterns are correct/correctable any more! Just like this site, They Can't answer those the correcting questions! Terrible just terrible... I have tried this pattern before, it is not any better or never been corrected since the RedHeart site posted it when it was new!
AFC Editor Julia
Jul 13, 2016
Hi Melissasea22, I'm sorry you were having trouble with Red Heart patterns previously. I just went back to the company website, and it looks like there's a newer/updated version of this pattern there. I went ahead and edited this page to match the Red Heart page exactly, so this is now the most current version. If you can let me know where you're having trouble as you work through this pattern, I can maybe try and help out - or, you can pose a question to our Facebook community (Facebook.com/allfreecrochet) to see if anyone has any insight. Good luck, and I hope this helps! Julia, editor for AllFreeCrochet
Zeemer
May 24, 2016
Wow. This is perfect for summer. Very elegant cover for a 2-pc or one-pc swimsuit, a tee shirt or tank top. The color is very appropriate. You can also make this in colors that you like. Thanks for having the pattern right in front.
TWilkinson312 8947 062
Jun 16, 2015
Why do the right front and left front not look the same? I've crocheted the 1st four pieces and am ready to put them together, but I am confused. Please help!
TWilkinson312 8947 062
Jun 18, 2015
I've figured it out. Instructions are wrong. Row 9 for left front should only have 5 V-stitches, not 9.
tumbleweeds2009 77 99511
May 06, 2015
For the left back it says repeat rows 13 and 14 for large size but there is no row 13 and 14. What should I do?
domestic1 1554898
Mar 27, 2014
I'm trying to make this and everything was going fine until I started making the right back and I'm not sure what to do. It says to work same as left back but adds through row 5. I really want to finish this project so any help will be greatly appreciated. Thank you for all the free patterns!
Dragonfly Lady
Mar 29, 2013
Spring Tulip Cover Up I love it. It immediately made me think of my early tulips when they start to bloom.
judysharp
Mar 29, 2013
Sunshine Bright !!! That is what I would call it. I will be delighted to make this for my summer wardrobe. Thank you so much.
Julie Hephzibah D
Mar 28, 2013
"Pretty Perfect Cover Up" or "Perfectly Pretty Cover Up" ... Looking forward to making my own. :)
Report Inappropriate Comment
Are you sure you would like to report this comment? It will be flagged for our moderators to take action.
Thank you for taking the time to improve the content on our site.

