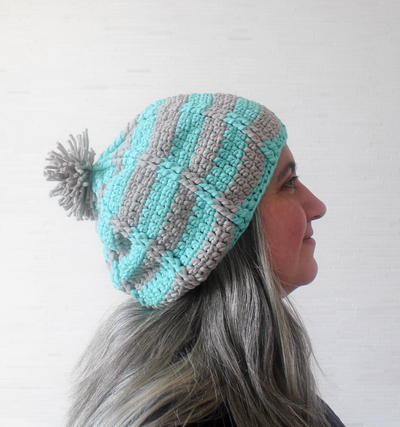
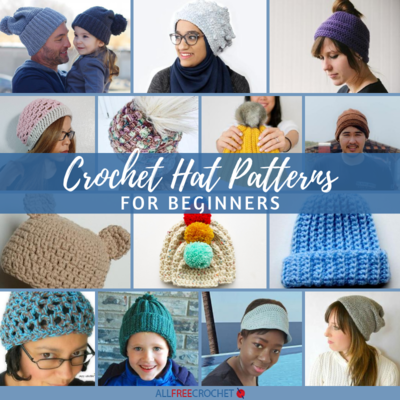
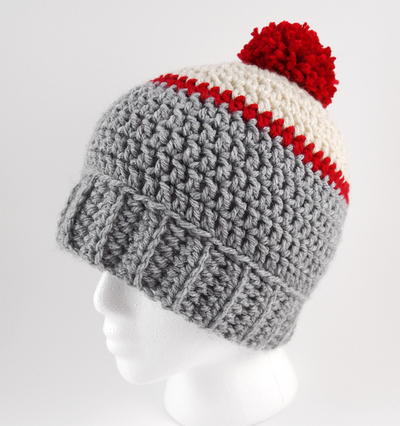
Ice Fishing Beanie

There's something so right about the classic pompom crochet beanie, like the Ice Fishing Beanie. Worked in a simple stitch and featuring a classic fold-up ribbing and a little pompom at the very top of the hat, this crochet hat pattern is your classic, everyday winter hat. This is an easy design to work up and since it features bulky-weight yarn, is super warm. There are minimal color changes in this design, but you could also work this in a solid hue or a variegated color to minimize those further. With sizes from newborn through adult, everyone in your family will be begging for one of their very own.
NotesNotes:
•The hat can be started with a Magic Ring or with the instructions given in Round 1.
•The beginning chain does not count as a stitch.
•Each round is started in the same stitch as your beginning chain.
•The end of each round is joined by slip stitching in the first stitch of the round, not the beginning chain.

Crochet HookJ/10 or 6 mm hook
Yarn Weight(5) Bulky/Chunky (12-15 stitches for 4 inches)
Crochet Gauge11 stitches and 7 rows = 4" (10 cm)
Finished SizeNewborn through Large Adult
Materials List
- Bulky weight #5 yarn such as Knit Picks Brava Bulky or Loops & Threads Charisma (Color A, B & C)
- 6.0 mm (J-10) crochet hook or size needed to obtain the gauge
- yarn needle for weaving in ends
Pattern
-
Newborn • Head Circumference = 13" - 15" • Hat Circumference = 13" • Height hat = 5"
Hat Brim - Start with Color A; leave a lengthy tail for seaming the ends of the brim together.
Row 1: Ch 5, hdc in 2nd chain and in each chain to end, turn (4)
Row 2: Ch 1, working in BACK LOOPS only - hdc in each stitch across, turn (4)
Row 3 - 23: Repeat Row 2
Hat Body - Turn your work so you are working in the ends of the Rows.
Round 1: Ch 1, *make 1 sc in the end of the first row, make 2 sc in the next row* repeat across, make 2 sc into the foundation chain after the last row, bring the ends together and join in the first sc (36)
Round 2: Working in BACK LOOPS for this round only - Ch 2, dc in same stitch and in each stitch around, join in first dc (36)
Round 3 - 4: Ch 2, dc in each stitch around, join (36)
Round 5: With Color B – Ch 1, hdc in each stitch around, join (36)
Round 6: With Color C - Ch 1, *dc2tog, dc in next 4 stitches* repeat around, join (30)
Round 7: Ch 2, *dc2tog, dc in next stitch* repeat around, join (20)
Round 8: Ch 2, *dc2tog* 10 times, join and fasten off, leaving a lengthy tail (10)
With a yarn needle, weave the tail through the front loop of all 10 stitches and pull gently to close the hole. Use the starting tail to seam the ends of the brim together. Weave in all ends. Attach a pompom if desired. -
0 - 3 Months • Head Circumference = 14" - 16" • Hat Circumference = 14" • Height hat = 5.5"
Hat Brim - Start with Color A; leave a lengthy tail for seaming the ends of the brim together.
Row 1: Ch 5, hdc in 2nd chain and in each chain to end, turn (4)
Row 2: Ch 1, working in BACK LOOPS only - hdc in each stitch across, turn (4)
Row 3 - 25: Repeat Row 2
Hat Body - Turn your work so you are working in the ends of the Rows.
Round 1: Ch 1, *make 1 sc in the end of the first row, make 2 sc in the next row* repeat across, make 2 sc into the foundation chain after the last row, bring the ends together and join in the first sc (39)
Round 2: Working in BACK LOOPS for this round only - Ch 2, dc in same stitch and in each stitch around, join in first dc (39)
Round 3 - 5: Ch 2, dc in each stitch around, join (39)
Round 6: With Color B – Ch 1, hdc in each stitch around, join (39)
Round 7: With Color C - Ch 1, dc in first 3 stitches, *dc2tog, dc in next 2 stitches* repeat around, join (30)
Round 8: Ch 2, *dc2tog, dc in next stitch* repeat around, join (20)
Round 9: Ch 2, *dc2tog* 10 times, join and fasten off, leaving a lengthy tail (10)
With a yarn needle, weave the tail through the front loop of all 10 stitches and pull gently to close the hole. Use the starting tail to seam the ends of the brim together. Weave in all ends. Attach a pompom if desired. -
3 - 6 Months • Head Circumference = 15" - 17" • Hat Circumference = 15" • Height hat = 6"
Hat Brim - Start with Color A; leave a lengthy tail for seaming the ends of the brim together.
Row 1: Ch 5, hdc in 2nd chain and in each chain to end, turn (4)
Row 2: Ch 1, working in BACK LOOPS only - hdc in each stitch across, turn (4)
Row 3 - 27: Repeat Row 2
Hat Body - Turn your work so you are working in the ends of the Rows.
Round 1: Ch 1, *make 1 sc in the end of the first row, make 2 sc in the next row* repeat across, make 2 sc into the foundation chain after the last row, bring the ends together and join in the first sc (42)
Round 2: Working in BACK LOOPS for this round only - Ch 2, dc in same stitch and in each stitch around, join in first dc (42)
Round 3 - 5: Ch 2, dc in each stitch around, join (42)
Round 6: With Color B – Ch 1, hdc in each stitch around, join (42)
Round 7: With Color C - Ch 2, *dc2tog, dc in next 19 stitches* repeat around, join (40)
Round 8: Ch 2 *dc2tog, dc in next 2 stitches* repeat around, join (30)
Round 9: Ch 2, *dc2tog, dc in next stitch* repeat around, join (20)
Round 10: Ch 2, *dc2tog* 10 times, join and fasten off, leaving a lengthy tail (10)
With a yarn needle, weave the tail through the front loop of all 10 stitches and pull gently to close the hole. Use the starting tail to seam the ends of the brim together. Weave in all ends. Attach a pompom if desired. -
6 - 12 Months
Head Circumference = 16" - 18" • Hat Circumference = 16" • Height hat = 6.5"
Hat Brim - Start with Color A; leave a lengthy tail for seaming the ends of the brim together.
Row 1: Ch 6, hdc in 2nd chain and in each chain to end, turn (5)
Row 2: Ch 1, working in BACK LOOPS only - hdc in each stitch across, turn (5)
Row 3 - 29: Repeat Row 2
Hat Body - Turn your work so you are working in the ends of the Rows.
Round 1: Ch 1, *make 1 sc in the end of the first row, make 2 sc in the next row* repeat across, make 2 sc into the foundation chain after the last row, bring the ends together and join in the first sc (45)
Round 2: Working in BACK LOOPS for this round only - Ch 2, dc in same stitch and in each stitch around, join in first dc (45)
Round 3 - 5: Ch 2, dc in each stitch around, join (45)
Round 6: With Color B – Ch 1, hdc in each stitch around, join (45)
Round 7: With Color C - Ch 2, *dc2tog, dc in next 7 stitches* repeat around, join (40)
Round 8: Ch 2 *dc2tog, dc in next 2 stitches* repeat around, join (30)
Round 9: Ch 2, *dc2tog, dc in next stitch* repeat around, join (20)
Round 10: Ch 2, *dc2tog* 10 times, join and fasten off, leaving a lengthy tail (10)
With a yarn needle, weave the tail through the front loop of all 10 stitches and pull gently to close the hole. Use the starting tail to seam the ends of the brim together. Weave in all ends. Attach a pompom if desired. -
Toddler & Small Child (Approximately 1 to 5 years - please measure for a more accurate fit)
Head Circumference = 17" - 19" • Hat Circumference = 17" • Height hat = 7.25"
Hat Brim - Start with Color A; leave a lengthy tail for seaming the ends of the brim together.
Row 1: Ch 6, hdc in 2nd chain and in each chain to end, turn (5)
Row 2: Ch 1, working in BACK LOOPS only - hdc in each stitch across, turn (5)
Row 3 - 31: Repeat Row 2
Hat Body - Turn your work so you are working in the ends of the Rows.
Round 1: Ch 1, *make 1 sc in the end of the first row, make 2 sc in the next row* repeat across, make 2 sc into the foundation chain after the last row, bring the ends together and join in the first sc (48)
Round 2: Working in BACK LOOPS for this round only - Ch 2, dc in same stitch and in each stitch around, join in first dc (48)
Round 3 - 6: Ch 2, dc in each stitch around, join (48)
Round 7: With Color B - Ch 1, hdc in each stitch around, join (48)
Round 8: With Color C - Ch 2, *dc2tog, dc in next 4 stitches* repeat around, join (40)
Round 9: Ch 2, *dc2tog, dc in next 2 stitches* repeat around, join (30)
Round 10: Ch 2, *dc2tog, dc in next stitch* repeat around, join (20)
Round 11: Ch 2, *dc2tog* 10 times, join and fasten off, leaving a lengthy tail (10)
With a yarn needle, weave the tail through the front loop of all 10 stitches and pull gently to close the hole. Use the starting tail to seam the ends of the brim together. Weave in all ends. Attach a pompom if desired. -
Child (Approximately 5 to 10 years - please measure for a more accurate fit)
Head Circumference = 18" - 20" • Hat Circumference = 18" • Height hat = 7.5"
Hat Brim - Start with Color A; leave a lengthy tail for seaming the ends of the brim together.
Row 1: Ch 7, hdc in 2nd chain and in each chain across, turn (6)
Row 2: Ch 1, working in BACK LOOPS only - hdc in each stitch across, turn (6)
Row 3 - 33: Repeat Row 2
Hat Body - Turn your work so you are working in the ends of the Rows.
Round 1: Ch 1, *make 1 sc in the end of the first row, make 2 sc in the next row* repeat across, make 2 sc into the foundation chain after the last row, bring the ends together and join in the first sc (51)
Round 2: Working in BACK LOOPS for this round only - Ch 2, dc in same stitch and in each stitch around, join in first dc (51)
Round 3 - 6: Ch 2, dc in each stitch around, join (51)
Round 7: With Color B - Ch 1, hdc2tog, hdc in each remaining stitch around, join (50)
Round 8: With Color C - Ch 2, *dc2tog, dc in next 3 stitches* repeat around, join (40)
Round 9: Ch 2, *dc2tog, dc in next 2 stitches* repeat around, join (30)
Round 10: Ch 2, *dc2tog, dc in next stitch* repeat around, join (20)
Round 11: Ch 2, *dc2tog* 10 times, join and fasten off, leaving a lengthy tail (10)
With a yarn needle, weave the tail through the front loop of all 10 stitches and pull gently to close the hole. Use the starting tail to seam the ends of the brim together. Weave in all ends. Attach a pompom if desired. -
Teen / Small Adult
Head Circumference = 20" - 22" • Hat Circumference = 19" • Height hat = 8"
Hat Brim - Start with Color A; leave a lengthy tail for seaming the ends of the brim together.
Row 1: Ch 7, hdc in 2nd chain and in each chain across, turn (6)
Row 2: Ch 1, working in BACK LOOPS only - hdc in each stitch across, turn (6)
Row 3 - 35: Repeat Row 2
Hat Body - Turn your work so you are working in the ends of the Rows.
Round 1: Ch 1, *make 1 sc in the end of the first row, make 2 sc in the next row* repeat across, make 2 sc into the foundation chain after the last row, bring the ends together and join in the first sc (54)
Round 2: Working in BACK LOOPS for this round only - Ch 2, dc in same stitch and in each stitch around, join in first dc (54)
Round 3 - 6: Ch 2, dc in each stitch around, join (54)
Round 7: With Color B - Ch 1, hdc in each stitch around, join (54)
Round 8: With Color C - Ch 2, dc in first 2 sts, *dc2tog, dc in next 11 stitches* repeat from * around, join (50)
Round 9: Ch 2, *dc2tog, dc in next 3 stitches* repeat around, join (40)
Round 10: Ch 2, *dc2tog, dc in next 2 stitches* repeat around, join (30)
Round 11: Ch 2, *dc2tog, dc in next stitch* repeat around, join (20)
Round 12: Ch 2, *dc2tog* 10 times, join and fasten off, leaving a lengthy tail (10)
With a yarn needle, weave the tail through the front loop of all 10 stitches and pull gently to close the hole. Use the starting tail to seam the ends of the brim together. Weave in all ends. Attach a pompom if desired. -
Medium Adult • Head Circumference = 22" - 23" • Hat Circumference = 20.5" • Height hat = 8"
Hat Brim - Start with Color A; leave a lengthy tail for seaming the ends of the brim together.
Row 1: Ch 7, hdc in 2nd chain and in each chain across, turn (6)
Row 2: Ch 1, working in BACK LOOPS only - hdc in each stitch across, turn (6)
Row 3 - 37: Repeat Row 2
Hat Body - Turn your work so you are working in the ends of the Rows.
Round 1: Ch 1, *make 1 sc in the end of the first row, make 2 sc in the next row* repeat across, make 2 sc into the foundation chain after the last row, bring the ends together and join in the first sc (57)
Round 2: Working in BACK LOOPS for this round only - Ch 2, dc in same stitch and in each stitch around, join in first dc (57)
Round 3 - 6: Ch 2, dc in each stitch around, join (57)
Round 7: With Color B - Ch 1, hdc in each stitch around, join (57)
Round 8: With Color C - Ch 2, dc in first 2 sts, *dc2tog, dc in next 11 stitches* repeat from * around, join (50)
Round 9: Ch 2, *dc2tog, dc in next 3 stitches* repeat around, join (40)
Round 10: Ch 2, *dc2tog, dc in next 2 stitches* repeat around, join (30)
Round 11: Ch 2, *dc2tog, dc in next stitch* repeat around, join (20)
Round 12: Ch 2, *dc2tog* 10 times, join and fasten off, leaving a lengthy tail (10)
With a yarn needle, weave the tail through the front loop of all 10 stitches and pull gently to close the hole. Use the starting tail to seam the ends of the brim together. Weave in all ends. Attach a pompom if desired. -
Large Adult
Head Circumference = 23" - 24" • Hat Circumference = 22" • Height hat = 8"
Hat Brim - Start with Color A; leave a lengthy tail for seaming the ends of the brim together.
Row 1: Ch 7, hdc in 2nd chain and in each chain across, turn (6)
Row 2: Ch 1, working in BACK LOOPS only - hdc in each stitch across, turn (6)
Row 3 - 39: Repeat Row 2
Hat Body - Turn your work so you are working in the ends of the Rows.
Round 1: Ch 1, *make 1 sc in the end of the first row, make 2 sc in the next row* repeat across, make 2 sc into the foundation chain after the last row, bring the ends together and join in the first sc (60)
Round 2: Working in BACK LOOPS for this round only - Ch 2, dc in same stitch and in each stitch around, join in first dc (60)
Round 3 - 6: Ch 2, dc in each stitch around, join (60)
Round 7: With Color B - Ch 1, hdc in each stitch around, join (60)
Round 8: With Color C - Ch 2, *dc2tog, dc in next 4 stitches* repeat around, join (50)
Round 9: Ch 2, *dc2tog, dc in next 3 stitches* repeat around, join (40)
Round 10: Ch 2, *dc2tog, dc in next 2 stitches* repeat around, join (30)
Round 11: Ch 2, *dc2tog, dc in next stitch* repeat around, join (20)
Round 12: Ch 2, *dc2tog* 10 times, join and fasten off, leaving a lengthy tail (10)
With a yarn needle, weave the tail through the front loop of all 10 stitches and pull gently to close the hole. Use the starting tail to seam the ends of the brim together. Weave in all ends. Attach a pompom if desired.
Read NextSpiral Messy Bun Hat
Your Recently Viewed Projects
Thanks for your comment. Don't forget to share!
JaneEK
Aug 08, 2017
Folks around here do plenty of angling, but were too far south for the ice fishing variety. This would still be a cute novelty hat for your favorite fisherman as pretty much all of us started using the hook, line and bobber method. I especially like that the brim can be worn down as shown in the photo, or folded up for more of a toque look. Besides, I need more practice attaching hats to ribbed brims.
Zeemer
Nov 25, 2016
This is another crochet pattern that deserves a five-star rating because it shows us how to do different sizes for different ages. Awesome! Thank you. I've always loved the color gray and this one is no exception. I like the medium shade of gray used here. This Ice Fishing Beanie has been carefully crafted that started with a ribbed edge then worked rows and rows of half double crochets from the top down then connected to the ribbed edge of the beanie. The red combo can be done in any other color if you don't like the color red and the pompom can be optional. Thanks for the free pattern.
Cheryl Y
Nov 25, 2016
I really like the look of this Ice Fishing Beanie. After reading the patterns I think it will go quickly and will be easy to make. I like the colors picked and I know my hubby will appreciate the warmth of the bulky yarn. I like having the pattern for different sizes right here, taking the guess work out of it. I have a basket of winter hats for whom ever may need one and I'll be adding a few of these to that basket. Thank you so much for this free crochet pattern.
mulberrygalprinces s
Nov 15, 2016
This is one of the easiest patterns I have ever read. And it is so handsome. I can make it up in a matter of hours. I have three grand sons that will like them and I know they will look good in them. I have plenty of yarn so all I need to do is sit down and do it. Thank you for sharing this.
Report Inappropriate Comment
Are you sure you would like to report this comment? It will be flagged for our moderators to take action.
Thank you for taking the time to improve the content on our site.