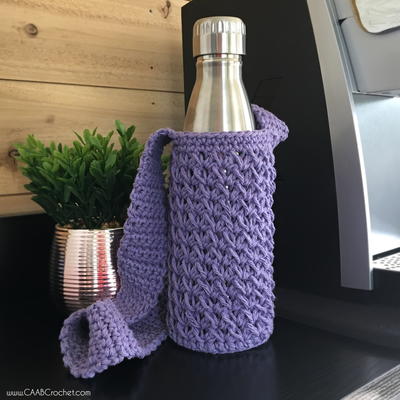
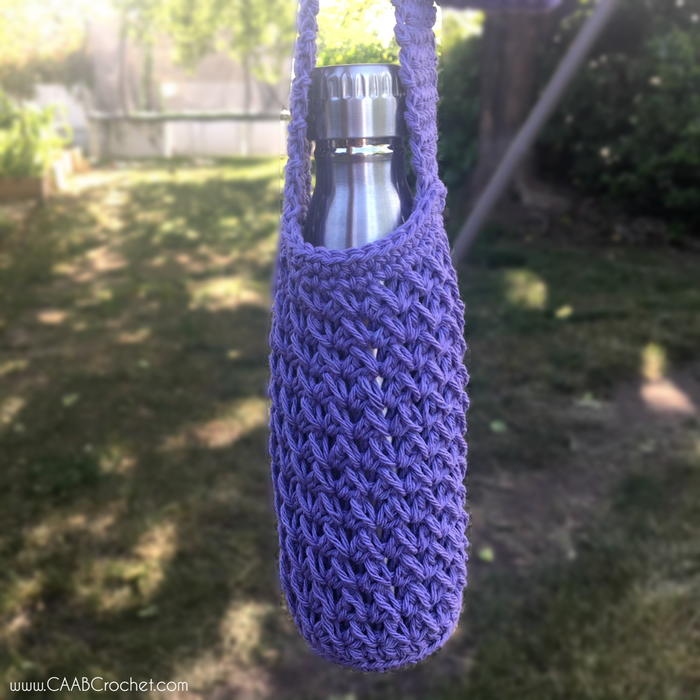
Trellis Bottle Holder

If you're active or like to go out while it's warm it's important to bring a water bottle to stay hydrated. However, carrying around the water bottle can be a hassle so why not make a bottle holder? This pattern shows you how to make a cute Trellis Bottle Holder that can hold a standard 16.9 fl oz water bottle. This project is simple to make, but extremely practical and you can adjust it however you like to make it work the best for you and your routine.

Crochet HookI/9 or 5.5 mm hook
Yarn Weight(4) Medium Weight/Worsted Weight and Aran (16-20 stitches to 4 inches)
Crochet GaugeThe easiest place to measure gauge in this pattern is after the base (round 6) has been completed. After round 6, my base was 3 ¾” in diameter.
Finished SizeWhen completed at this gauge, the bottle carrier should fit a typical 16.9 fl oz. water bottle loosely and a slightly larger bottle with a snug fit.
Materials List
- Size 4 Yarn, 120 yards (1 skein of Lily Sugar N Cream)
- US I9/ 5.5 mm Crochet Hook
- Yarn Needle
- Scissors
Instructions
Stitches & Abbreviations Used:
- (ch) chain
- (sl st) slip stitch
- (sc) single crochet
- (dc) double crochet
- (sk) skip
- (yo) yarn over
Pattern Notes:
- Beginning chain of each round/row does not count as a stitch.
- I tend to crochet tightly. So be sure to check your gauge and if you are crocheting more loosely you can move to a smaller hook (or larger if you crochet even more tightly).
- This pattern instructs you to join at the end of each round. This will create a slightly noticeable seam that runs diagonally along the side of the project. If this bothers you, an alternative method (once you have started working up the sides on round 8) is to not join, but crochet in a “continuous” round. If you choose to use this method, just be sure to use a stitch marker to keep track of the end of your round.
-
Round 1: Ch 2. 6 sc in the 2nd chain from the hook. Join with a sl st to the first sc in the
round. (6) -
Round 2: Ch 1. 2 sc in the same stitch and each stitch around. Join with a sl st to the
first sc of the round. (12) -
Round 3: Ch 1. 1 sc in the same stitch. 2 sc in the next stitch. *1 sc in next stitch. 2 sc
in next stitch.* Repeat from * to * to the end of the round and join with a sl st to the first
sc of the round. (18) -
Round 4: Ch 1. 1 sc in the same stitch. 1 Sc in the next stitch. 2 sc in the next stitch.
*Sc in next stitch. Sc in next stitch. 2 sc in next stitch.* Repeat from * to * to the end of
the round and join with a sl st to the first sc of the round. (24) -
Round 5: Ch 1. 1 sc in the same stitch. Sc in next stitch. Sc in next stitch. 2 sc in next
stitch. *Place 1 sc in each of the next 3 stitches. 2 sc in next stitch.* Repeat from * to * to the end of the round and join with a sl st to the first sc of the round. (30) -
Round 6: Ch 1. 1 sc in the same stitch. 1 sc in each of the next 3 stitches. 2 sc in the
next stitch. *1 sc in each of the next 4 stitches. 2 sc in the next stitch.* Repeat from * to * to the end of the round and join with a sl st to the first sc of the round. (36)
Note: Round 6 will complete the base of the carrier and as you
move on to Round 7, you will begin to work up the sides. With the gauge of this pattern
the base after Round 6 should be about 3 3/4” in diameter. If your base is much larger
or smaller, you may want to consider starting over with a smaller or larger hook. -
Round 7: Ch 1. (Crochet in the back loop only for this round) 1 sc in the same stitch
and in each stitch around. Join with a sl st to the first sc of the round. (36)
Note: In an effort to break up some of the instructions in rounds 8 and 9, so that they
are not one long paragraph that is hard to follow, I will insert a line break for each sub-
step. This will make the directions look a bit like a long list. -
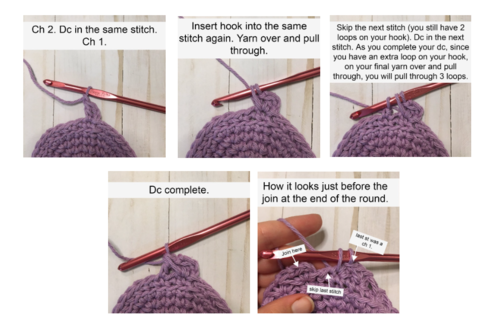
Round 8: Ch 2. Dc in the same stitch. Ch 1.
-
Insert hook into the same stitch again. Yarn over and pull through. (Pull enough through
so that the tension is loose. This will allow the loop to stretch across the space created
by the upcoming skipped stitch.) -
Skip the next stitch (you still have two loops on your hook).
-
*Dc in the next stitch.
Note: As you complete your dc, since you have an extra loop on
your hook, on your final yarn over and pull through, you will pull through 3 loops (rather
than the usual last 2 of a dc). -
Ch 1. Insert hook into the same stitch again.
-
Yo and pull through (again, the goal is to have loose tension on this loop).
-
Skip the next stitch (you still have two loops on your hook).*
-
Repeat from * to * around.
-
At the end of the round your last step will be to skip the last stitch. You will have two
loops on your hook. Join with a sl st to the first dc of the round. (36) (see photos below
for visuals for this round)
Click on the image to enlarge. -
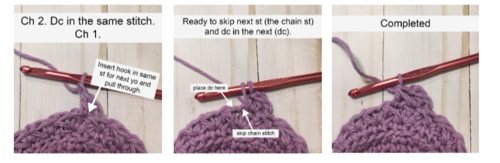
Round 9: Ch 2. Dc in the same stitch. Ch 1.
-
Insert hook into the same stitch again. Yarn over and pull through.
-
Skip the next stitch. Skip the next stitch.
-
*Dc in the next stitch.
-
Ch 1. Insert hook into the same stitch again.
-
Yo and pull through.
-
Skip the next stitch.*
-
Repeat from * to * around.
-
At the end of the round your last step will be to skip the last stitch. You will have two loops on your hook. Join with a sl st to the first dc of the round. (36)
Note: If you’re unsure what stitch your dc should be going into for rounds 9+, it should go in the dc from the previous round, which is the “more loose” stitch, which looks like it stretches between the gap between dc. The ch 1 will be skipped, which will probably be the tighter stitch in your row. See photos below for additional help. Click on the image to enlarge. -
Rounds 10 – 19: Repeat round 9. (36).
Note: At this point my bottle holder was 6 ½” tall (measuring rounds 7 – 19). If you
would like your bottle holder to be taller or shorter, you can add or remove rounds here.
This round will be followed by two rounds of sc, which will add about ½ an inch. -
Round 20: Ch 1. Sc in the same stitch and each stitch around. Join with a sl st to the first sc of the round. (36)
-
Round 21: Repeat round 20. Do not finish off.
Creating the Strap
-
Row 1: After completing round 21, ch 1. Sc in the same stitch and each of the next 5 stitches. (6)
-
Row 2: Ch 1. Turn. Sc in the same stitch and each stitch across. (6)
-
Rows 3-108: Repeat row 2.
At this point my strap was roughly 27 ½” long. You can add or remove rows to create a strap length according to your personal preference. When you reach the length you desire, finish off, leaving a long tail. -
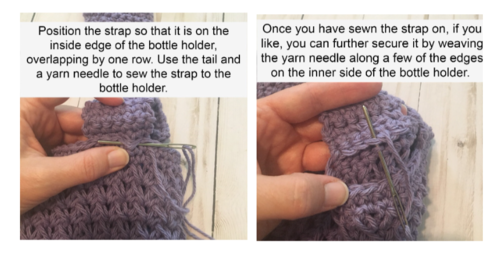
To attach the 2 nd end of the strap, count along the top of the bottle carrier, 12 stitches from the strap. Align the second end along stitches 13 – 18 (see photos below). Position the strap so that it is on the inside edge of the bottle holder, overlapping by one row (double check that your strap is not twisted). Use the tail and a yarn needle to sew the strap to the bottle holder. Positioning the strap at stitches 13-18 of the bottle holder will mean that there are 12 stitches between both the straps on either side.
-
Once you have sewn the strap, if you like, you can further secure it by weaving the yarn needle along a few of the edges on the inner side of the bottle holder. Once you have secured it to your satisfaction, weave in the ends.
Click on the images to enlarge them.

Up Next:
Up Next:
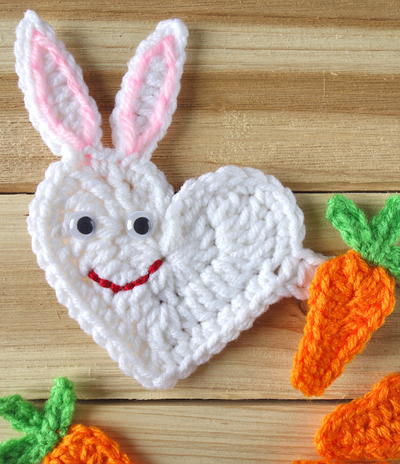
31 Free Crochet Bags + Free eBook
Read Next2770+ Free Crochet Patterns