Metallic Masquerade Mask
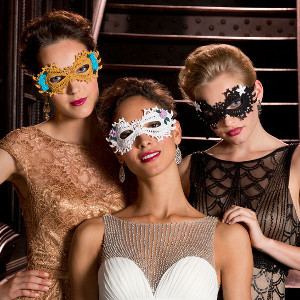
One of the best parts about Halloween is being able to dress up as whatever or whoever you want. Try on this Metallic Masquerade Mask to hide your identity and attend that ball or party everyone's been talking about. You could even throw your own masquerade party once you know you'll have the best homemade mask of anyone there. It doesn't even have to be Halloween- this crochet mask is perfect for any ball or similar special occasion.

Crochet Hook5 or 1.9 mm hook (steel)
Yarn Weight(0) Lace (33-40 stitches to 4 inches). Includes crochet thread.
MATERIALS:
- Aunt Lydia's Metallic Crochet Thread, Size 10:
- Version 1: 1P White/Pearl (1 ball)
- Version 2: 90G Gold/Gold (1 ball)
- Version 3: Small amount of 1P White/Pearl for embellishments
- Aunt Lydia's Classic Crochet Thread, Size 10:
- Version 1: Small amount of 495 Wood Violet and 449 Forest Green for embellishments
- Version 2: Small amount of 451 Parakeet and 449 Forest Green for embellishments
- Version 3: 12 Black (1 ball)
- Susan Bates Steel Crochet Hook (1.7 mm/US 5)
- Stitch Markers
- Yarn Needle
- Fabric Stiffener
- Styrofoam Wig Head
- Small Paint Brush
- 18" (46 cm) of 5/8" (15 mm) Wide Fold-over Elastic
- 2 Size 1/0 Snaps
- Sewing Needle and Thread
- Size 10 Beads
- 7 mm Silver Star Sequins (Version 3 Only)
GAUGE:
Gauge is not important for this project.
SIZE:
Mask measures 7 1/2" (19 cm) long.
PATTERN NOTES:
Mock padding cord ring = [Ch 5, slip st to form a ring, fasten off ] 2 times, holding both rings together, work required number of sts around both rings at the same time, working over the tails of the rings.
Picot = Ch 3, slip st in base of ch.
Puff St = [Yo, insert hook in designated space or st, draw loop up to height of a dc] 6 times, yo, draw through all loops on hook, ch 1.
Cdc = Skip 1 st, dc in next st, reaching behind dc just made, dc in skipped st.
Cdc increase = Dc in next dc, reaching behind dc just made, dc in previous st.
MASK (all versions)
Round 1: With desired main color, make mock padding cord ring, working 13 sc around both rings, join with slip st in first sc.
Round 2: Ch 1, sc in same st, ch 2, sc in next sc, [ch 1, sc in next sc] 7 times, (bottom side of mask) ch 2, sc in next sc, [ch 1, sc in next sc] 3 times, ch 1, join with slip st in first sc.
Side A Eye Piece
Row 1: Slip st in ch-2 space, ch 35, slip st in same space.
Row 2: Ch 1, turn, 49 sc in ch-35 space, join with slip st in ch-2 space.
Row 3: Ch 1, turn, sc in next 9 sc, hdc in next 3 sc, dc in next 8 sc, [2 dc in next sc, dc in next sc] 4 times, 2 dc in next sc, dc in next 8 sc, hdc in next 3 sc, sc in next 9 sc, slip st in ch-2 space. Fasten off, weave in ends.
Side B Eye Piece
Join same color in next ch-2 space, follow instructions for side A, do not fasten off.
Eye Bridge
Row 1: Turn, slip st up to and in 3rd sc on Side B, ch 1, turn, sc in same sc, [ch 1, dc in next ch-1 space on ring] 4 times, ch 1, sc in 3rd sc on next eye piece.
Row 2: Slip st in next sc, ch 1, turn, sc in next ch-1 space, [ch 3, sc in next ch-1 space] 4 times, join with slip st in next sc on eye piece.
Row 3: Ch 1, turn, [2 sc in next ch-3 space, picot in last sc made, sc in same space] 4 times, join with slip st in 4th sc on eye piece.
Do not fasten off, Do not turn.
Side A Eye Piece
Row 4: Sc in next sc, ch 2, skip next sc, dc in next sc, ch 1, dc in next sc, ch 1, skip next hdc, dc in next hdc, ch 1, skip next hdc, dc in next dc, [ch 1, skip next dc, dc in next dc] 2 times, dc in next dc, 2 cdc worked in next 4 dc, 10 cdc increases worked in next 10 dc, 3 cdc worked in next 6 dc, dc in next 2 dc, ch 1, skip next dc, dc in next dc, ch 1, skip next hdc, dc in next hdc, ch 1, skip next hdc, dc in next sc, [ch 1, skip next sc, dc in next sc] 3 times, ch 2, skip next sc, slip st in next sc, slip st in ch-2 space on ring.
Row 5: Ch 1, turn, 3 sc in next ch-2 space, [2 sc in ch-1 space] 6 times, sc in next 30 dc, hdc in next 2 dc, dc in next 2 dc, [puff st in LC3805 Masquerade Fancy Mask next ch-1 space, dc in next dc] 3 times, puff st in next ch-1 space, hdc in next dc, 2 sc in next ch-1 space, 2 sc in next ch-2 space, slip st in joining between eye piece and nose bridge.
Row 6: Ch 1, turn, sc in next 3 sc, picot in last sc made, sc in next sc, sc in next hdc, sc in next puff st, sc in next dc, sc in next puff st, picot in last sc made, sc in next dc, sc in next puff st, sc in next dc, ch 7, turn, skip next 5 sc, sc in next sc, slip st in next sc, ch 1, turn, [4 sc in ch-7 space, picot in last sc made] 2 times, 3 sc in same space, sc in same dc on eye piece, sc in next puff st, sc in next 2 dc, sc in next 2 hdc, sc in next 2 sc, ch 3, turn, skip next 2 sc, dc in next sc, ch 3, dc in same sc, ch 3, skip next 2 sc, sc in next sc, slip st in next sc, ch 1, turn, 2 sc in next ch-3 space, picot in last sc made, sc in same space, 3 sc in next ch-3 space, picot in last sc made, 2 sc in next ch-3 space, picot in last sc made, sc in same space, sc in next sc, sc in front loop only on next 21 sc, (place marker in back loop of first and 21st sc worked in front loop), sc in next 20 sc, slip st in next ch-1 space on ring.
Row 7: Ch 1, turn, sc in next 4 sc, picot in last sc made, sc in next 3 sc, picot in last sc made, sc in next 5 sc, picot in last sc made, sc in next 3 sc, ch 7, turn, skip next 5 sc, sc in next sc, slip st in next sc, ch 1, turn, [4 sc in ch-7 space, picot in last sc made] 2 times, 3 sc in same space, sc in next 8 sc, ch 3, turn, skip next 2 sc, dc in next sc, ch 3, dc in same sc, ch 3, skip next 2 sc, sc in next sc, slip st in next sc, ch 1, turn, [2 sc in next ch-3 space, picot in last sc made, sc in same space] 3 times, slip st in same sc on eye piece. Fasten off, weave in ends.
Row 8: Join same color thread in sc shared by arch on top of mask, working down the side, ch 1, sc in next 8 sc, 2 sc in next sc, sc in next 9 sc, ch 9, slip st in 2nd ch from hook, sc in next ch st, dc in same sc, [skip next ch st, dc in next ch st] 3 times, rotate to work in sc on mask, skip next sc, hdc in next sc, sc in next 13 sc, slip st in next sc, turn, sc in next 11 sc, ch 7, slip st in 2nd ch from hook, sc in next ch st, dc in same sc, [skip next ch st, dc in next ch st] 2 times, rotate to work in sc on mask, skip next sc, hdc in next sc, sc in next 12 sc, slip st in next sc, turn, sc in next 10 sc, ch 7, slip st in 2nd ch from hook, sc in next ch st, dc in same sc, [skip next ch st, dc in next ch st] 2 times, rotate to work in sc on mask, skip next sc, hdc in next sc, [sc in next 3 sts, picot in last sc made] 2 times, sc in next sc, slip st in same st as thread join at beginning of row. Fasten off, weave in ends.
Side B Eye Piece
Row 4: With wrong side facing, join thread in same sc eye piece is slip stitched in on upper edge, sc in next sc, ch 2, skip next sc, dc in next sc, ch 1, dc in next sc, ch 1, skip next hdc, dc in next hdc, ch 1, skip next hdc, dc in next dc, [ch 1, skip next dc, dc in next dc] 2 times, dc in next dc, 2 cdc worked in next 4 dc, 10 cdc increases worked in next 10 dc, 3 cdc worked in next 6 dc, dc in next 2 dc, ch 1, skip next dc, ch 1, dc in next dc, ch 1, skip next hdc, dc in next hdc, ch 1, skip next hdc, dc in next sc, [ch 1, skip next sc, dc in next sc] 2 times, ch 2, skip next sc, slip st in next sc, slip st in ch-2 space on ring.
Row 5: Repeat row 5 from side A.
Row 6: Ch 1, turn, sc in next 3 sc, picot in last sc made, sc in next sc, sc in next hdc, sc in next puff st, sc in next dc, sc in next puff st, picot in last sc made, sc in next dc, sc in next puff st, sc in next dc, ch 7 turn, skip next 5 sc, sc in next sc, slip st in next sc, ch 1, turn, [4 sc in ch-7 space, picot in last sc made] 2 times, 3 sc in same space, sc in same dc on eye piece, sc in next puff st, sc in next 2 dc, sc in next 2 hdc, sc in next 2 sc, ch 3, turn, skip next 2 sc, dc in next sc, ch 3, dc in same sc, ch 3, skip next 2 sc, sc in next sc, slip st in next sc, ch 1, turn, 2 sc in next ch-3 space, picot in last sc made, sc in same space, 3 sc in next ch-3 space, picot in last sc made, 2 sc in next ch-3 space, picot in last sc made, sc in same space, sc in next sc, sc in back loop only on next 21 sc, (place marker in front loop of first and 21st sc worked in back loop), sc in next 20 sc, slip st in next ch-1 space on ring.
Rows 7 and 8: Repeat rows 7 and 8 from side A.
Nose Piece
With right side facing, join thread in last sc next to lower section of the ring on eye piece, working toward the ring, ch 1, sc in same st, sc in next 2 ch-1 spaces on ring, picot in last sc made, [sc in next sc, picot in last sc made] 2 times, sc in next ch-1 space, sc in next sc on the next eye piece. Fasten off, weave in ends.
Strap Piece Sides A and B
Row 1: Join thread in first marked free loop on row 6, ch 1, sc in same st, working in the free loop across, sc in next 20 sc.
Row 2: Ch 1, turn, sc2tog worked in next 2 sc, sc in next 5 sc, ch 7, skip next 7 sc, sc in next 5 sc, sc2tog worked in next 2 sc.
Row 3: Ch 1, turn, sc2tog worked in next 2 sc, sc in next sc, picot in last sc made, sc in next 2 sc, picot in last sc made, sc in next sc, 9 sc in ch-7 space, [sc in next 2 sc, picot in last sc made] 2 times, sc2tog worked in next 2 sc. Fasten off, weave in ends.
EMBELLISHMENTS
Version 1
Flower (make 2)
With desired contrast color, ch 4, slip st to form a ring.
Round 1: Ch 1, 12 sc in ring, join with slip st in front loop of first sc.
Round 2: Ch 1, working in front loop only around, sc in same sc, ch 3, sc in same sc, ch 3, *sc in next sc, ch 3, sc in same sc, ch 3; repeat from * around, join with slip st in first sc. Fasten off, weave in ends.
Leaf 1 (make 2)
With desired contrast color, ch 10, holding last loop of each st on hook, 2 tr in 4th ch from hook, yo, draw through all loops on hook, ch 2, slip st in top of cluster just made, ch 4, slip st in the ch st at base of leaf, slip st in next 3 ch, ch 3, holding last loop of each st on hook 2 tr in same ch, yo, draw through all loops on hook, ch 4, slip st in same ch, slip st around base of leaf just made, slip st in next 2 ch.
Fasten off, weave in ends.
Leaf 2 (make 2)
With desired contrast color, ch 5, 2 tr in 4th ch from hook, yo, draw through all loops on hook, ch 2, slip st in top of cluster just made, ch 4, slip st in the ch at base of leaf, slip st in next ch. Fasten off, weave in ends.
Sew beads and embellishments in place before stiffening.
Version 2
Flower (make 6)
With desired contrast color, ch 4, slip st to form a ring. [Ch 2, 3 dc in ring, ch 2, slip st in ring] 5 times. Fasten off, weave in ends.
Leaves (make 4)
Work as for Leaf 2, Version 1.
Sew beads and embellishments in place before stiffening.
Version 3
Star Flower (make 2)
With desired contrast color, ch 4, 2 tr in 4th ch from hook, yo and draw through all loops on hook, ch 3, slip st in top of cluster just made, ch 3, slip st in base of the tr cluster, [ch 3, 2 tr in same st as last petal, yo and draw through all loops on hook, ch 3, slip st in top of cluster just made, ch 3, slip st in same st as last petal] 4 times. Fasten off, weave in ends.
Stiffening
Using paint brush, apply fabric stiffener following manufacturer’s instructions. Pin to wig head to shape and allow to dry, making sure side pieces lay next to head.
Strap
Measure and cut elastic, allowing 1” (2.5 cm) on each end for hem. Hem each end. Sew one half of each snap in place on each end of elastic, and second half of each snap approximately 1½” (3.8 cm) away. Slide ends of the elastic through the holes on the side of the mask and fasten snaps to secure. (If desired, elastic and simply be tied and omit snaps).
Read NextYour Highness Adult Crown
Your Recently Viewed Projects
JaneEK
Oct 16, 2017
Even if a masquerade ball isnt in your near future, these darling masques certainly can be! Located at the Red Heart site (Masquerade Fancy Mask), the download gives the crafter much more detail than can be provided on this splash page. There are also close up photos of each individual mask. These are definitely challenging and not for the Beginner. But what a bunch of projects to aspire to!
Report Inappropriate Comment
Are you sure you would like to report this comment? It will be flagged for our moderators to take action.
Thank you for taking the time to improve the content on our site.

