Santa's Favorite Wine Cozy
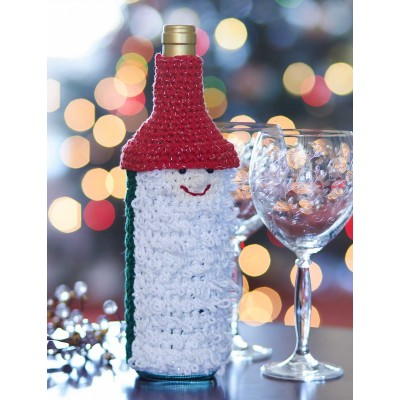
Santa's Favorite Wine Cozy is a super cute way to make even your bottles look festive this holiday. This little smile is sure to bring Christmas cheer to any holiday dinner party. I think the best use for this fun bottle cozy could be as a hostess gift for another party you're attending. Then you bring something to share as well as something for the homeowners to keep for themselves! Bring fun all around the table this Christmas season by working up this fun Christmas crochet wine bottle cozy that everyone is sure to love.

Crochet HookH/8 or 5 mm hook
Yarn Weight(4) Medium Weight/Worsted Weight and Aran (16-20 stitches to 4 inches)
Crochet Gauge13 sc and 14 rows = 4" [10 cm].
Finished SizeTo fit 0.75L wine bottle.
Materials List
- Bernat Handicrafter Holidays: Main Color (MC) White Sparkle (48005) 1 ball, Contrast A Red Sparkle (48705) 1 ball, Contrast B Mod Green (13223) 1 ball, Contrast C Off White (00002) 1 ball
- Size 5mm (US H/8) crochet hook
- 2 black beads
- Red embroidery floss
Cozy
Note: When joining new color, work to last 2 loops on hook of first color. Draw new color through last 2 loops and proceed. With MC, ch 15, then with B, ch 18. 1st row: (RS). With B, 1 sc in 2nd ch from hook. 1 sc in each of next 16 ch. With MC, 1 sc in each ch to end of chain. Turn. 32 sc. 2nd row: With MC, ch 1. 1 sc in first sc. Loop in each of next 14 sts. (Loops will appear on RS). With B, 1 sc in each sc to end of row. Turn. 3rd row: With B, ch 1. 1 sc in each of next 17 sc. With MC, 1 sc in each st to end of row. Turn. Rep last 2 rows until work from beg measures 6" [15 cm], ending on a 2nd row. Make Face: Next row: With B, ch 1. 1 sc in each of next 17 sc. With MC, 1 sc in each of next 5 sts. Do not break MC. Join C. With C, 1 sc in each of next 5 sts. Do not break C. With MC, 1 sc in each of last 5 sts. Turn. Next row: With MC, ch 1. 1 sc in first sc. Loop in each of next 3 sc. With C, 1 sc in each of next 7 sc. With MC, Loop in each of next 4 sc. With B, 1 sc in each sc to end of row. Turn. Next row: With B, ch 1. 1 sc in each of next 17 sc. With MC, 1 sc in each of next 4 sc. With C, 1 sc in each of next 3 sc. (Yoh and draw up a loop. Yoh and draw through 2 loops on hook) 4 times in next st. Yoh and draw through all loops on hook Bobble made (nose). 1 sc in each of next 3 sc. With MC, 1 sc in each of last 4 sc. Turn. Next row: With MC, ch 1. 1 sc in first sc. Loop in each of next 2 sc. With C, 1 sc in each of next 9 sts. With MC, Loop in each of next 3 sc. With B, 1 sc in each sc to end of row. Turn. Next row: With B, ch 1. 1 sc in each of next 17 sc. With MC, 1 sc in each of next 3 sc. With C, 1 sc in each of next 9 sc. With MC, 1 sc in each of last 3 sc. Turn. Next row: With MC, ch 1. 1 sc in first sc. Loop in each of next 4 sc. With C, 1 sc in each of next 5 sc. Break C. With MC, Loop in each of next 5 sc. With B, 1 sc in each sc to end of row. Turn. Next row: With B, ch 1. 1 sc in each of next 17 sc. With MC, 1 sc in each of next 15 sc. Fasten off. Sew side seams tog. HAT With A, ch 40. Join with sl st to first ch to form a ring, taking care to not twist ch. 1st rnd: Ch 1. 1 sc in each ch around. Join with sl st to first sc. 40 sc. 2nd rnd: Ch 1. 1 sc in each sc around. Join with sl st to first sc. 3rd rnd: Ch 1. *1 sc in each of next 3 sc. Sc2tog. Rep from * around. Join with sl st to first sc. 32 sts. Join Hat to Gnome: 1st rnd: Align Hat over Gnome Body, having Hat on outside. With A, ch 1. Working through both thicknesses, 1 sc in each st around. Join with sl st to first sc. 32 sc. 2nd rnd: Ch 1. 1 sc in each sc around. Join with sl st to first sc. 3rd rnd: Ch 1. *1 sc in each of next 2 sc. Sc2tog. Rep from * around. Join with sl st to first sc. 24 sts. 4th and 5th rnds: Ch 1. 1 sc in each st around. Join with sl st to first sc. 6th rnd: Ch 1. *1 sc in next sc. Sc2tog. Rep from * around. 16 sts. 7th and 8th rnds: Ch 1. 1 sc in each st around. Join with sl st to first sc. 9th rnd: Ch 1. *1 sc in each of next 2 sts. Sc2tog. Rep from * around. Join with sl st to first sc. 12 sts. 10th to 13th rnds: Ch 1. 1 sc in each st around. Join with sl st to first sc. Fasten off at end of 13th rnd. FINISHING Sew black beads to Face for eyes as shown in picture. With red embroidery floss, embroider mouth using outline st.
Read NextPoinsettia Stocking
Your Recently Viewed Projects
mulberrygalprinces s
Nov 14, 2017
I could just kiss who ever came up with this creation. Every year I get my friend a bottle of wine. I usually give it in a festive bag. But this year I want to give it in this. Santa will be so cute peeking out of that bag. Thank you for this.
JaneEK
Dec 22, 2016
As soon as I saw this pattern, I immediately started thinking about how to change it into a penguin! It wouldnt take much at all. Meanwhile, Ill work up the Santa as he is now because I have a friend who collects Santas. Im willing to bet she doesnt have anything like this. Nice thing is its a great way to recycle an old wine bottle, too!
mulberrygalprinces s
Aug 22, 2016
Oh what a cutie patoodie. He is adorable and the directions are right there, no hunting for them or down loading to do either. This is a must for me to make. My boy friend is from Italy and always has wine at dinner so he will get one. And I bet I can get one to fit a a one liter soda bottle too.
Report Inappropriate Comment
Are you sure you would like to report this comment? It will be flagged for our moderators to take action.
Thank you for taking the time to improve the content on our site.

