Adorable Owl Crochet Baby Hat
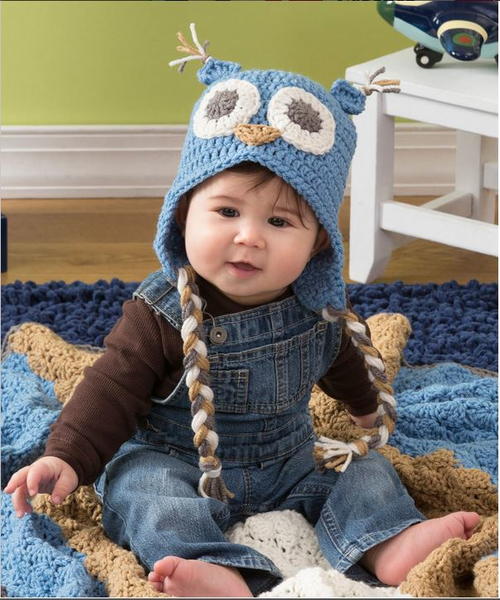
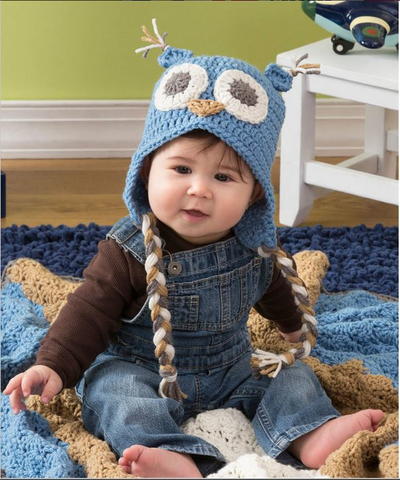
The Adorable Owl Crochet Baby Hat is a super cute way to keep your little one's head warm and toasty. The crochet baby hat pattern has ear flaps, so your child's ears will stay protected from the elements. The neutral colors of this pattern makes it ideal for both little boys and little girls. You can work up this crochet hat in a number of different sizes, so your child can continue to wear it as he or she grows. If you makes this hat and give it to a friend or family member as a gift, it is sure to be a real hoot. After all, there's nothing cuter than seeing tiny babies wearing adorable animals on their head.

Crochet HookI/9 or 5.5 mm hook
Yarn Weight(4) Medium Weight/Worsted Weight and Aran (16-20 stitches to 4 inches)
Crochet GaugeGAUGE: 17 dc = 5 [12.5 cm]; 9 rows dc = 5 [12.5 cm]. CHECK YOUR GAUGE. Use any size needles/hook to obtain the gauge given.
Materials:
- RED HEART® With Love®: 1 skein each
- 1805 Bluebell A
- 401 Pewter B
- 1101 Eggshell C
- 1308 Tan D
- Susan Bates® Crochet Hook: 5.5mm [US I-9]
- Stitch markers
- Yarn needle
Hat measures 14 (16, 18, 20)” (35.5 (40.5, 45.5, 50.5) cm) in circumference.
Hat measures 6 (6.5, 7, 7.5)” (15 (16.5, 18,19) cm) long.
Note
The ch-1 worked at the beginning of a Round or a Row does not count as a stitch.
Special Stitches
dc2tog = [Yarn over, insert hook in next stitch, yarn over and pull up loop, yarn over, draw through 2 loops] 2 times, yarn over, draw through all loops on hook.
picot = Ch 3, slip st into first ch.
Special Technique
Adjustable ring = Wrap yarn into a ring, ensuring that the tail falls behind the working yarn. Pinch ring and tail between middle finger and thumb. Insert hook through center of ring, yarn over (with working yarn) and draw up a loop. Work stitches of first round in the ring. After the first round of stitches is worked, pull gently on tail to tighten ring.
Hat
With A, make an Adjustable ring, ch 1.
Round 1: Work 12 dc in ring; slip stitch in first dc to join—12 dc.
Round 2: Ch 1, 2 dc in each dc around; slip stitch in first dc to join—24 dc.
Round 3: Ch 1, [dc in next dc, 2 dc in next dc] 12 times; slip stitch in first dc to join—36 dc.
Round 4: Ch 1, [dc in each of next 2 dc, 2 dc in next dc] 12 times; slip stitch in first dc to join—48 dc
Rounds 5-10: Ch 1, dc in each dc around; slip stitch in first dc to join—48 dc. Do not fasten off; continue to make Right Ear Flap.
16” Circumference Only
Round 5: Ch 1, [dc in each of next 7 dc, 2 dc in next dc] 6 times; slip stitch in first dc to join—54 dc.
Rounds 6-11: Ch 1, dc in each dc around; slip stitch in first dc to join—54 dc. Do not fasten off; continue to make Right Ear Flap.
18” Circumference Only
Round 5: Ch 1, [dc in each of next 3 dc, 2 dc in next dc] 12 times; slip stitch in first dc to join—60 dc.
Rounds 6-12: Ch 1, dc in each dc around; slip stitch in first dc to join—60 dc. Do not fasten off; continue to make Right Ear Flap.
20” Circumference Only
Round 5: Ch 1, [dc in each of next 3 dc, 2 dc in next dc] 12 times; slip stitch in first dc to join—60 dc.
Round 6: Ch 1, [dc in each of next 9 dc, 2 dc in next dc] 6 times; slip stitch in first dc to join—66 dc.
Rounds 7-13: Ch 1, dc in each dc around; slip stitch in first dc to join—66 dc. Do not fasten off; continue to make Right Ear Flap.
Right Ear Flap
Row 1: Ch 2 (counts as dc now and throughout), dc2tog, dc in each of next 4 dc, dc2tog, dc in next dc; turn—8 dc.
Row 2: Ch 1, sc in each dc across; turn—8 sc.
Row 3: Ch 2, dc2tog, dc in each of next 2 sc, dc2tog, dc in last sc; turn—6 dc.
Row 4: Ch 1, sc in each dc across; turn—6 sc.
Row 5: Ch 2, [dc2tog] twice, dc in last sc; turn—4 dc.
Row 6: Ch 1, sc in each dc across—4 sc.
Fasten off and weave in ends.
Note: for 14” (16”, 18”, 20”) [(35.5 (40.5, 45.5, 50.5) cm)] circumference
With Right Earflap facing, and Hat seam to the right, place a stitch marker 20 (22, 24, 26) spaces to the left of the last stitch from the Earflap.
Left Ear Flap
Join with A in marked stitch.
Rows 1-6: Repeat Rounds 1-6 for Right Earflap.
Border
Round 1: Join A in center back of Hat between Right and Left Earflaps; ch 1, sc evenly around by working one sc in each stitch and one sc in the end of each sc Row and 3 sc in the end of each dc Row; slip stitch in first sc to join. Fasten off and weave in ends.
For more adorable crochet hat ideas, check out our collection of 28 Beginner Crochet Hat Patterns for the Whole Family
Eyes (Make 2)
With B, make an Adjustable ring, ch 1.
Round 1: Work 12 dc in ring; slip stitch in first dc to join—12 dc. Fasten off B.
Round 2: Join C; ch 1, 2 dc in each dc around; slip stitch in first dc to join—24 dc. Fasten off C, leaving a 3” (7.6 cm) tail.
Nose
With D, leave a 3” (7.6 cm) tail; make an Adjustable ring, ch 3 (counts as dc).
Row 1: Work 3 dc into ring, ch 3, slip stitch into ring. Fasten off, leaving a 3” (7.6 cm) tail.
Ears (Make 2)
With A, leave a 3” (7.6 cm) tail; make an Adjustable ring, ch 3 (counts as dc).
Row 1: Work 3 dc into ring, picot, work 3 dc into ring, ch 3, slip stitch into ring. Fasten off, leaving a 3” (7.6 cm) tail.
Row 2: Cut a 6” (15 cm) strand of each color B, C and D, fold in half and knot to picot in Ear. Trim ends evenly.
Assembly
Braids (Make 2)
Cut three 28” (71 cm) strands of each color B, C, and D. Separate each color. Referring to photograph for placement, evenly attach strands between stitches on last Row of Earflap. Braid together until 4” (10 cm) of fringe remains, knot to fasten, trim ends evenly.
Attach Eyes
Use stitch markers to hold eyes in place, centered mid forehead between Earflaps. Use yarn needle and C to fasten into place.
Attach Nose
Cut two 4” strands of D, knot one to the top of the first dc on the Nose, knot the second to the top of the 5th dc on the Nose. Using tail ends from all three sides of Nose, fasten to Hat where desired.
Attach Ears
Flatten Hat so that Eyes are facing and centered. Using Round 3 as a guide, place one stitch marker on either side of Hat as desired. Use the 3” tails from each Ear to fasten to Hat where stitch markers are placed.
Abbreviations
- A, B, C = Color A, Color B, Color C, etc
- ch = chain
- cm = centimeters
- dc = double crochet
- mm = millimeters
- sc = single crochet
- st(s) = stitch(es)
- [] = work directions in brackets the number of times specified
- * or ** = repeat whatever follows the * or ** as indicated
Read NextBaby Elephant Crochet Hat
Your Recently Viewed Projects
elocin1104 2800379
Oct 06, 2018
This is such a cute owl hat pattern! I am thinking it would be a great gift for my nephew, due to arrive any day now! It would definitely keep his little head warm this winter, and be totally adorable on him! I have found so many different things I want to make for him, I dont even know which to make first.
Zeemer
Aug 06, 2018
This Owl Crochet baby hat is so cute. It can protect the baby from the elements and at the same time a fashion statement. This will be a perfect match to her/his denim pants or jumper whichever outfit the baby wears. So cute!
JaneEK
Aug 06, 2018
I cant ever remember not knowing about Greek mythology, so when I discovered Athena had a companion owlwell, that instantly became my favorite bird. Luckily, there are so many different owl hat patterns out there that I can actually make one for EACH of my numerous grandchildren. The next baby is due in October, so this project is just in time. Heres the original post http//www.redheart.com/free-patterns/owl-baby-hat
Daughter of Light
Feb 28, 2018
This is a sweet owl hat pattern! I think the model is adorable too!!! It is very nice that they've included several sizes on this one pattern. I really like the idea of the ear flaps. It'll keep the little one toasty for sure and for certain. It definitely is a unisex hat. I can also see the colors changed up a bit too especially if it helps you use up some of your stash. I think this hat will be a fun one to create!
Hippie Chick
Mar 01, 2017
I made a version of this owl crochet hat, but not for a baby I made mine for a teenager who is still crazy for owls. She loves it. The color combos can be changed around in so many different ways and this can be used for a girl or a boy. Looks simple enough to make. The most time-consuming part, I think, will be sewing on all the parts when the project is done.
Report Inappropriate Comment
Are you sure you would like to report this comment? It will be flagged for our moderators to take action.
Thank you for taking the time to improve the content on our site.

