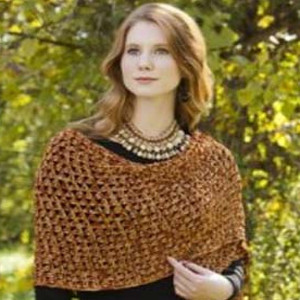
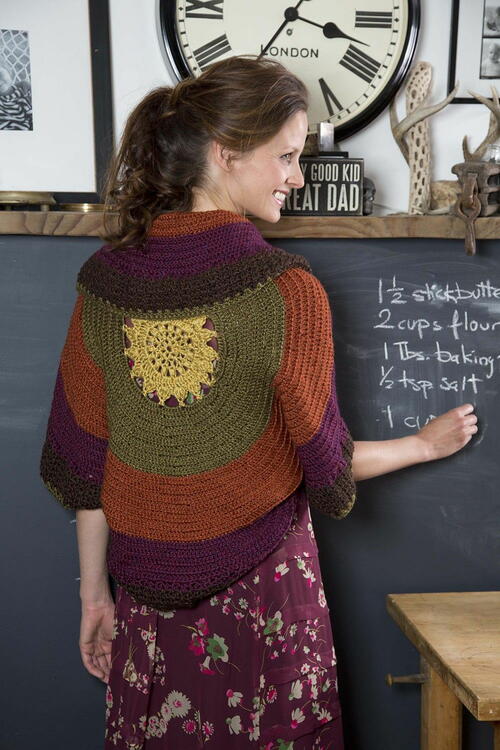
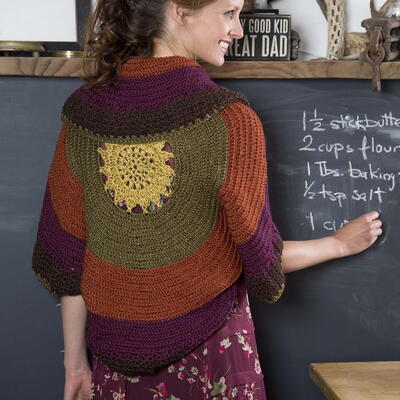
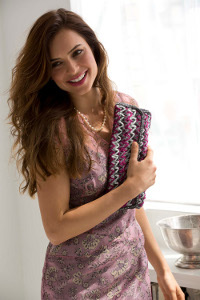
Sunset Shrug

This insanely beautiful shrug is crocheted with all the colors of a late autumn sunset. This easy crochet shawl features a sunburst stitch design with radiating blocks of warm, natural colors like moss green, burnt orange, and deep violet. This shawl is perfect for long afternoon walks through the park on a breezy fall day or keeping warm outside on a cool summer evening. This pretty pattern is both warm and cozy, making the Sunset Shrug a show stopping cold weather piece you'll love to wear season after season.

Crochet HookH/8 or 5 mm hook
Yarn Weight(4) Medium Weight/Worsted Weight and Aran (16-20 stitches to 4 inches)
MATERIALS:
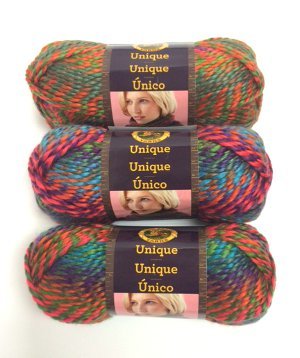
- LION BRAND® HEARTLAND (Art. #136)
#158 Yellowstone 1 ball (A)
#174 Joshua Tree 1 ball (B)#135 Yosemite 1 ball (C)#189 Isle Royale 1 ball (D)#126 Sequoia 1 ball (E) - or colors of your choice
- LION BRAND® crochet hook size H-8 (5 mm)
- LION BRAND® stitch markers
- LION BRAND® large-eyed blunt needle
SIZE: About 38 in. (96.5 cm) diameter, before folding and seaming.
GAUGE: 12 sts + 6 1/2 rnds = 4 in. (10 cm) in pattern; Center Motif = about 7 in. (18 cm) diameter.
STITCH EXPLANATIONS:
- beg-Cl (beg cluster): Ch 2, yarn over, insert hook in indicated st and draw up a loop, yarn over and draw through 2 loops on hook (2 loops rem on hook); yarn over, insert hook in same st and draw up a loop, yarn over and draw through 2 loops on hook, yarn over and draw through all 3 loops on hook.
- Cl (cluster): Yarn over, insert hook in indicated st and draw up a loop, yarn over and draw through 2 loops on hook (2 loops rem on hook), *yarn over, insert hook in same st and draw up a loop, yarn over and draw through 2 loops on hook; rep from * once more, yarn over and draw through all loops on hook.
NOTES:
- Shrug is worked in joined rnds beg at center. Do not turn at the end of rnds.
- Color is changed by fastening off old color and joining new color.
- Piece is folded and 2 side seams sewn to create armholes.
SHRUG:
Center Motif
- With A, ch 5.
- Rnd 1 (RS): Dc in 5th ch from hook (beg ch counts as dc, ch 1), (ch 1, dc in same ch) 6 times, ch 1; join with sl st in 4th ch of beg ch – 8 dc and 8 ch-1 sps at the end of this rnd.
- Rnd 2: Ch 4 (counts as dc, ch 1 in this rnd and in all following rnds), dc in first ch-1 sp, (ch 1, dc in next dc, ch 1, dc in next ch-1 sp) 7 times, ch 1; join with sl st in 3rd ch of beg ch – 16 dc and 16 ch-1 sps at the end of this rnd.
- Rnd 3: Beg-Cl in same st as joining, *ch 2, sk next ch-1 sp, Cl in next dc; rep from * around, ch 2, sk last ch-1 sp; join with sl st in beg-Cl – 16 Cl and 16 ch-2 sps at the end of this rnd.
- Rnd 4: Ch 3 (counts as dc in this rnd and in all following rnds), 3 dc in first ch-2 sp, *dc next Cl, 3 dc in next ch-2 sp; repeat from * around; join with sl st in top of beg ch – 64 dc at the end of this rnd.
- Rnd 5: Ch 3, (tr, dc, hdc) in same st as joining, sk next st, sc in next st, *sk next st, (hdc, dc, tr, dc, hdc) in next st, sk next st, sc in next st; repeat from * around to last st, sk last st, (hdc, dc) in same st as joining; join with sl st in top of beg ch – 16 (hdc, dc, tr, dc, hdc) groups and 16 sc at the end of this rnd.
- Rnd 6: (Sl st, ch 1, sc) in first tr, *ch 5, sk next 5 sts, sc in next tr; repeat from * around to last 5 sts, ch 5, sk last 5 sts; join with sl st in first sc – 16 sc and 16 ch-5 sps. Fasten off.
Body of Shrug
- Rnd 7: From RS, draw up a loop of B in any ch-5 sp, ch 3 (counts as dc in this rnd and in all following rnds), 6 dc in same ch-5 sp, 7 dc in each ch-5 sp around; join with sl st in top of beg ch – 112 dc at the end of this rnd.
- Rnd 8: Ch 3, working in back loops only, dc in same st as joining (increase made), dc in next 6 sts, *2 dc in next st, dc in next 6 sts; rep from * around; join with sl st in top of beg ch – 128 sts.
- Rnd 9: Ch 3, working in back loops only, dc in same st as joining, dc in next 7 sts, *2 dc in next st, dc in next 7 sts; rep from * around; join with sl st in top of beg ch – 144 sts.
- Rnd 10: Ch 3, working in back loops only, dc in same st as joining, dc in next 8 sts, *2 dc in next st, dc in next 8 sts; rep from * around; join with sl st in top of beg ch – 160 sts.
- Rnd 11: Ch 3, working in back loops only, dc in same st as joining, dc in next 9 sts, *2 dc in next st, dc in next 9 sts; rep from * around; join with sl st in top of beg ch – 176 sts.
- Rnd 12: Ch 3, working in back loops only, dc in same st as joining, dc in next 10 sts, *2 dc in next st, dc in next 10 sts; rep from * around; join with sl st in top of beg ch – 192 sts.
- Rnd 13: Ch 3, working in back loops only, dc in same st as joining, dc in next 11 sts, *2 dc in next st, dc in next 11 sts; rep from * around; join with sl st in top of beg ch – 208 sts. Fasten off.
- Rnd 14: From RS, draw up a loop of C in same st as joining, ch 3, working in back loops only, dc in same st as joining, dc in next 12 sts, *2 dc in next st, dc in next 12 sts; rep from * around; join with sl st in top of beg ch – 224 sts.
- Rnd 15: Ch 3, working in back loops only, dc in same st as joining, dc in next 13 sts, *2 dc in next st, dc in next 13 sts; rep from * around; join with sl st in top of beg ch – 240 sts.
- Rnd 16: Ch 3, working in back loops only, dc in same st as joining, dc in next 14 sts, *2 dc in next st, dc in next 14 sts; rep from * around; join with sl st in top of beg ch – 256 sts.
- Rnd 17: Ch 3, working in back loops only, dc in same st as joining, dc in next 15 sts, *2 dc in next st, dc in next 15 sts; rep from * around; join with sl st in top of beg ch – 272 sts.
- Rnd 18: Ch 3, working in back loops only, dc in same st as joining, dc in next 16 sts, *2 dc in next st, dc in next 16 sts; rep from * around; join with sl st in top of beg ch – 288 sts.
- Rnd 19: Ch 3, working in back loops only, dc in same st as joining, dc in next 17 sts, *2 dc in next st, dc in next 17 sts; rep from * around; join with sl st in top of beg ch – 304 sts.
- Rnd 20: Ch 3, working in back loops only, dc in same st as joining, dc in next 18 sts, *2 dc in next st, dc in next 18 sts; rep from * around; join with sl st in top of beg ch – 320 sts. Fasten off.
- Rnd 21: From RS, draw up a loop of D in same st as joining, ch 3, working in back loops only, dc in same st as joining, dc in next 19 sts, *2 dc in next st, dc in next 19 sts; rep from * around; join with sl st in top of beg ch – 336 sts.
- Rnd 22: Ch 3, working in back loops only, dc in same st as joining, dc in next 20 sts, *2 dc in next st, dc in next 20 sts; rep from * around; join with sl st in top of beg ch – 352 sts.
- Rnd 23: Ch 3, dc in each dc around; join with sl st in top of beg ch.
Border
- Rnd 24 (RS): With D, ch 3, working in back loops only, dc in same st as joining, 2 dc in next st, *sk next 2 sts, 2 dc in each of next 2 sts; repeat from * around to last 2 sts, sk last 2 sts; join with sl st in top of beg ch. Fasten off.
- Rnd 25: From RS, draw up a loop of E in sp between sts of any 2-dc group, ch 3, dc in same sp, 2 dc in sp between sts of each 2-dc group around; join with sl st in top of beg ch
- Rnds 26-29: Sl st in sp between sts of first 2-dc group, ch 3, dc in same sp, 2 dc in sp between sts of each 2-dc group around; join with sl st in top of beg ch. Fasten off.
- Rnd 30: With B, rep Rnd 25. Fasten off.
FINISHING:
- Fold piece in half. With fold at top, measure 8 in. (20.5 cm) down from fold on each side and place marker for armholes. Measure 6 in. (15 cm) along edge below each marker and place another marker.
- Baste or pin edges together between markers and try Shrug on to check fit. Adjust marker position if desired, then sew edges together between markers on both sides. Weave in ends.
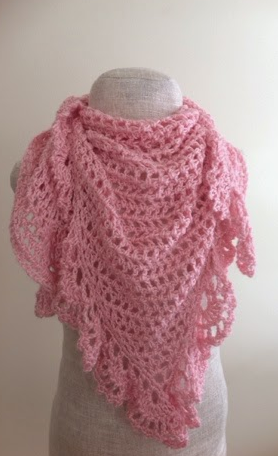
Read NextAmazing Grace Pocket Shawl
Your Recently Viewed Projects
Thanks for your comment. Don't forget to share!
Lynn K
May 23, 2017
So pretty and such an unusual design too. I love the central motif and it is nice to have a focal point on the back of an item for a change. Having previously used Red Heart Heartland yarn I know that it is lovely to work with so I am really looking forward to this project!
Delphine Bryant
May 22, 2017
Took the time to read over the comments and wondering if anyone else can give any additional information about the size this works out to be? Will changing the hook size increase the size of the shrug?
Lynn K
May 23, 2017
Hello Delphine, the shrug size will change with a different hook size but the nice thing about this pattern is that you can make it bigger or smaller simply by doing more, or less, rows. Good luck!
Delphine Bryant
Nov 04, 2018
Lynn K I thank you so much for responding to my question. I will let you know how my shrug turns out. Happy crocheting to you.
witchmedea 7668936
May 07, 2017
Can someone who has made this pattern please explain to me how to make the arm holes? I find the instructions to be very vague and confusing.
Cheryl Y
Mar 09, 2017
I love the look of this Sunset Shrug, it reminds me of a fall sunset over the water. The colors go together well and there are no large open spaces in the shrug like some of the others I have seen. This will be a great shrug to have for the cool nights and days. This pattern is well written and easy to follow. After reading the comments below, I see this pattern runs on the small side. I'm thinking a hook size larger would work to make it slightly bigger. ?? Has anyone tried making it larger? If yes please post how you did it.. Thanks. Thank you so much for sharing this free crochet pattern.
janetlynn 7224872
Oct 10, 2016
For those of you who have made this shrug, would it be possible to make an extra row or two of each color to make it a little bigger ? Seems the comments/complaints are mostly running on the small size of this pattern .
Zeemer
Aug 26, 2016
Love the colors. I've always loved rusts, creams, ochres, yellows and cranberries. This looks easy to do. Thanks for the free pattern which is well presented complete with diagrams and instructions.
labudd
Oct 29, 2015
Easy to work up, love the idea of it. However, it doesn't fit the way it shows, and way it says that the arm holes are to be made, is just wrong. Wish I had chosen a different pattern.
MccfamschoolMom
Jun 04, 2015
I tried making this about 1 1/2 years ago, not long after LB first published it, and there were already several comments on the Lion Brand website about how this pattern ran small (a problem for a plus-size lady like me). I upsized to a K/6.5mm hook and started it anyway, but ended up frogging reclaiming the first 3 colors' worth of yarn (roughly the yellow, green and orange areas in the pattern image), because the rounds were getting overwhelmingly huge intimidatingly time-consuming to complete by that point. Unfortunately, my life outside crocheting is just too busy for me to keep track of where I am in such large rounds between sessions.
Mamadukes3571 9078 826
May 27, 2015
I made this last fall...and cannot TELL you how many compliments I get! Just stunning Tricialu
dizzydeb58
Mar 12, 2015
I've made this twice. It said one size fits all. Well, one size fits someone who wears about a women's size 8 to 10. or smaller. How can you make this for someone who is about a size 18?
ziggy1210 6388420
Apr 17, 2015
I'm glad you posted this because I had the yarn bought to make it. Being closer to a 22-24 I'd have to double the thing. My crochet skills are new and certainly no where near trying to enlarge a pattern to make it look right
sheryl37 5783777
Jan 06, 2015
you are so clever!!! thank you for this Pattern i have nearly finished mine
purpleokie
Oct 21, 2013
You click on the link & it takes you to the book that the pattern is in. Download the book to find the pattern or open with a PDF reader to see it. You'll get all the other patterns in the book too.
Report Inappropriate Comment
Are you sure you would like to report this comment? It will be flagged for our moderators to take action.
Thank you for taking the time to improve the content on our site.