Foxy Yarn Basket
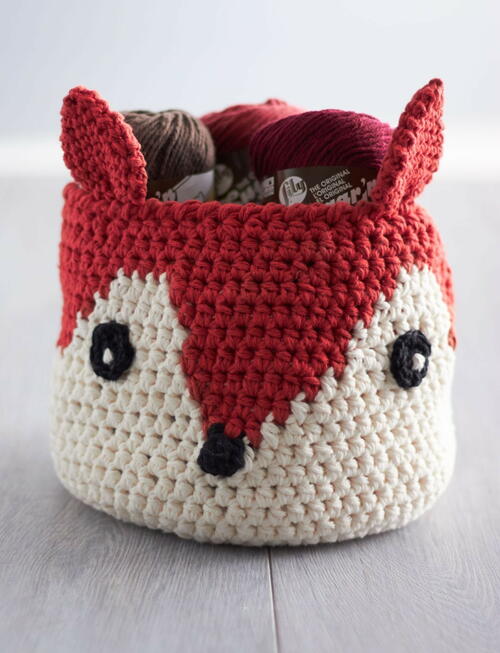
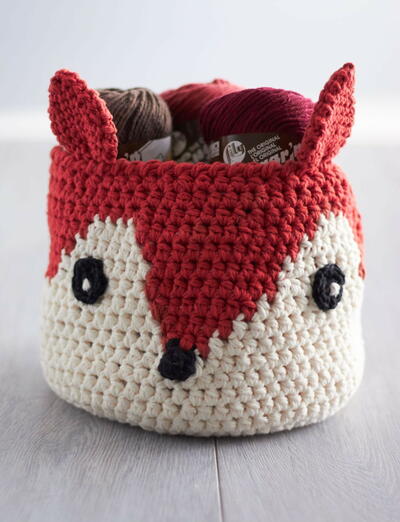
Let this tidy little fox help you keep your yarn stash organized. It's easy to keep your craft supplies neat and tidy when you have adorable crocheted baskets like this to help. You could even use the Foxy Yarn Basket to help keep the children's toys organized.
However you choose to put this adorable basket to good use, there's no doubt that this Foxy Yarn Basket belongs in your home. Keeping your house clean has never been so fun! This free crochet pattern is for intermediate crocheters.

Crochet HookG/6 or 4 mm hook
Yarn Weight(4) Medium Weight/Worsted Weight and Aran (16-20 stitches to 4 inches)
MATERIALS
- Lily® Sugar’n Cream® (2.5 oz/70.9 g; 120 yds/109 m)
Main Color (MC) Soft Ecru (01004) 2 balls or 192 yds/175 m
Contrast A Country Red (01530) 2 balls or 180 yds/165 m
Contrast B Black (00002) 1 ball or 3 yds/3 m - Sizes U.S. G/6 (4 mm) and U.S. J/10 (6 mm) crochet hooks or size needed to obtain gauge.
SIZE: Approx 11" [28 cm] tall x 12" [30.5 cm] diameter.
GAUGE:
10 hdc and 8 rows = 4" [10 cm] with larger hook and 2 strands held tog.
INSTRUCTIONS
Notes:
- Basket is worked holding 2 strands tog.
- Ears are worked with 1 strand only.
- Ch 2 at beg of rnd does not count as hdc.
- When joining new color, work to last 2 loops on hook of last st.Draw new color through 2 loops, then proceed in new color.
- Carry color not in use across top of previous rnd and work sts around it to prevent stranding.
Beg at Base, with 2 strands of MC and larger hook, ch 4. Join with sl st to first ch to form a ring.
1st rnd: Ch 2. 8 hdc in ring. Join with sl st to first hdc.
2nd rnd: Ch 2. 2 hdc in each hdc around. Join with sl st to first hdc. 16 hdc.
3rd rnd: As 2nd rnd. 32 hdc.
4th rnd: Ch 2. *2 hdc in next hdc. 1 hdc in next hdc. Rep from * around. Join with sl st to first hdc. 48 hdc.
5th rnd: Ch 2. 1 hdc in each hdc around. Join with sl st to first hdc.
6th rnd: Ch 2. *2 hdc in next hdc. 1 hdc in each of next 2 hdc. Rep from * around. Join with sl st to first hdc. 64 hdc.
7th to 11th rnds: Ch 2. 1 hdc in each hdc around. Join with sl st to first hdc.
Face:
1st rnd: Ch 2. 1 hdc in each of next 32 hdc. Join 2 strands of B. With B, work 5 dc in next hdc. Drop loop from hook. Insert hook into first dc of 5-dc group and pull dropped loop through (nose made). Break B. With MC, 1 hdc in each hdc to end of rnd. Join with sl st to first hdc.
2nd rnd: With MC, ch 2. 1 hdc in each of next 31 hdc. With A, 1 hdc in each of next 3 sts. With MC, 1 hdc in each hdc to end of rnd. Join with sl st to first hdc.
3rd rnd: With MC, ch 2. 1 hdc in each of next 30 hdc. With A, 1 hdc in each of next 5 hdc. With MC, 1 hdc in each hdc to end of rnd. Join with sl st to first hdc
4th rnd: With MC, ch 2. 1 hdc in each of next 29 hdc. With A, 1 hdc in each of next 7 hdc. With MC, 1 hdc in each hdc to end of rnd. Join A with sl st to first hdc. Break MC.
5th and 6th rnds: With A, ch 2. 1 hdc in each of next 20 hdc. Do not break A. With MC, 1 hdc in each of next 8 hdc. Do not break MC. With A, 1 hdc in each of next 9 hdc. Do not break A. With MC, 1 hdc in each of next 8 hdc. With A, 1 hdc in each hdc to end of rnd. Join with sl st to first hdc.
7th rnd: With A, ch 2. 1 hdc in each of next 21 hdc. Do not break A. With MC, 1 hdc in each of next 6 hdc. Do not break MC. With A, 1 hdc in each of next 11 hdc. Do not break A. With MC, 1 hdc in each of next 6 hdc. With A, 1 hdc in each hdc to end of rnd. Join with sl st to first hdc.
8th rnd: With A, ch 2. 1 hdc in each of next 22 hdc. Do not break A. With MC, 1 hdc in each of next 4 hdc. Do not break MC. With A, 1 hdc in each of next 13 hdc. Do not break A. With MC, 1 hdc in each of next 4 hdc. Break MC. With A, 1 hdc in each hdc to end of rnd. Join with sl st to first hdc.
9th rnd: With A, ch 2. *1 hdc in each of next 6 hdc. Hdc2tog. Rep from * around. Join with sl st to first hdc. 56 sts.
10th rnd: Ch 2. 1 hdc in each st around. Join with sl st to first hdc.
11th rnd: Ch 2. *1 hdc in each of next 5 hdc. Hdc2tog. Rep from * around. Join with sl st to first hdc. 48 sts.
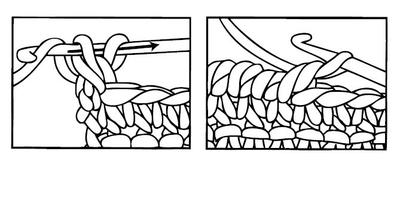
12th rnd: Ch 1. Working from left to right, instead of from right to left as usual, work 1 reverse sc in each sc around. Join with sl st to first sc.
Fasten off.
Ears (make 2).
Worked with 1 strand.
With 1 strand of A and smaller hook, ch 16. Join with sl st to first ch to form a ring.
1st rnd: Ch 1. 1 sc in each ch around. Join with sl st to first sc. 16 sc.
2nd rnd: Ch 1. 2 sc in first sc. 1 sc in each of next 6 sc. 2 sc in each of next 2 sc. 1 sc in each of next 6 sc. 2 sc in last sc. Join with sl st to first sc. 20 sc.
3rd to 5th rnds: Ch 1. 1 sc in each sc around. Join with sl st to first sc.
6th rnd: Ch 1. Sc2tog. 1 sc in each of next 6 sc. (Sc2tog) twice. 1 sc in each of next 6 sc. Sc2tog. Join with sl st to first st. 16 sts.
7th rnd: Ch 1. Sc2tog. 1 sc in each of next 4 sts. (Sc2tog) twice. 1 sc in each of next 4 sts. Sc2tog. Join with sl st to first st. 12 sts.
8th rnd: Ch 1. 1 sc in each st around. Join with sl st to first sc.
9th rnd: Ch 1. Sc2tog. 1 sc in each of next 2 sc. (Sc2tog) twice. 1 sc in each of next 2 sc. Sc2tog. Join with sl st to first st. 8 sts.
10th rnd: As 8th rnd.
11th rnd: Ch 1. (Sc2tog) 4 times. Join with sl st to first sc. Fasten off. Thread end through rem sts and draw up tightly. Fasten securely.
Eyes (make 2)
With 1 strand of B and smaller hook, ch 2.
1st rnd: 6 sc in 2nd ch from hook. Join with sl st to first sc.
2nd rnd: Ch 1. 2 sc in each sc around. Join with sl st to first sc. 12 sc. Fasten off.
FINISHING
Sew Ears to top edge of Basket as shown in picture.
Sew Eyes to front as shown in picture.
Read NextGlowing Embers Crochet Basket
Your Recently Viewed Projects
jkoppman1947 32543 56
Nov 25, 2017
I want to make this basket for one of my grand daughters, I bought the yarn for it. All I have is the bottom of the basket, the face and ears. Where is the basket instructions ?????????? Please send complete pattern to my email. br /Thank you
Editor Dana
Nov 27, 2017
Hi there! The face part of the basket is the majority of the basket pattern. The instructions are the same on the Yarnspriations website, which you can see here: http://www.yarnspirations.com/patterns/foxy-stash-basket.html I hope that helps!
achumley0003 31706 34
Jun 29, 2017
I love how cute crocheted animals always turn out, but I especially love owls and foxes. I think this organizer would look cute anywhere in the house, but I also think it would be adorable in a fox themed nursery. It makes me wish mine were little again, so i could redecorate their nursery.
hildenovak 9638901
Mar 13, 2014
Where is the rest of the pattern, head only goes to ow three. Please, if you can email me as it is so hard to find another page where to go - perhaps hilde.novak@sbcglobal.net Thank you so much,
amyljohnson82 1365 809
Nov 20, 2013
Found it! Here is the link http://www.yarnspirations.com/pattern/crochet/foxy-stash-basket
annekekruger 02799 53
Nov 20, 2013
I cannot make this as the pattern is not complete. Would be lovely to make though.
VictorianRose1942
Nov 19, 2013
Isn't there some of the instructions missing...? It doesn't seem to be finished and the instructions for the ears are not included here...!
Report Inappropriate Comment
Are you sure you would like to report this comment? It will be flagged for our moderators to take action.
Thank you for taking the time to improve the content on our site.

