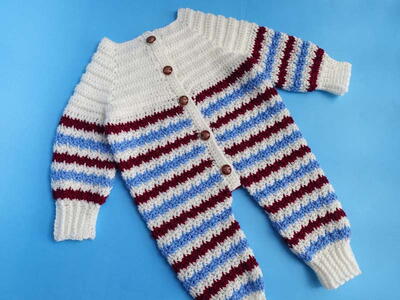
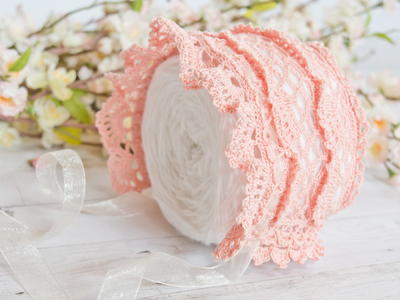
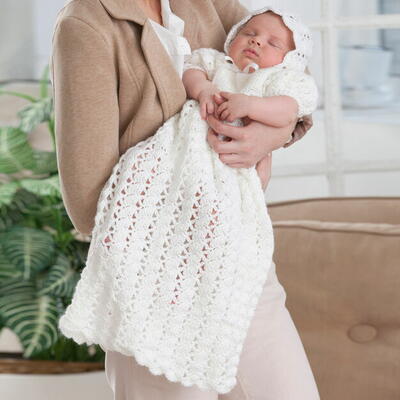
Princess Charlotte's Christening Gown and Crochet Bonnet

Everyone will "ooh" and "ahh" over Princess Charlotte's Christening Gown and Crochet Bonnet. Your little princess will look adorable and extremely elegant for her baby christening or baptism in this crochet pattern. All babies deserve the royal treatment when it comes to special occasions. You could work up this pattern as a gift for a baby shower, too. The mother to be who receives this present will absolutely love dressing her newborn in this ensemble fit for a princess. There's also Princess Charlotte's Christening Crochet Blanket to match on AllFreeCrochetAfghanPatterns.

Crochet HookG/6 or 4 mm hook, H/8 or 5 mm hook
Yarn Weight(3) Light/DK (21-24 stitches to 4 inches)
Crochet Gauge17 sts = 4; 24 rows = 4 in single crochet with smallest hook; 2 (ch 3, 3 dc, sc) pattern repeats = 3; 6 rows = 2 in lace pattern with middle-sized hook.
Finished SizeTo Fit: 17 (18)” Finished Chest: 19 (20)” Finished Length: 22½ (24)”
Materials List
- Red Heart® Baby TLC™: 3 balls 5011 White or another light/DK weight yarn.
- Crochet Hooks: 4mm [US G-6] and 5mm [US H-8]
- Yarn needle
Pattern
Pattern Notes
- Gown bodice is worked from lower edge of bodice up to shoulders.
- Gown skirt is worked from lower edge of bodice down to lower edge.
- Gown sleeves are worked separately, beginning at top of each sleeve, and sewn into armholes.
- Bonnet is worked from center, back of head toward front edges.
- sc2tog: [Draw up a loop in next st] 2 times, yarn over and draw through all 3 loops on hook.
Gown Bodice
With smallest hook, ch 82 (86).
Row 1 (Right Side): Sc in 2nd ch from hook and in each ch across, turn—81 (85) sc.
Rows 2 and 3: Ch 1, sc in each sc across, turn.
Divide for Backs and Front
First Half of Back
Row 1 (Wrong Side): Ch 1, sc in first 17 (18) sc, turn; leave remaining sts unworked for armholes, front and second half of back—17 (18) sc.
Row 2: Ch 1, sc2tog, sc in each sc across, turn—16 (17) sc.
Row 3: Ch 1, sc in each sc across to last 2 sts, sc2tog, turn—15 (16) sc.
Row 4: Ch 1, sc in each sc across, turn.
Repeat last row until piece measures 4” from beginning, end with a Wrong Side row.
Shape Shoulder
Next Row (Right Side): Ch 1, sc in first 5 sc, turn; leave remaining sts unworked—5 sc.
Next 2 Rows: Ch 1, sc in each sc across, turn.
Fasten off.
Front
Row 1 (Wrong Side):With Wrong Side facing, skip next 6 unworked sc (for armhole) following first half of back, join yarn with sc in next st, sc in next 34 (36) sc, turn; leave remaining sts unworked for second armhole and half of back—35 (37) sc.
Rows 2 and 3: Ch 1, sc2tog, sc in each sc across to last 2 sc, sc2tog, turn—31 (33) sc at the end of Row 3.
Row 4: Ch 1, sc in each sc across, turn.
Repeat last row until front measures 3” from beginning, end with a Wrong Side row.
Divide for Neck
First Shoulder
Next Row (Right Side): Ch 1, sc in first 10 (11) sc for first shoulder, turn; leave remaining sts unworked for neck and second shoulder—10 (11) sc.
Next Row: Ch 1, sc2tog, sc in each sc across, turn—9 (10) sc.
Next Row: Ch 1, sc in each sc across to last 2 sc, sc2tog, turn—8 (9) sc.
Repeat last 2 rows until 5 sc remain.
Next Row: Ch 1, sc in each sc across, turn.
Repeat last row until piece measures same as back.
Fasten off.
Second Shoulder
Next Row (Right Side): Skip next 11 unworked sc following first shoulder (for neck), join yarn with sc in next sc, sc in each remaining sc across—10 (11) sc.
Next Row: Ch 1, sc in each sc across to last 2 sc, sc2tog, turn—9 (10) sc.
Next Row: Ch 1, sc2tog, sc in each sc across, turn—9 (10) sc.
Repeat last 2 rows until 5 sc remain.
Next Row: Ch 1, sc in each sc across, turn.
Repeat last row until piece measures same as back.
Fasten off.
Second Half of Back
Row 1 (Wrong Side): With Wrong Side facing, skip next 6 unworked sc (for armhole) following front, join yarn with sc in next sc, sc in each remaining sc across, turn—17 (18) sc.
Row 2: Ch 1, sc in each sc across to last 2 sc, sc2tog, turn—16 (17) sc.
Row 3: Ch 1, sc2tog, sc in each sc across, turn—15 (16) sc.
Row 4: Ch 1, sc in each sc across, turn.
Repeat last row until piece measures 4” from beginning, end with a Wrong Side row. Fasten off.
Shape Shoulder
Next Row (Right Side): With Right Side facing, skip first 10 (11) sc, join yarn with sc in next sc, sc in each remaining sc across, turn—5 sc.
Next 2 Rows: Ch 1, sc in each sc across, turn.
Fasten off.
Sew shoulder seams.
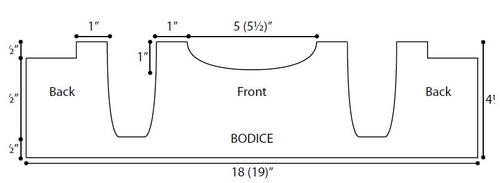
-
Diagram - Click for larger version
Skirt
Row 1 (Wrong Side): With Wrong Side facing and smallest hook, working across opposite side of bodice foundation ch, join yarn with sc in first ch, sc in each ch across, turn—81 (85) sc.
Row 2: Ch 3, 3 dc in first sc, skip next 2 sc, sc in next sc, [ch 3, 3 dc in next sc, skip next sc, sc in next sc, ch 3, 3 dc in next sc, skip next 2 sc, sc in next sc] 11 times, [ch 3, 3 dc in next sc, skip next 2 sc, sc in next sc] 0 (1) time(s), turn—23 (24) 3-dc groups.
Change to larger hook.
Rows 3–5: Ch 3, 3 dc in first sc, sc in next ch-3 space, *ch 3, 3 dc in next sc, sc in next ch-3 space; repeat from * across, turn.
Work now proceeds in rounds.
Round 6 (Right Side): Ch 3 (counts as dc), 2 dc in first sc, sc in next ch-3 space, *ch 3, 3 dc in next sc, sc in next ch-3 space; repeat from * across, ch 3; join piece into a round by working a slip st in top of first ch-3, turn.
Round 7: Ch 1, *sc in next ch-3 space, ch 3, 3 dc in next sc; repeat from * around; join with slip st in first sc, turn.
Round 8: Ch 3 (counts as dc), 2 dc in same sc as join, sc in next ch-3 space, *ch 3, 3 dc in next sc, sc in next ch-3 space; repeat from * around, ch 3; join with slip st in top of first ch-3, turn.
Repeat last 2 rounds until skirt measures 18 (19½)” from bodice, end with a Wrong Side row.
Edging Round (Right Side): Ch 3, 4 dc in same sc as join, sc in next ch-3 space, *5 dc in next sc, sc in next ch-3 space; repeat from * around; join with slip st in top of first ch-3. Fasten off.
Sleeves (make 2)
Beginning at top of sleeve, with middle-sized hook, ch 12.
Row 1 (Right Side): Sc in 2nd ch from hook, [ch 3, 3 dc in next ch, sc in next ch] 5 times, turn—Five 3-dc groups.
Row 2: Ch 4, 3 dc in first sc, [sc in next ch-3 space, ch 3, 3 dc in next sc] 5 times, tr in same sc as last 3 dc, turn—6 groups.
Row 3: Ch 4, 3 dc in space between tr and next dc, [sc in next ch-3 space, ch 3, 3 dc in next sc] 5 times, (sc, ch 3, 3 dc, tr) in last ch-4 space, turn—7 groups.
Row 4: Ch 4, 3 dc between tr and next dc, [sc in next ch-3 space, ch 3, 3 dc in next sc] 6 times, (sc, ch 3, 3 dc, tr) all in last ch-4 space, turn—8 groups.
Row 5: Ch 3, 3 dc between tr and next dc, [sc in next ch-3 space, ch 3, 3 dc in next sc] 7 times, (sc, ch 3, 3 dc, tr) in last ch-4 space, turn—9 groups.
Row 6: Ch 3, 3 dc between tr and next dc, [sc in next ch-3 space, ch 3, 3 dc in next sc] 8 times, sc in last ch-3 space, turn—9 groups.
Rows 7 and 8: Ch 3, 3 dc in first sc, sc in next ch-3 space, *ch 3, 3 dc in next sc, sc in next ch-3 space; repeat from * across, turn.
Row 9: Ch 3 (counts as dc), 3 dc in first sc, [2 sc in next ch-3 space, 3 dc in next sc] 8 times, sc in top of first ch-3, turn—45 sts.
Cuff
Change to smallest hook.
Row 10: Ch 1, sc in first st, *skip next st, sc in next st; repeat from * across, turn—23 sc.
Rows 11–13: Ch 1, sc in each sc across, turn.
Fasten off.
Finishing
Sew side edges of cuff together (only sew the cuff seam). Place seam of one sleeve at center of underarm of bodice, and sew sleeve in place, easing cap to fit. Repeat to sew in other sleeve.
Buttonband
Row 1: With Right Side facing and smallest hook, join yarn with sc to work across right edge of back opening, sc evenly spaced across right back edge, turn.
Rows 2 and 3: Ch 1, sc in each sc across, turn.
Fasten off.
Buttonhole band
Row 1: With Right Side facing and smallest hook, join yarn with sc to work across left edge of back opening, sc evenly spaced across left back edge, turn. Place 4 markers evenly spaced across Row 1, for buttonhole placement. Place first marker near top of back opening, next marker near bottom of back opening and remaining 2 markers evenly spaced between the first two.
Row 2 (buttonhole): Ch 1, [sc in each sc to next marker, ch 2, skip marked sc] 4 times, sc in each remaining sc across, turn.
Row 3: Ch 1, [sc in each sc to one sc before next ch-2 space, skip sc before ch-2 space, 2 sc in ch-2 space] 4 times, sc in each remaining sc across.
Fasten off.
Neck Edging
Row 1: With Right Side facing, join yarn with sc at beginning of neck edge, sc evenly spaced across neck edge. Fasten off.
Overlap buttonhole band over button band and sew bottom of bands together and to lower edge of back opening.
Weave in ends.
Sew buttons opposite buttonholes.
Bonnet
With middle-sized hook, ch 5; join with slip st in first ch to form a ring.
Round 1: Ch 3 (counts as dc here and throughout), 17 dc in ring; join with slip st in top of beginning ch—18 dc.
Round 2: Ch 3, dc in same st as join, 2 dc in each dc around; join with slip st in top of beginning ch—36 dc.
Row 3: Ch 3, 3 dc in same st as join, skip next dc, sc in next dc, *ch 3, skip next dc, 3 dc in next dc, skip next dc, sc in next dc; repeat from * across to last dc, turn; leave last dc unworked, do not join—Nine 3-dc groups.
Row 4: Ch 3, 3 dc in first sc, sc in next ch-3 space, *ch 3, 3 dc in next sc, sc in next ch-3 space; repeat from * across, turn.
Repeat last row until piece measures 6 (6½)” from center of ring, end with a Wrong Side row.
Next Row: Ch 3, 4 dc in first sc, sc in next ch-3 space, *5 dc in next sc, sc in next ch-3 space; repeat from * across; rotate piece to work across side edges (for neckband), ch 1, sc in end of each row down side edge, sc in unworked dc of Round 2, sc in end of each row up other side edge, turn.
Next 2 Rows: Ch 1, sc in each sc across, turn.
Fasten off.
Finishing
Weave in ends. Sew ½ yd of ribbon to each front corner of bonnet, for ties.
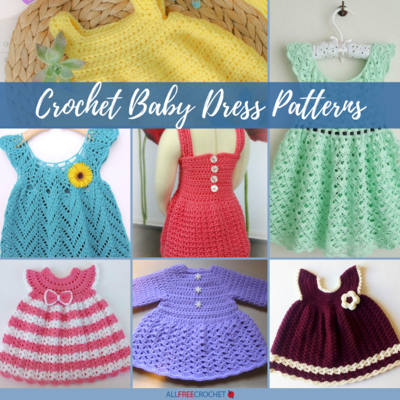
Up Next:
24 Free Crochet Baby Dress Patterns
What is your favorite type of pattern to crochet for newborns?
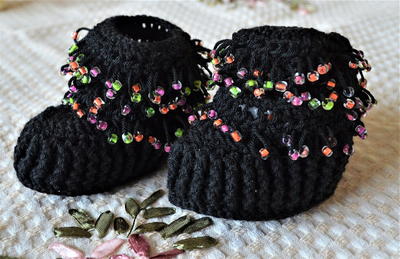
Read NextBeaded Baby Booties
Your Recently Viewed Projects
Thanks for your comment. Don't forget to share!
bwilliams1130 2448 611
Apr 14, 2019
I am having trouble with the pattern for the sleeves. Instructions are not well written. Is there a video explaining the directions?
EditorLP
Apr 18, 2019
Hi bwilliams1130 2448 611, I'm sorry to hear you are having trouble with this pattern. As far as we know, there is not a video for this pattern. However, if you are having difficulties, I would recommend that you contact Red Heart, the designers of this pattern, for assistance. I hope this helps a bit! - Laura, editor of AllFreeCrochet
lonelyturtle3
Apr 12, 2019
I am having trouble with the sleeves, can someone explain it to me, it doesn't say anything about joining or do I make them then sew them on or what? I'm stuck please help me so I can finish this project. ty
JaneEK
Dec 29, 2017
As soon as I saw this was a Red Heart pattern, I went to the site so I could download the original. If youd like to do the same, the pattern is called the Little Cherub Set (LW3046). Its rated as Intermediate because of the gown, and if youve ever constructed a project with a bodice, youll know exactly what I mean. There is also a matching blanket included in the download.
Hippie Chick
Apr 14, 2017
Beautiful christening gown and bonnet. Thanks for including the written instructions along with diagrams along with the picture. This is such a lovely set and I know a couple of new parents that would love to get a set like this. I will enjoy making a few sets for them.
brendabes 0644581
May 09, 2016
The pattern for the skirt states at the end of Row 2 to sc in next sc which I assume is at the end of the row. Then it says to turn, change to larger hook and ch 3, 3 dc in first sc. I am uncertain where the first sc is located. The pictures aren't quite clear enough. Please be a little more explicit. I am looking forward to getting along with this pattern. It is a beautiful Christening gown and I thank you for sharing it....for free!
Zeemer
Mar 22, 2016
I am an avid fan of the Royal Family starting with Princess Charlotte's great grandparents so I'll probably make one like this christening dress as a gift for a special baby.
IncurableRomantici st
Nov 30, 2015
DON'T PASS THIS UP IF YOU ARE MAKING IT FOR A BABY BOY! I made this gown for my little Prince Carl. Fancy Christening gowns are good for boys, too. I string little blue ribbons through for boys, and pink ones for the girls. My older daughter's Princess Charlotte (really) got a different pattern, because I couldn't find this one. I wil have to make this one for her own little prince or princess a couple of decades from now
malveauxe
Nov 30, 2015
I am about to make this dress as well. The pattern sleeves mention a "middle sized" hook, but the only ones I see are G and H. Do you know which to use?
IncurableRomantici st
Nov 30, 2015
Crochet a square to get the gauge. Instructions for this are at the top of the pattern. Use the size hook that gives you the gauge. The other way you can think about it is that this pattern is for a normal infant size. If the baby is big, or over six months, use the larger hook, or one that gives you a bigger square when you are deciding on gauge.
IncurableRomantici st
Nov 30, 2015
Thank you, thank you for this pattern. I've been looking for it since I made the gown and the blanket for my baby in 1982. It is now a family heirloom! I lost the pattern twenty years ago, and have been trying to find it for my grandchildren ever since. For anyone interested, it is not difficult at all, but quite interesting to make, and it makes up beautifully. I will go to work on making one for all my now too grown up grandchildren, so that they will have them for their own families some day.
malveauxe
Nov 30, 2015
I am about to make this dress as well. The pattern sleeves mention a "middle sized" hook, but the only ones I see are G and H. Do you know which to use?
Report Inappropriate Comment
Are you sure you would like to report this comment? It will be flagged for our moderators to take action.
Thank you for taking the time to improve the content on our site.