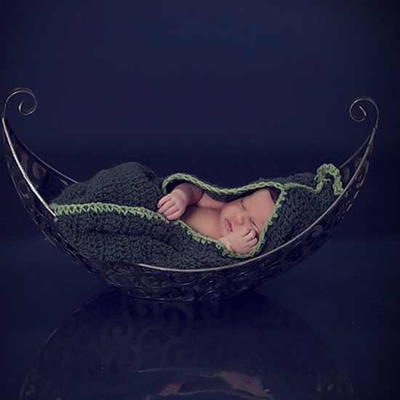
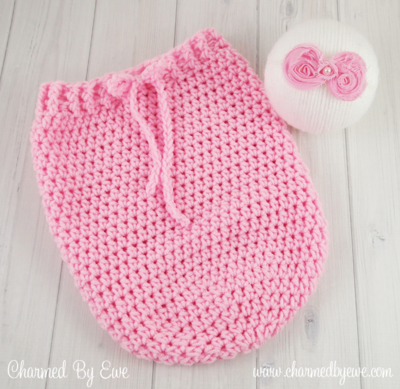
Little Sweetheart Newborn Swaddle Sack

The Little Sweetheart Newborn Swaddle Sack is the perfect photo prop for birth announcements. Easy to work up in the bulky yarn of your choice, this baby crochet pattern will keep your little one all snug, cozy and safe. This crochet pattern is worked in the round using front post and back post half double crochet stitches to create a thick, textured swaddle sack. Use a soft pink or a blue for a newborn girl or boy, or stick to a gender-neutral hue. Whatever color you choose to use, know that baby will be warm and snug.
NotesNotes:
-Starting chain does not count as a stitch
-The first stitch of each round is made in the same stitch as your starting chain
-The end of each round is joined by slip stitching in the first stitch of the round, not the starting chain
-The pattern is written in a way so that the seam runs straight

Crochet HookJ/10 or 6 mm hook
Yarn Weight(5) Bulky/Chunky (12-15 stitches for 4 inches)
Crochet GaugeGauge in HDC: 11 stitches and 9 rows = 4" (10 cm) PLEASE CHECK YOUR GAUGE
Finished SizeNewborn (9 inches wide x 12 inches long when laid flat)
Materials List
- Heavy worsted weight yarn or Bulky #5 yarn; I used Red Heart Comfort
- 6.0 mm crochet hook or size needed to obtain the gauge
- Yarn needle for weaving in ends
Pattern
-
Round 1: Ch 2, make 9 hdc in the 2nd chain from hook, sl st to join in first hdc (9)
-
Round 2: Ch 1, make 2 hdc in each stitch around, join (18)
-
Round 3: Ch 1, *hdc in first stitch, make 2 hdc in next stitch* repeat around, join (27)
-
Round 4: Ch 1, *hdc in first 2 stitches, make 2 hdc in next stitch* repeat around, join (36)
-
Round 5: Ch 1, *hdc in first 3 stitches, make 2 hdc in next stitch* repeat around, join (45)
-
Round 6: Ch 1, *hdc in first 8 stitches, make 2 hdc in next stitch* repeat around, join (50)
-
Round 7: Ch 1, skip first stitch, hdc around until 1 stitch remains, make 2 hdc in last stitch, join in first hdc (50)
-
Round 8: Ch 1, hdc in each stitch around, join (50)
-
Round 9 to 25: Repeat Round 7 and Round 8
-
Round 26: Ch 1, *BPhdc in first stitch, FPhdc in next stitch* repeat between * to end, join (50)
-
Round 27 to 29: Repeat Round 26
-
Fasten off and weave in all ends.
-
Ties: Make a chain approximately 36" long. I chained about 90 stitches. Fasten off. Secure the ends by weaving them through the chain.
-
Weave the length of chain through the front post/back post stitches at the top of the sack.
Abbreviations
- Front post half double crochet
- Yarn over, on the right side of the work, insert hook around the post of the next stitch, yarn over and pull up a loop, yarn over and draw through all 3 loops on hook
- Back post half double crochet
- Yarn over, on the back side of the work, insert hook around the post of the next stitch, yarn over and pull up a loop, yarn over and draw through all 3 loops on hook
Read NextNewborn Crochet Cocoon Pod

Thanks for your comment. Don't forget to share!
Cheryl Y
Aug 17, 2017
I love the idea of this Little Sweetheart Newborn Swaddle Sack. But has anyone ever used one? It isn't easy to get the baby inside these sacks. I have made a few of these and left a opening down the center with a zig zag closer like you would use on your shoes. It makes it much easier to get your little bundle inside the warm sack. This pattern is well written and easy to follow. If you give this as a gift, it can serve two purposes, first as a swaddle sack when the baby is new, then as a diaper bag when the baby is older.. Thank you so much for sharing this free crochet pattern.
mulberrygalprinces s
Aug 14, 2017
This is adorable. A friends daughter is expecting twins. A girl and a boy. I was wondering what I could make up quickly for them. This is it. I can make a pink and blue set along with booties and a hat in no time. Thank you for sharing this great idea.
Hippie Chick
Aug 14, 2017
Baby will look so cute and warm rocking this snuggle sack in a first photo shoot. It can be made in pink for girls and blue for boys or gender neutral greens and yellows. Just make sure that your stitching is tight so that little fingers and toes dont get snagged.
AFC Editor Annalis a
Sep 02, 2016
This would be so cute for photos. The simple look of it and soft color would especially look great against an all-white backdrop.
Report Inappropriate Comment
Are you sure you would like to report this comment? It will be flagged for our moderators to take action.
Thank you for taking the time to improve the content on our site.