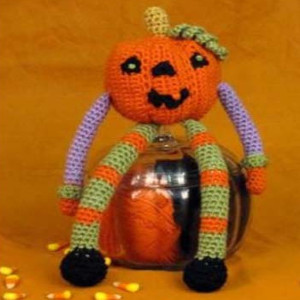
Plump Pumpkin Doll

Imagine this Plump Pumpkin Doll sitting on your mantel, surrounded by candy corn. Wouldn't he look cute? Learn how to crochet a doll that you can use to decorate this Halloween. This punky little pumpkin is a free Halloween crochet pattern, so don't pass him up! With long candy-colored legs and a little leaf beret, he's hard to resist. This is one Halloween decoration that won't scare little kids. In fact, they'll want to hug this friendly jack o'lantern.

Crochet HookG/6 or 4 mm hook
Yarn Weight(4) Medium Weight/Worsted Weight and Aran (16-20 stitches to 4 inches)
MATERIALS:
-
Everyday Soft Worsted Solids by Premier Yarns: ED100-22 Bittersweet (A) – 1 ball, ED100-20 Orchid (B) – 1 ball, ED100-14 Caramel (C) – 1 ball, ED100-15 Sagebrush (D) – 1 ball, ED100-12 Black (E) – 1 ball
-
G/6 or 4 mm hook
SIZE:
Approximately 14.5” tall.
GAUGE:
4 sc and 4 rnds = 1” in sc. Use any size hook necessary to obtain the specified gauge.
PUMPKIN:
Beg at side with A, ch 19.
Row 1: Sc in second ch from hook and each ch across; turn – 18 sc.
Rows 2-5: Ch 1, sc in each sc across; turn.
Row 6: Ch 1, sc2tog across; turn–9 sc.
Row 7: Ch 1, sc in each sc across; turn.
Row 8: Ch 1, 2 sc in each sc across; turn–18 sc.
Rows 9-13: Ch 1, sc in each sc across; turn.
Rows 14-53: Rep Rows 6-13.
Row 54: Rep Row 6.
Row 55: Rep Row 7.
Row 56: Rep Row 8; do not fasten off, turn to work across sides of rows.
Top of Pumpkin—
Row 1: Sc in side of each row across; turn–56 sc.
Row 2: Ch 1, sc2tog across; turn–28 sc.
Row 3: Ch 1, sc2tog across –14 sc; fasten off, leaving an 18” end.
Thread end through yarn needle and weave through rem 14 sts of Row 3; pull to draw close opening. Use this endto also close up any holes from decreasing.
Bottom of Pumpkin—
Row 1: Working along remaining side edges, join A with a sl st in end of first row, ch 1, sc in same row as joining and in end of each row across– 56 sc.
Rows 2 and 3: Rep Rows 2 and 3 of Top of Pumpkin, leaving a 24” end. Use this end to close opening in same manner and to sew back seam, stuffing before closing completely to form pumpkin head.
STEM:
With B, ch 2.
Rnd 1: 6 sc in second ch from hook; do not join rnd, place a marker in last st and move marker up with each rnd.
Rnd 2: 2 sc in each sc around – 12 sc.
Rnd 3: Working in back lps only for this rnd, sc in each sc around.
Rnds 4-7: Sc in each sc around; fasten off, leaving a 12” end. Stuff Stem and use end to sew to top of Pumpkin.
EYE (Make 2):
With E, ch 4.
Row 1: Sl st in second ch from hook and each rem ch across; turn.
Row 2: Ch 1, d raw up lp in each sl st across, yo and pull through all 4 lps on hook; Fasten off, leaving a 12” end. Use end to sew Eye in place. Use D to embroider a French knot in center of each eye.
NOSE:
With E, ch 4.
Row 1: Sc in second ch from hook, 3 sc in next sc, sc in last sc; fasten off, leaving a 12” end. Use end to sew Nose in place.
MOUTH:
With E, ch 6.
Row 1: Sc in second ch from hook, 2 hdc in each of next 3 ch, sc in last ch; fssten off, leaving a 12” end. Sew Mouth in place in desired position on Pumpkin. Use A to e mbroider two teeth in satin stitch, using photo as a guide.
STEM CURLS:
With D, [ch 15, work 2 sc in second ch from hook and each ch across] twice; fasten off. Sew curls in place by stem.
ARM (Make 2):
With A, ch 2.
Rnd 1: 7 sc in second ch from hook – 7 sc.
Rnd 2-6: Sc in each sc around, changing to B in last sc of Rnd 6.
Rnds 7-25: Sc in each sc around, stuffing lightly as work progresses; fasten off at end of Rnd 25. Sew Arm in place on each side of Head.
CUFF (Make 2):
With D, ch 9.
Row 1: Sc in second ch from hook and in each ch across; turn.
Rows 2-4: Ch 1, sc in each sc across; turn. Fasten off at end of Row 4 and sew Cuff in place on each Arm.
LEG (Make 2):
With E, ch 2.
Rnd 1: 6 sc in second ch from hook –6 sc.
Rnd 2: 2 sc in each sc around – 12 sc.
Rnd 3: * Sc in next sc, 2 sc in next sc; rep from * a round–18 sc.
Rnd 4: Sc in each back lp of each sc around.
Rnd 5: Sc in each sc around.
Rnd 6: Sc2tog around –9 sc.
Rnd 7: Sc in each sc around, changing to D in last sc.
Rnds 8-13: Sc in each sc around, changing to A in last sc of Rnd 13 and stuffing lightly as work progresses.
Rnds 14-16: Sc in each sc around, changing to D in last st of Rnd 16.
Rnds 17-40:Rep Rnds 8-16 twice, then rep Rnds 8-13 once more. Fasten off and sew each Leg in place on bottom of Pumpkin.
