What is C2C Crochet? + 12 C2C Crochet Patterns
Learn what does C2C mean, how to C2C crochet, and more with this page that's all about this crochet technique!

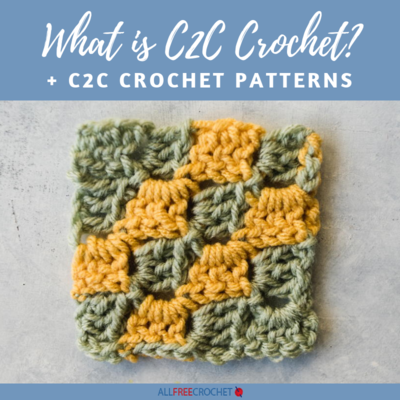
What is C2C Crochet? C2C = Corner to Corner
C2C is one of the most popular techniques in crochet. But what does it mean in crochet? C2C crochet is also known as corner to corner crochet.
To make a corner to corner crochet piece, work from one corner to the other by forming boxes. The number of boxes (also referred to as tiles, blocks, and squares) increase as you work from the corner out.
Working corner to corner allows you to crochet one piece instead of making multiple crochet pieces and seaming them together. On this page, What is C2C Crochet? + 12 C2C Crochet Patterns, you will learn more about this technique, how to do it, the different stitches used, and find some great corner to corner crochet patterns to try.
We even have lots of advice from some of the most popular C2C designers to share with you so that you can avoid pitfalls and master it like the best of the best.
Corner to corner crochet is so popular because it's one-piece crochet. You can easily add or subtract widths and lengths to your piece without having to stop crocheting.
This ultimate guide will leave you feeling like you can crochet anything in this style, so take a look.
Table of Contents
What is C2C Crochet?
C2C crochet is an abbreviation of "corner to corner" crochet. You work up a c2c square or rectangle by crocheting a corner and moving outward to add boxes in 90-degree angles as you go.
Once you reach the widest point with the two additional corners, you will start decreasing the number of boxes on each side until you get to the final corner.
You can make a corner to corner crochet pattern in a square or rectangle. For a rectangle, you will keep adding boxes on one side but not the other in order to make the longer shape.

If you are a beginner, start with a granny square, dishcloth, or placemat in a solid or variegated color and then move on to larger squares and rectangles or those with more complicated features, such as images.
Many corner to corner patterns include pictures. Often referred to as "graphghans" because graphs are used to create the designs. Because of the box or tile appearance, the images look "pixelated." This adds a unique aspect to a C2C crochet project.
When you scroll down to the last section of this page, you will find a list of patterns that use the C2C technique. Patterns include animals, objects, shapes, stripes, and more.
Corner to Corner Crochet Variations
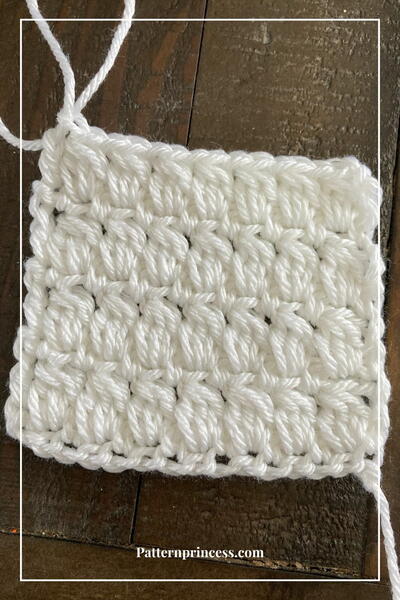
As far as stitches go in corner to corner crochet, there is a standard C2C stitch used in most patterns, which you will see in the How to Corner to Corner Crochet section below.
It uses chains and double crochet to create the boxes and then the process repeats. The trickier part with corner to corner crochet is the fact that you are moving outwardly as you crochet, adding more boxes to each side.
"I have noticed 2 ways to work the C2C online - one uses a chain 6 / chain 3
method and the other uses a chain 5 / chain 2 method.
When I C2C I prefer working my blocks with a chain 5 / chain 2. I find this decreases the spaces and holes in the individual blocks and it gives the project a much neater finish.
You can click to see my Right-Handed and Left-Handed photo tutorials.
If you are working with color changes like Sarah from Repeat Crafter Me, I recommend investing in some bobbins as the yarn can become difficult to manage (at least for me!)." — Rhondda from Oombawka Design.
Because the standard C2C stitches are repetitive, once you have it down, it is easy to remember and becomes a relaxing movement for most crocheters. You will find that some C2C crochet patterns use stitches other than the standard.
Such as the Corner to Corner Shell Stitch, which is the type of stitch used in Rhondda's tutorials linked above. The C2C moss stitch is also one of the most popular variations. You will also see the waffle stitch, single, half double, and double crochet, the alpine stitch, and the diagonal box stitch.
Another variation is the mini C2C stitch. Alexandra from Two Hearts Crochet explains it and discusses why she loves it:
"While C2C is great, I actually prefer the "mini" C2C stitch. C2C is usually worked by chaining 6, then working 4 dc in the chain spaces. Mini C2C is worked by chaining 4, then working
2 hdc in the chain spaces. Because the mini C2C block stitch is smaller, you can work a more intricate design into the same amount of space as you could with regular C2C.
Last year, I made a video tutorial series on what I call the Corner-to-Corner Basics. The videos cover getting started/increasing, decreasing, color changes, and the mini C2C stitch. There's also a brief introduction on bobbins, which are especially helpful when working with C2C! You can find the entire video tutorial series here.
The other reason I love C2C is because you can design your own graphs to make something truly unique and customized to your own liking! I've made lots of C2C graphs--like my Harry Potter graphghan designs and my Game of Thrones grapghan designs.
It's super easy and lots of fun! There are lots of ways to make your own graphs for use with C2C, but I prefer using Microsoft Excel. I even made a tutorial on how to make your own graphs using that program, which you can find here."

Corner to Corner Video Tutorial
There are a few video tutorials on C2C, like the one in the next section, which uses chunkier yarn and a larger hook, or How to Work Corner to Corner Crochet Projects from our friend Heidi.
Right below, this super beginner-friendly tutorial for corner to corner from our in-house crochet teacher Chris, is a must-watch for anyone wanting to get started. Press play and see for yourself.
Corner to Corner AFGHAN Video Tutorial
If you are a visual learner who loves video tutorials, you will love following along with our friend and crochet expert, Mary Beth Temple, as she teaches you How to Crochet Corner to Corner for an afghan. Click the link to play the video. Just watch and learn!
When it comes to learning C2C, Emma from Emma Wilkinson Designs has some advice for beginners. She says,
"When I teach C2C, I explain that it is like a staircase. Each little cluster is one step, and each row builds another step. Row one has one step, Row 2 has two steps, etc.
The hardest part is turning your work, and working out where to slip stitch to join your 'steps' But once you've done 3 or 4 rows, it should start to be really clear. persistence is the key, as with any new technique you are learning!
I love the texture c2c creates. It works up very quickly, and is very versatile. One of my most popular patterns is a c2c block, inspired by a patchwork quilt."
The corner to corner crochet stitch is an easy tutorial to follow along with. This version uses two colors and any crochet hook of choice. Check out the video tutorial here.
To make a shape bigger than a 4" inch square, repeat the steps needed to increase until your desired width is achieved and then decrease as needed.
Learn how to corner to corner crochet by following along with the step-by-step instructions below.
Materials
Crochet hook
Yarn "Color A"
Yarn "Color B"
- Begin with Color A and chain 6.
- In the fourth chain from the hook, work a double crochet.
- Work a double crochet into each of the remaining two chains.
Now you have your first box.
- Turn your work clockwise to the next side. Chain 6.
- Repeat steps 2 and 3 (fourth chain from the hook, dc, and then dc into each of the two chains that remain).
Tip: Once you finish making your second box, make sure to keep the two boxes going in opposite directions. The bottom box needs to be flipped over so that you are working on the wrong side.
- Locate the chain three space from your first box. Slip stitch in that gap.
- Chain 3, still using Color A. Work 3 double crochets in the same chain three gap from the first box.
- Change colors. Cut the string from Color A, leaving a couple inches of extra yarn for the tail. Take the string of the Color B yarn, grab a loop with your hook, pull it through the loop left on your work from the Color A yarn, and pull the string to secure.
- Flip your work (the "v" shape you have created should be facing your left hand if you are a right-handed crocheter – as shown in the image below). With Color B, chain 6.
- Repeat the steps 2 and 3 (dc in the fourth chain from the hook and then dc into each of the two chains that remain).
Note: If you change colors and the stitches become loose, pull the tail to tighten.
- Slip stitch in the chain three gap of Color A as done previously.
- Chain 3 and work 3 double crochets in that same gap as your slip stitch.
- Find the chain three gap on your next closest box, and repeat step 11 for your third box.
- Change back to Color A by repeating step 8.
- To match pattern shown, create one more increase row with four boxes in Color A.
TO DECREASE: - Change to Color B by repeating step 8 once again.
- Slip stitch across the first box 3 times to reach the chain three gap of that same box.
- Slip stitch in that chain three gap and make a box as you have been doing.
- Find the next chain three gap and lock it with a slip stitch.
- Repeat the box and slip stitch process until you have made it to the end of your row. Lock it down with a slip stitch.
Note: Don't forget that you are decreasing, so your row will be one shorter than the row below. The row after will be one shorter than that until you are back down to one.
- Change to Color A for your last row (following step 8). Turn your work. Repeat steps 17-19 to finish.
Note: Be sure to slip stitch up the top of the box below as you are decreasing.
Trim and weave in your ends.

C2C Crochet Patterns


Tips for Corner to Corner Crochet
We asked Sarah from Repeat Crafter Me if she had some tips on C2C for beginners. She creates and crochets a LOT of corner to corner patterns, so she knows what she's talking about. Sarah says,
My best tips for corner to corner crochet are:
- Carry your yarn up or over when you can instead of clipping off and reattaching during a color change. This will save you from weaving in a ton of loose ends!
- There will inevitably be places on your project (when following a picture graph) where the squares don't touch and you want them too. For instance on an eye or mouth. Use the loose ends you have to your advantage. When sewing them in, stitch to connect corners of squares that should be touching.
- Create your own pixel graphs and C2C designs with graph paper and colored pencils! If you use transparent graph paper you can put a printed out clip art image under it and use it as a traceable guide to make it a pixelated picture.

Up Next
More Corner to Corner Crochet Patterns >>>
Do you have any C2C tips or tricks?
Let us know in the comment section below!
Read NextSirtaki Relief Crochet Stitch
Your Recently Viewed Projects
Thanks for your comment. Don't forget to share!
hopkinsnoel 272865 9
Jan 02, 2019
I am crocheting an blanket and want to take out the first ten rows. Is there a way to do this without losing the rest of the pattern?
melainegouws 95435 32
May 30, 2018
why is my C2C blocks sides not straight but make point in the two opposite corners
KLC
Aug 23, 2017
For the longest time, I didn't know what C2C was and wondered. Now I know and it's such a fun technique!
Report Inappropriate Comment
Are you sure you would like to report this comment? It will be flagged for our moderators to take action.
Thank you for taking the time to improve the content on our site.