Fun Time Cardigan
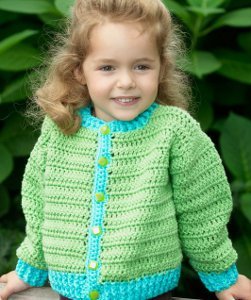
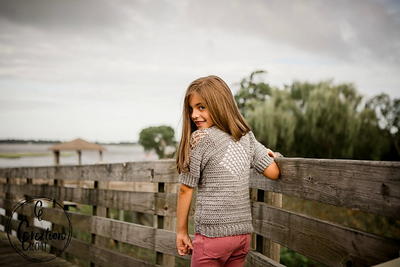
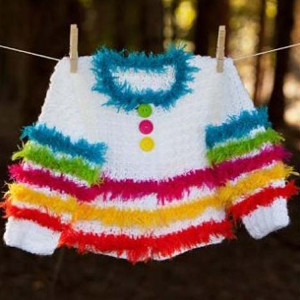
Make this cute little cardigan as a gift for your daughter, granddaughter, or niece and watch her eyes light up as she opens it. This Fun Time Cardigan free crochet pattern uses a size I crochet hook and Red Heart Kids medium weight yarn. it can be a challenge to find reasonably priced kids clothes these days, and they outgrow clothing so fast. Save some money and crochet your own clothes at home with free patterns like this cute crocheted sweater pattern.

Crochet HookI/9 or 5.5 mm hook
Yarn Weight(4) Medium Weight/Worsted Weight and Aran (16-20 stitches to 4 inches)
MATERIALS:
- RED HEART® “Kids®”: 1 skein each 2846 Cruise Blue A, 2650 Pistachio B.
- Crochet hooks: 4mm [US G-6] and 5.5mm [US I-9].
- Six buttons, 7/8” diameter.
- Sewing needle and matching thread.
- Yarn needle
- Assembly Diagram
SIZE:
Directions are for size 2. Changes for sizes 4, 6, and 8 are in parentheses.
Finished Chest: 26 (28, 30, 32)”.
Finished Length: 12 1/2 (13, 14 1/2, 15)”.
GAUGE:
14 dc = 4”; 11 rows = 6” using larger hook.
CHECK YOUR GAUGE. Use any size hook to obtain the gauge.
INSTRUCTIONS:
BACK
With larger hook and B, ch 48 (51, 55, 58).
Row 1 (Right Side): Dc in 4th ch from hook and in each ch across – 46 (49, 53, 56) dc.
Row 2: Ch 3 (counts as dc), turn, dc in each dc, dc in top of turning ch.
Repeat Row 2 until piece measures 5 1/2 (5 1/2, 6 1/2, 6 1/2)” from beginning, end on wrong side row.
Shape Armhole
Next Row (Right Side): Ch 1, turn, slip st in first 5 sts, ch 3 (counts as dc), dc in each st to last 4 sts, leave last 4 sts unworked – 38 (41, 45, 48) sts.
Work in dc until Armhole measures 5 1/2 (5 1/2, 6 1 /2, 6 1/2)”.
Fasten off.
Rib
With right side facing and smaller hook, join A at lower edge, ch 3 (counts as dc), work 45 (47, 51, 55) dc evenly across opposite edge of beginning ch – 46 (48, 52, 56) sts.
Ribbing Row:
Ch 2 (counts as st), [Fpdc, Bpdc] across to last st, hdc in top of turning ch.
Repeat Ribbing Row until Rib measures 1 1/2 (2, 1 1/2, 2)”.
Fasten off
LEFT FRONT
With larger hook and B, ch 25 (26, 28, 30).
Row 1 (Right Side): Dc in 4th ch from hook and in each ch across – 23 (24, 26, 29) dc.
Row 2: Ch 3 (counts as dc), turn, dc in each dc, dc in top of turning ch.
Repeat Row 2 until piece measures 5 1/2 (5 1/2, 6 1/2, 6 1/2)” from beginning, end on wrong side row.
Shape Armhole
Next Row (Right Side):
Ch 1, turn, slip st in first 5 sts, ch 3 (counts as dc), dc in each st across – 19 (20, 22, 25) sts.
Work in dc until Armhole measures 4 (4, 5, 5)”, end with a right side row.
Shape Neck
Next Row (Wrong Side):
Ch 3, dc to last 7 (7, 7, 9) sts, leave remaining sts unworked for Neck – 12 (13, 15, 16) sts.
Dec 1 st at Neck edge every row twice – 10 (11, 13, 14) sts.
Work until piece measures same length as Back to Shoulders. Fasten off.
Rib
With right side facing and smaller hook, join A at lower edge, ch 3 (counts as dc), work 22 (23, 25, 28) dc evenly across opposite edge of beginning ch – 23 (24, 26, 29) sts.
Ribbing Row:
Ch 2 (counts as st), [Fpdc, Bpdc] across to last st, hdc in top of turning ch.
Repeat Ribbing Row until Rib measures 1 1/2 (2, 1 1/2, 2)”.
Fasten off.
Right Front
Work same as for Left Front reversing shaping.
SLEEVES
With larger hook and B, ch 28 (30, 32, 34).
Row 1 (Right Side): Dc in 4th ch from hook and in each ch across – 26 (28, 30, 32) dc.
Row 2: Ch 3 (counts as dc), turn, dc in each dc, dc in top of turning ch.
Repeat Row 2, inc 1 st each side every other row 6 (5, 8, 7) times – 38 (38, 46, 46) dc.
Work even until piece measures 8 (9, 10, 11 1/2)” from beginning. Fasten off.
Rib
With right side facing and smaller hook, join A at lower edge, ch 3 (counts as dc), work 21 (21, 22, 25) dc evenly across opposite edge of beginning ch – 22 (22, 24, 26) sts.
Ribbing Row:
Ch 2 (counts as st), [Fpdc, Bpdc] across to last st, hdc in top of turning ch.
Repeat Ribbing Row until Rib measures 2”. Fasten off.
FINISHING
Sew Shoulders. Sew in Sleeves. Sew side and Sleeve seams.
Neck Band
With right side facing and smaller hook, join A at Right Front Neck edge, ch 3, work 47 (47, 49, 49) sts evenly spaced around Neck edge – 48 (48, 50, 50) sts.
Work Ribbing Row as for Back. Fasten off.
Button Band
(Work on Left Front for girls, Right Front for boys)
With right side facing and smaller hook, join A and work 39 (40, 45, 47) sc evenly spaced along Front edge.
Work 2 more rows in sc. Fasten off.
Buttonhole Band
Mark for 6 buttons evenly spaced on Button Band.
Work 1 row in sc as for Button Band.
Buttonhole Row:
Ch 1, turn, [sc to where marked for Button, ch 2, skip 2 sc] 6 times, sc to end.
Next Row:
Ch 1, [sc to ch-2 space, work 2 sc in ch-2 space] 6 times, sc to end. Fasten off.
Sew on buttons. Weave in ends.
ABBREVIATIONS: A, B, etc= color A, B, etc; Bpdc: Back post double crochet; ch = chain; dc = double crochet; dec = decrease; Fpdc: Front post double crochet; inc = increase; mm = millimeters; sc = single crochet; st(s) = stitch (es); [ ] = work directions in brackets the number of times specified
See this crochet pattern and more in our free eBook, 26 Homemade Christmas Gifts for Kids: Christmas Crochet Ideas
Read NextChild's Poncho
Your Recently Viewed Projects
Daughter of Light
Feb 28, 2018
Awwww! Don't know which is sweeter the model or the Fun Time Cardigan!!! I can see this on several of my nieces. Of course it would have to be done in purple and pink OR two different shades of blue for the movie, Frozen. So nice to have four sizes in one pattern too. I can see this one becoming an heirloom that'll be passed down from generation to generation!
Hippie Chick
Mar 10, 2017
A very cute cardigan sweater for the little girl in your life. Cheerful and bright color theme on this sweater. So happy that the pattern is for crocheting instead of knitting because crochet works up so much faster. I printed the pattern out as a pdf and it is ready for when I find the exact yarn colors that I want to use.
SFRobinson
Jul 17, 2015
I've now made the sweater in a size I love the sweater but I also found the directions the source of the pattern's being a wee bit frustrating the inferences one has to make and the slight changes from the pattern For example the instructions for the left side only worked for me if I started the neck section on Wrong Side row not a Right Side row and the same applied for the right side as opposed to left side of the sweater From the beginning my gauge was dc rather than dc I maintained this because it seemed it would lead to a sweater truer to size and that was a good assumption at least for the size While it's only implied by a line near the end of the pattern FINISHING Sew Shoulders Sew in Sleeves Sew side and Sleeve seams you need to make four of the…Read More sleeve pieces If you prefer to do it without the extra second seam on each arm you can double the initial chain length for the sleeve and then subtract three from it This gives you the right size sleeve so that you'll have one piece rather than two for each sleeve The instructions to add a stitch every other row for a few rows then needs to be changed to add two stitches to these rows not just one That line would then read as follows Repeat Row inc st each side every other row times dc I am by no means anything but an amateur who tried the pattern but I'd be happy to try to answer questions that are still out there since most posts seem a year or so old The back side of my sweater looks just like the front in terms of the patterns' appearances for the main sweater and the ribbing Size wise the back is about twice the width of the front The armholes look the same but there is no dip in the neckline as there is in the front Hope this helps Also one link that works for me is the following http www allfreecrochet com Sweaters-and-Ponchos Fun-Time-Cardigan-Red-Heart-Yarns I hope I may have helped someone again I'm not an expert just a crocheter
thegreatgelliebean 9721990
Jul 04, 2015
I really like this pattern. I used it to make sweaters for my two kids. I ended up using Red Heart Super Saver yarn because there are so many more color choices. The sweaters came out beautifully. And they always got some nice comments when my kids were out wearing them. It's easy and quick to make.
MamawV 2850129
Oct 27, 2014
I have just started this project & I am using an I/9 - 5.50mm hook as directed & am having problems already. First of all, There is no pic of the back side of this sweater to see if I'm doing this correctly! Also, 46 dc's across seems awfully wide for a size two & 5 1/2" doesn't seem to be tall enough, if in fact, this pattern is written so that you are crocheting for height & not width! Can someone who's made this tell me what I'm doing wrong??????
shrtstuff46 515463 8
Jul 04, 2014
I really want this pattern but when I click on the pattern link I go to a coats and clarks site that has no link to the pattern. Can this be fixed please
cmbeb90 5555945
Feb 28, 2014
How can I view this pattern? Everytime I click on the "click here for pattern" link I get sent to a different webpage. HELP
bcglpn 3981690
Feb 01, 2014
I really want to use this pattern, but every time I click on "click here for pattern, I get sent to the Make It Coats website. How can I print the pattern?
cindysue1953 82759 31
Mar 06, 2013
are there any pattern corrections to this, I can not get the left front neck shape to come out on the correct side of the sweater?
planier 1179214
Jan 02, 2013
I have made a couple of these sweaters now, very cute!! While it was easy for me, A couple of friends who are fairly new to crocheting found it very difficult.
pflan7113 2758974
Sep 15, 2014
I am presently making this sweater for my 4 yr old granddaughter and I am having a problem with the sleeves. When it comes to doing the ribbing I find that the number of ribbing stitches is less than the number of stitches in the row. What does it mean when it says to "dc evenly across opposite edge of beginning chain"? Thanks pflan7113
vcheath65 4991313
Nov 25, 2012
I've made the front(s), back and sleeves. Am having a VERY difficult time putting the sleeves in. I've fastened the front(s) and back at the shoulders, but the space for the sleeves on the main body of the sweater is MUCH larger than the "top" of the sleeve. How does one connect the sleeve(s) to the main body of the sweater? The directions are totally imcomplete at this point. Very frustrating and somewhat midleading.
ondread2
Jul 18, 2011
I think this pattern is lovely, I am going to make one each for my granddaughter who is 2 and my great niece who is one and a half and my daughter's friends daughter who is 3.... Great sweater.
Report Inappropriate Comment
Are you sure you would like to report this comment? It will be flagged for our moderators to take action.
Thank you for taking the time to improve the content on our site.

